13 Times Table | How to Read & Write Multiplication Table of 13 | Tips to Remember 13 Table Chart

13 Times Table

Learning tables from 1 to 20 is the most important part of elementary education. Every student is supposed to study 13 table as mathematics have most of the problems depending on it. Become perfect with all math tables by going through our complete article. Some of the students may feel it is very difficult to remember the multiplication table of 13 as the values are hard to remember. Get the tricks and tips to memorize the 13 times table, know how to read and write Thirteen Times Table.

13 Times Table Chart

13 times multiplication tables in table format and image format is given here. So, it makes it easy for you to remember the values. Download 13 table charts for free and prepare well. The 13th table is helpful to perform the multiplication of numbers easily. You can save your time in competitive eams by learning these multiplication tables.
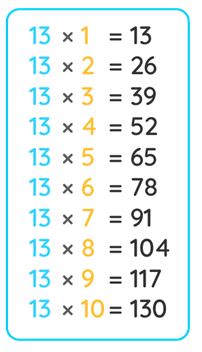
13 times table 1

How to Read 13 Table?

Check the reading of the 13 multiplication table here.

One time thirteen is 13.

Two times thirteen is 26.

Three times thirteen is 39.

Four times thirteen is 52.

Five times thirteen is 65.

Six times thirteen is 78.

Seven times thirteen is 91.

Eight times thirteen is 104.

Nine times thirteen is 117.

Ten times thirteen is 130.

Importance of Multiplication Tables

Multiplication tables play an essential role in mathematics. It is the foundation of elementary maths. By learning the table chart, you will get self-confidence while doing multiplications. You can keep the information at your fingertips that help you to solve the questions quickly. Multiplication tables will enhance your memory power and improve the calculations speed.

Tables from 2 to 20 help in performing the simple arithmetic operations. So that you can save time and do calculations easily. Without learning the 13 times table, you can also calculate the multiplicative of 13 by performing the arithmetic multiplication operations.

Multiplication Table of 13 up to 20

Studying 13 Multiplication Table is an essential skill to solve the division and multiplication questions. Check out the below table to know how to write a 13 times table chart.

13x1=13
13x2=26
13x3=39
13x4=52
13x5=65
13x6=78
13x7=91
13x8=104
13x9=117
13x10=130
13x11=143
13x12=156
13x13=169
13x14=182
13x15=195
13x16=208
13x17=221
13x18=234
13x19=247
13x20=260

Tips and Tricks to Learn 13 Times Table

Here we are giving the easy tips that are helpful to remember the 13th table. Follow the below tricks and learn the multiplication tables quickly.

  • To remember the 13 times table, first, we need to memorize the 3 times table. So, the multiples of 3 are 3, 6, 9, 12, 15, 18, 21, 24, 27, 30, 33, 36, 39, . . .
  • For getting the multiples of 13, add natural numbers to the ten’s digit of the 3 multiples. Therefore, 13 times table is obtained as (1 + 0)3 = 13, (2 + 0)6 = 26 , (3 + 0)9 = 39, (4 + 1)2 = 52, (5 + 1)5 = 65, (6 + 1)8 = 78, (7 + 2)1 = 91, (8 + 2)4 = 104, (9 + 2)7 = 117, (10 + 3)0 = 130, . . .
  • 13 does not have any rules that make the multiplication of 13 table easier to memorize, then there is a structure for every 10 multiples of 13. They are 13, 26, 39, 52, 65, 78, 91, 104, 117, 130. In all these multiples, the last digit i.e units place digit is repeating. So, one can remember this logic to memorize the table.

Get More Math Tables:

0 Times Table1 Times Table2 Times Table
3 Times Table4 Times Table5 Times Table
6 Times Table7 Times Table8 Times Table
9 Times Table10 Times Table11 Times Table
12 Times Table14 Times Table15 Times Table
16 Times Table17 Times Table18 Times Table
19 Times Table20 Times Table21 Times Table
22 Times Table23 Times Table24 Times Table
25 Times Table

Solved Examples on 13 Times Table Multiplication

Example 1:

Using the table of 13, calculate 13 times 13 plus 13?

Solution:

From the given data

We can express the given data in the form of Mathematical Expression

= (13 x 13) + 13

= 169 + 13

= 182

Therefore, 13 times 13 plus 13 is 182.

Example 2:

If David’s father has to pay the amount “12 less than 13 times 15” in dollars. Using the table of 13, find how much he needs to pay?

Solution:

From the given data,

The mathematical expression of 12 less than 13 times 15 = (13 x 15) – 12

= 195 – 12

= 183

therefore, David’s father is required to pay $183.

Example 3: 

Families in a colony are going on a picnic. If 13 people ride in each car and there are 5 cars, then how many people are going on a picnic?

Solution:

Given that,

The number of people going on picnic = 13

Number of cars = 5

Then, multiply the number of people on each car, total number of cars on the picnic to get the total number of persons going for the picnic.

The number of persons going on the picnic = 13 x 5

= 65

Therefore, 65 people going on a picnic.

Example 4:

Using the 13 times table, check whether 13 times 7 minus 1 plus 10 is 100?

Solution:

Firstly, let us express the given statement in the form of mathematical expression

13 times 7 minus 1 plus 10 = (13 x 7) – 1 + 10

= (91) + 9

= 100

Hence, 13 times 7 minus 1 plus 10 is 100.
Common Factors Definition, Examples | How to Find Common Factors?

Common Factors

A factor is a number that is the exact multiplicand of another number. Every number factor is less than or equal to the given number but it cannot be greater than the given number. Every number has at least 2 factors. Common factors are also the factors that are common to two or more numbers. Fet the detailed steps to find the common factors of 2 or more numbers, solved examples, and applications in the below sections.

What are Common Factors?

Common Factors are defined as the factors that are common to two or more numbers. You can also say that a common factor is a number with which a set of two or more numbers will be divided exactly.

To find the common factors of two numbers, you need to list the factors of each number separately and then compare them. Now write the factors which are common and those are called common factors for the given numbers.

How to find Common Factors?

Factors are the numbers that divide the original number. Here are the steps to check whether two or more numbers have common factors or not.

  • Get the factors of each number separately.
  • Compare the factors of two numbers.
  • If you find common numbers then those are common factors between two numbers.

Example:

Common Factors of 4, 12

Find the factors of given numbers

4 = 1, 2, 4

12 = 1, 2, 3, 4, 6, 12

The common factors between 4 and 12 are 1, 2, 4.

Read More Articles,

Common Factors Examples

Example 1:

Find the common factors of 2, 16?

Solution:

The given numbers are 2, 16

Factors of 2 = 1, 2

Factors of 16 = 1, 2, 4, 8, and 16

Therefore, common factors of 2 and 16 = 1, 2.

Example 2:

Calculate the common factors of 14, 21?

Solution:

The given numbers are 14, 21

Factors of 14 = 1, 2, 7, 14

Factors of 21 = 1, 3, 7, 21

Therefore, common factors of 14 and 21 = 1, 7.

Example 3:

Find the common factors of 15, 45?

Solution:

The given numbers are 15, 45

Factors of 15 = 1, 3, 5, 15

Factors of 45 = 1, 3, 15, 5, 9, 45

Therefore, common factors of 15 and 45 = 1, 3, 5, 15.

Example 4:

Find the common factors of 36 and 63.

Solution:

The given numbers are 36, 63

The factors of 36 are

1 × 36 = 36

2 × 18 = 36

3 × 12 = 36

4 × 9 = 36

6 × 6 = 36

Stop here, since the number 6 is repeated.

So, 1, 2, 3, 4, 6, 9, 12, 18, and 36 are factors of 36.

The factors of 63 are

1 × 63 = 63

3 × 21 = 63

7 × 9 = 63

9 × 7 = 63

Stop here, since the numbers 7 and 9 are repeated.

So, 1, 3, 7, 9, 21, and 63 are factors of 63.

1, 3, and 9 are common in both lists.

Hence, the common factors of 36 and 63 are 1, 3, 9.

Angle of Elevation Definition, Formulas, and Examples | How to find the Angle of Elevation?

Angle of Elevation

If two straight lines coincide at a point, then it is called the angle. The angle of elevation is defined as the angle between the horizontal plane and oblique line from the observer’s eye to an object which is located above his eye. Finally, the angle formed above the surface. It is a widely used concept and it is related to height and distance. The different terms used in the angle of elevation concept, trigonometric formulas, and solved examples are mentioned below for the sake of students.

Angle of Elevation – Definition

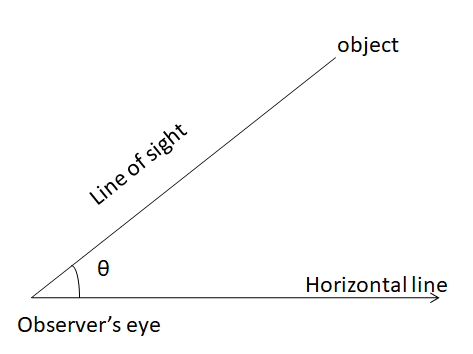
The angle of elevation of an object seen by the observer is the angle formed between the horizontal and the line from the object to the observer’s eye. The line in which the observer’s eye is there is known as the line of sight.

Angle of Elevation

From the above image, you can see that the observer is looking at the object from the ground making an angle θ with the line of sight and horizontal line. By joining the imaginary line between the object and the end of the horizontal line, it forms a right-angle triangle. Thus we can use the trigonometry concept to find the distance from the observer to the object.

Example:

A student named Rakesh is looking at a bird sitting at the building, then there is an angle formed, which is inclined towards the bird from the Rakesh eye. This elevation angle is helpful to find the distance, height of the building with the trigonometric function like sine, cosine, and tangent.

Terms used in Elevation Angle

The three most important terms used in this concept are angle, horizontal line, and line of sight. Let us discuss each of them in detail in the following sections.

Horizontal Line:

A straight line on the flat surface where all points lie on a line and those points will have the same y-coordinate value. The angle and horizontal lines combine to form the angle of elevation.

Angle:

If two line segments meet at an endpoint, then the point is called the vertex. When two straight lines meet at a common point form an angle. It is also defined as the gap between two limes that connect on one side. It is measured in degrees or radians.

Line of Sight:

The line which is drawn from the observer’s eye to the object is known as the line of sight. In the angle of elevation, the object is kept above the line of sight of the observer. If you know the elevation angle, then it is easy to determine the distance and altitude.

Also, Check:

Angle of Elevation Formulas

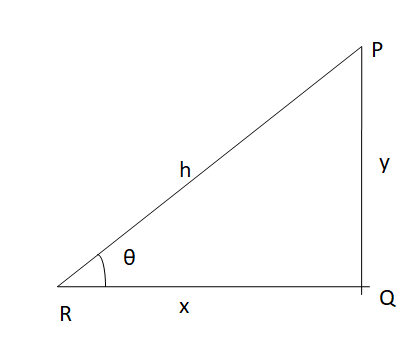
Trigonometric ratios are used to find the unknown measures of the opposite, adjacent, and hypotenuse sides of the right angle.

Angle of Elevation

The trigonometric ratios are

sin θ = \(\frac { Opposite side }{ Hypotenuse } =\frac { y }{ h } \)

cos θ = \(\frac { Hypotenuse }{ Adjacent side } =\frac { h }{ x } \)

tan θ = \(\frac { Opposite side }{ Adjacent side } =\frac { x }{ y } \)

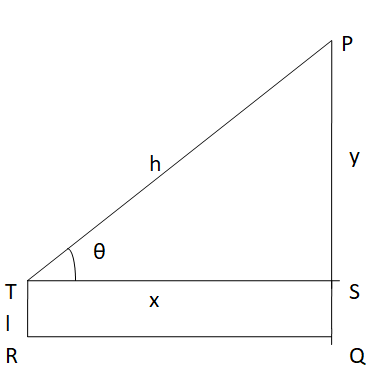
Another type of problem is along the lines.

Angle of Elevation 2

PQ = y, TQ = SR = I, PT = (y – l), QR = ST = x, PS = h

The formulas are

sin θ = \(\frac { PT }{ PS } =\frac { y – l }{ h } \)

cos θ = \(\frac { QR }{ PS } =\frac { x }{ h } \)

tan θ = \(\frac { PT }{ QR } =\frac { y – l }{ x } \)

Angle of Elevation Problems

Example 1:

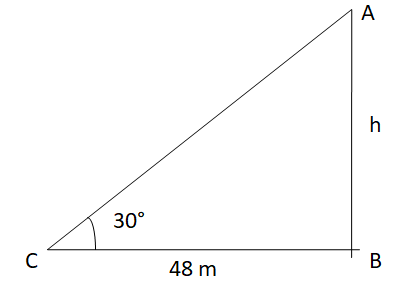
A tower stands vertically on the ground. From a point on the ground, which is 48 m away from the foot of the tower, the angle of elevation of the top of the tower is 30°. Find the height of the tower.

Solution:

Let AB be the height of the tower.

Angle of Elevation 3

Take AB = h and BC is the distance between the tower and the point C. In the right-angled trinagle ABC, ∠ACB = 30°

tan θ = \(\frac { AB }{ BC } \)

tan 30 = \(\frac { h }{ 48 } \)

\(\frac { 1 }{ √3 } \) = \(\frac { h }{ 48 } \)

cross multiply the fractions

48 = h√3

h = \(\frac { 48 }{ √3 } \)

h = 16√3

Therefore, the height of the tower is 16√3 m

Example 2:

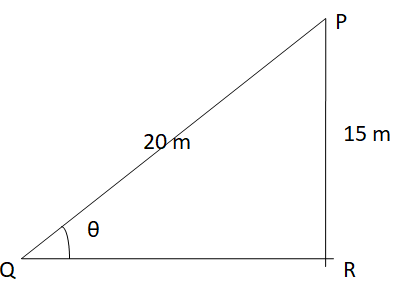
A ladder of length 20 m is kept in against a wall of length 15 m such that their topmost point is in contact with one another and their bottom point is at a certain distance as shown in the figure. Find the angle subtended by the ladder on the floor.

Angle of Elevation 4

Solution:

The length of the ladder is PQ = 20 m

The height of the wall is PR = 15 m

We have to find angle PQR = angle subtended by the ladder on the floor.

Let angle PQR = θ

We know that,

sin θ = \(\frac { PR }{ PQ } \)

sin θ = \(\frac { 15 }{ 20 } \)

θ = sin-1 (\(\frac { 15 }{ 20 } \))

θ = sin-1 (\(\frac { 3 }{ 4 } \))

θ = 48.59°

The angle subtended by the ladder on the floor is 48.59°.

Example 3:

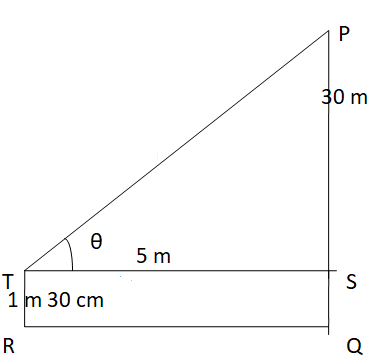
A man of height 1 m 30 cm is standing in front of a tree of height 30 m. Find the angle of elevation to be made by the man’s eyes to look at the topmost point of the tree if the man is standing at a distance of 5 m from the tree.

Solution:

Angle of Elevation 5

Here, PQ is the height of the tree = 30m

TR is the height of man = 1 m 30 cm = 1.30 m

RQ is the distance between the foot of the man and the tree = ST = 5 m

We have to find the angle of elevation, θ =?

We know that,

tan θ = \(\frac { (30 – 1.30) }{ 5 } \)

tan θ = 5.74

θ = tan-1 (5.74)

θ = 80.117°

The angle of elevation to be made by the man’s eye is 80.117°.

Example 4:

When the angle of elevation of the Sum is 45°, the shadow of a coconut tree is 15 m in length. What is the height of the coconut tree?

Solution:

Let AB denote the height of the coconut tree and BC denotes the length of the shadow.

Therefore, according to the problem ∠ACB = 45°, BC = 18 m.

Let the height of the coconut tree AB = x meters.

Now, tan 45° = \(\frac { AB }{ BC } \)

1 = \(\frac { x }{ 18 } \)

x = 18

Therefore, the height of the coconut tree is 18 meters.

FAQs on Angle of Elevation

1. What is the angle of elevation in trigonometry?

The angle of elevation is the angle between the horizontal line of the sight and the line of sight up to an object.

2. Differences between the angle of elevation and depression?

The angle of depression is opposite to the angle of elevation. In the angle of depression, the observer is standing at the height and the object is placed below the line of sight of the observer.

3. What is the formula for Angle of Elevation?

The formula for Angle of Elevation is given by

sin θ = \(\frac { Opposite side }{ Hypotenuse } =\frac { y }{ h } \)

cos θ = \(\frac { Hypotenuse }{ Adjacent side } =\frac { h }{ x } \)

tan θ = \(\frac { Opposite side }{ Adjacent side } =\frac { x }{ y } \)

Round off to Nearest 100 – Definition, Rules, Examples| How to Round Numbers to Nearest Hundred?

Round off to Nearest 100

Rounding is making a number simple but keeping its value nearest to what it was. The result of round-off is less accurate and easier to use especially while doing arithmetical operations. Likewise, rounding a number to the nearest hundred means making the units and tens place zeros and either increasing or decreasing the remaining part of the number by 1. Students can get the solved examples questions, definitions, and round-off rules in the below-mentioned sections of this page.

Round off to Nearest 100

Round off to the Nearest 100 is a process where you need to convert the given number into an easy form for various reasons. The obtained easy number is not the actual value but is an approximate value of the original number. Rounding to the nearest hundred means, you need to convert the given number to the nearest 100.

The purpose of rounding the numbers is it makes the numbers easier to understand and remember, the calculations become easier. The application of rounding is when you want to estimate an answer or try to find the most sensible guess, then rounding is used.

Rules for Rounding Numbers to Nearest 100

  • Rule 1: While round off to nearest 100, if the digit in the tens place is between 0 to 4 or <5, then the tens place is replaced by 0.
  • Rule 2: If the digit in the unit’s place is equal to 5 or greater than 5, then the tens place is replaced by 0 and the hundreds place is increased by 1.

How to Round Numbers to Nearest Hundred?

Get the detailed steps to rounding to the nearest 100. They are along the lines

  • Get the number we want to round.
  • Identify the digit in the tens place.
  • If the digit in the tens place is less than 5, then place zero’s in the tens, units place of the number.
  • If the digit in the tens place is more than or equal to 5, then place zero’s in the tens and units place, increase the hundredth place digit by 1.
  • Now, write the obtained number.

Also, Read: Rounding Decimals to Nearest Whole Number

Examples on Rounding Numbers to Nearest 100

Example 1:

Round the following numbers to the nearest 100.

(i) 148

(ii) 5520

(iii) 95

Solution:

(i) 148

Given number is 148

We see the digit in the tens place is 4 means that is less than 5. So, we round to the nearest multiple of a hundred which is less than the number. Keep zeros in the units and tens place.

Therefore, rounding of 148 to the nearest 100 is 100.
(ii) 5520

Given number is 5520

We can see that the digit in tens place is 2 which is less than 2. So, keep zero’s in the tens, units place, and write the remaining digits as it is.

Therefore, rounding of 5520 to the nearest 100 is 5500.

(iii) 95

Given number is 95

The tens digit of the given number is 9 that is more than 5. So, we need to place zeros in the tens, units place and increase the hundreds digit by 1. So, the obtained number is 100.
Example 2:

Round the following numbers to the nearest hundred.

(i) 696

(ii) 1,00,678

(iii) 12,05,896

Solution:

(i)696

Given number is 696

The digit in the tens place of the original number is 9. So, increase the hundreds digit by 1 and place zeros in the units, tens place.

Therefore, the obtained number is 700.

(ii) 1,00,678

Given number is 1,00,678

We can identify that the digit in the tens place of the number is 7 i.e > 5. Therefore, increase the digit in the hundreds place of the number by 1 and put zeros in the units, tens places.

Hence, the rounding off 1,00,678 to the nearest hundred is 1,00,700.

(iii) 12,05,896

Given number is 12,05,896

We see the digit in the tens place is 8, we round to the nearest multiple of hundred which is greater than the number. Hence, 12,05,896 is nearer to 12,05,900 than 12,05,800.

Example 3:

Round of To Nearest 100.

(i) 50

(ii) 255

(iii) 510

Solution:

(i) 50

Given number is 50

The digit in the tens position of the given number is 5. So, increase the hundreds position of the number by 1, place zeros in the tens, units place.

So, the round-off 50 to the nearest 100 is 100.
(ii) 255

Given number is 255

We choose the two multiple of 100 just greater than and just less than 255.

The nearest hundreds of 255 are 200, 300

255 – 200 = 55

300 – 255 = 45

As 300 has the lowest difference value.

So, 300 is the nearest 100 for 255.

(iii) 510

Given number is 510

We see the digit in the tens place is 1, we round to the nearest multiple of hundred which is less than the number. Hence, 510 is nearer to 500 than 600.
Pairs of Angles Definition, Examples | Different Types of Angle Pairs

Pairs of Angles

Angles are formed when two lines intersect each other at a point. The pair of angles are nothing but two angles. The angle pairs can relate to each other in various ways. Those are complementary angles, supplementary angles, vertical angles, adjacent angles, alternate interior angles, alternate exterior angles, and corresponding angles.

Pairs of Angles – Definition

The region between two infinitely long lines pointing a certain direction from a common vertex is called an angle. Which is the amount of turn is measured by an angle. The pairs of angles mean two angles. If there is one common line for two angles, it is known as angle pairs. Get the definitions and examples of all pairs of angles in the following section.

1. Complementary Angles

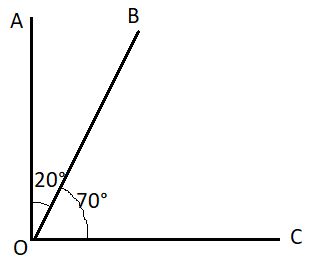
Two angles whose sum is 90° are called complementary angles and one angle is the complement of another angle.

Pairs of Angles 1

Here, ∠AOB = 20°, ∠BOC = 70°

So, ∠AOB + ∠BOC = 20° + 70° = 90°

Therefore, ∠AOB and ∠BOC are called complementary angles.

∠AOB is a complement of ∠BOC and ∠BOC is the complement of ∠AOB.

Example:

(i) Angles of measure 50° and 40° are complementary angles because 50° + 40° = 90°.

Thus, the complementary angle of 50° is the angle measure 40°. The complementary angle of 40° is the angle measure 50°.

(ii) Complementary of 60° is 90° – 60° = 30°

(iii) Complementary of 45° is 90° – 45°= 45°

(vi) Complementary of 25° is 90 – 25° = 65°

Working rule: To find the complementary angle of a given angle subtracts the measure of an angle from 90°.

So, the complementary angle = 90° – given angle

Also, Read:

2. Supplementary Angles

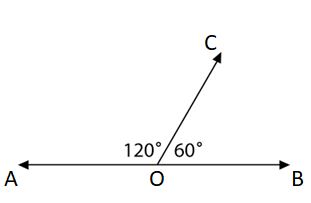
The pair of angles whose sum is 180° is called the supplementary angles and one angle is called the supplement of the other angle.

pairs of angles3

Here, ∠AOC = 120°, ∠COB = 60°

∠AOC + ∠COB = 120° + 60° = 180°

Therefore, ∠AOC, ∠COB are called supplementary angles.

∠AOC is the supplement of ∠COB, ∠COB is a supplement of ∠AOC.

Example:

(i) Angles of measure 90° and 90° are supplementary angles because 90°+ 90° = 180°

Thus, the supplementary angle of 90° is the angle of measure 90°.

(ii) Supplement of 100° is 180° – 100° = 80°

(iii) Supplement of 50° is 180° – 50° = 130°

(iv) Supplement of 95° is 180° – 95°= 85°

(v) Supplement of 140° is 180°- 140° = 40°

Working rule: To find the supplementary angle of the given angle, subtract the measure of angle from 180°.

So, the supplementary angle = 180° – given angle

3. Adjacent Angles

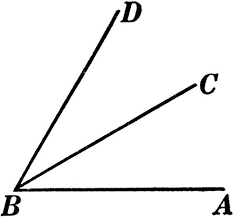
Two non-overlapping angles are said to be adjacent angles if they have a common vertex, common arm, and other two arms lying on the opposite side of this common arm so that their interiors do not overlap.

Pairs of Angles 4

In the above figure, ∠DBC and ∠CBA are non-overlapping, have BC as the common arm and B as the common vertex. The other arms BD, AB of the angles ∠DBC and ∠CBA are opposite sides of the common arm BC.

Hence, the arm ∠DBC and ∠CBA form a pair of adjacent angles.

4. Linear Pair of Angles

The angles are called liner pairs of angles when they are adjacent to each other after the intersection of two lines. Two adjacent angles are said to form a linear pair if their sum is 180°. The types of linear pairs of angles are alternate exterior angles, alternate interior angles, and corresponding angles.

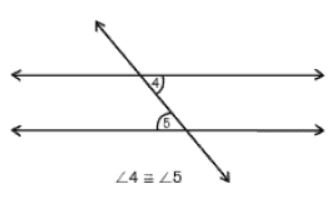
Alternate interior angles

Two angles in the interior of the parallel lines and on opposite sides of the transversal. Alternate interior angles are non-adjacent and congruent.

pairs of angles 5

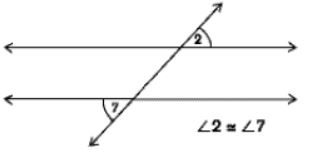
Alternate exterior angles

Two angles in the exterior of the parallel lines, and on the opposite sides of the transversal. Alternate exterior angles are non-adjacent and congruent.

Pairs of angles 6

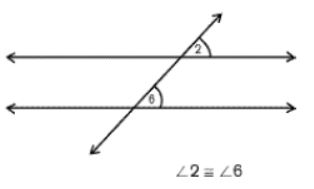
Corresponding angles

The pair of angles, one in the interior and another in the exterior that is on the same side of the transversal. Corresponding angles are non-adjacent and congruent.

Pairs of angles 7

5. Vertical Angles

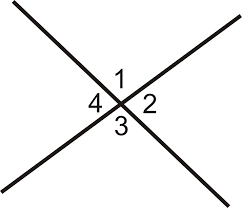
Two angles formed by two intersecting lines having no common arm are called the vertically opposite angles.

Pairs of angles 8

When two lines intersect, then vertically opposite angles are always equal.

∠1 = ∠3

∠2 = ∠4

Pair of Angles Examples

Example 1:

Suppose two angles ∠AOC and ∠ BOC form a linear pair at point O in a line segment AB. If the difference between the two angles is 40°. Then find both the angles.

Solution:

Given that,

∠AOC and ∠BOC form a linear pair

so, ∠AOC + ∠BOC = 180° —- (i)

∠AOC – ∠BOC = 40° —- (ii)

Add both equations

∠AOC + ∠BOC + ∠AOC – ∠BOC = 180° + 40°

2∠AOC = 220°

∠AOC = 220° / 2

∠AOC = 110°

Now, substitute ∠AOC in (i)

110° + ∠ BOC = 180°

∠BOC = 180° – 110°

∠BOC = 70°

Therefore, two angles are 70°, 110°.

Example 2:

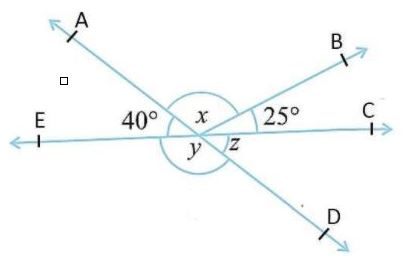
Find the values of the angles x, y, and z in the following figure.

Pairs of angles 9

Solution:

From the given figure,

lines AD and EC intersect each other and ∠DOC and ∠AOE are vertically opposite angles

When two lines intersect, then vertically opposite angles are always equal.

So, ∠DOC = ∠AOE

Therefore, z = 40°

AD is a line

∠DOE and ∠AOE are adjacent angles. The sum of adjacent angles are 180°

So, ∠DOE + ∠AOE = 180°

y + 40° = 180°

y = 180°- 40°

y = 140°

And, lines AD and CE intersect

∠DOE, ∠COA are vertically opposite.

When two lines intersect, then vertically opposite angles are always equal.

So, ∠DOE = ∠COA

y = ∠COB + ∠BOAA

140° = x + 25°

140° – 25° = x

x = 115°

Hence, x = 115°, y = 140°, z = 40°

Example 3:

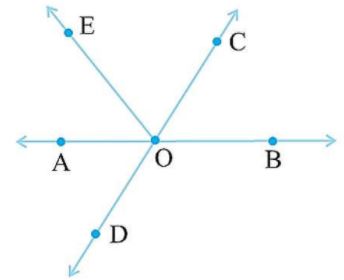
Identify the five pairs of adjacent angles in the following figure.

Pairs of angles 10

Solution:

Adjacent angles are the angles that have a common side, vertex, and no overlap.

So, (i) ∠AOD, ∠AOE are the adjacent angles

The common side is AO, the common vertex is O and OE, OD is not overlapping.

(ii) ∠AOD, ∠DOB is the adjacent angles

The common vertex is O, the common side is OD and OA, OB is not overlapping.

(iii) ∠DOB, ∠BOC is the adjacent angles

The common side is OB, the common vertex is O, and OD, OC are not overlapping.

(iv) ∠COE, ∠BOC are adjacent angles

The common side is OC, the common vertex is O, and OE, OB are not overlapping.

(v) ∠COE, ∠EOA are adjacent angles

The common vertex is O, the common side is OE, and OC, OA is not overlapping.

Converting Fractions to Decimals Examples | How to Convert Fractions to Decimals?

Converting Fractions to Decimals

Converting Fractions to Decimals means you need to press the fractional numbers in the form of exact decimals. You can use different methods like just divide the numerator by the denominator of the fraction apply the long division method or any other simple method. Check out those different forms of converting a fraction into a decimal and apply the best one to get the answers quickly and effortlessly.

What is meant by a Fraction?

The fraction is a part of the whole number and it is also expressed as a ratio of two numbers. The form of the fraction is a/b where ais the numerator, b is the denominator and it is not equal to 0. The different types of fractions are mixed, proper, improper fractions. A fraction is also known as the rational number.
Examples: 2/5, 10/8, 120/150.

What is meant by a Decimal?

A decimal is a number that has a dot or point in between the digits. In simple words, we can say that decimals are fractions with denominators as multiples of 10.

Examples: 5.26, 1.25, 0.06

Methods of Converting Fractions to Decimals

The three different ways of converting fractions to decimals are mentioned here.

Method 1: Divide the numerator by denominator

  • Get the fraction or mixed fraction
  • Convert the mixed fraction into a fraction
  • Just divide the numerator of the fraction by the denominator
  • While dividing add a dot to the quotient when you reach a point where the remainder is lesser than the divisor.

Example:

Convert 1/4 into decimal form

1/4 = 0.25

Method 2: Multiply both numerators, denominators by the same number 

  • Identify the fraction, you need to convert to the decimal number.
  • Multiply the denominator of the fraction by some number to get the denominator as the multiple of 10.
  • Find that number and multiply both the numerator and denominator by the same number.
  • Then, you will get the denominator as the multiple of 10.
  • After that, mark the decimal point after one place or two places or three places from right towards left if the given fraction’s denominator is 10 or 100 or 1000 respectively.

Example:

Convert 1/4 into the decimal form?

Given fraction is 1/4

1/4 = (1 x 25)/(4 x 25) = 25/100

= 0.25

Method 3: Using Long Division

  • Find the fractional number.
  • Divide the numerator of the fraction by denominator using the long division.
  • Then, you will get the decimal number as a quotient.

Example:

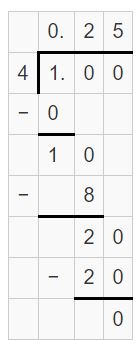
Convert 1/4 into the decimal form?

Given fraction is 1/4

Divide 1/4 using long division.

Converting Fractions To Decimals

So, 1/4 = 0.25

Have a look at the related articles

Example Questions on Fractions to Decimal Conversion

Example 1:

Convert the following fractions to decimals.

(i) 9(1/2)

(ii) 14/5

(iii) 125/6

Solution:

(i) The given mied fraction is 9(1/2)

= 19/2

= 9.5 using the division method

So, 9(1/2) = 9.5

(ii) The given fraction is 14/5

Multiply both numerator and denominator by 2

= (14 x 2)/(5 x 2)

= 28/10

= 2.8

So, 14/5 = 2.8

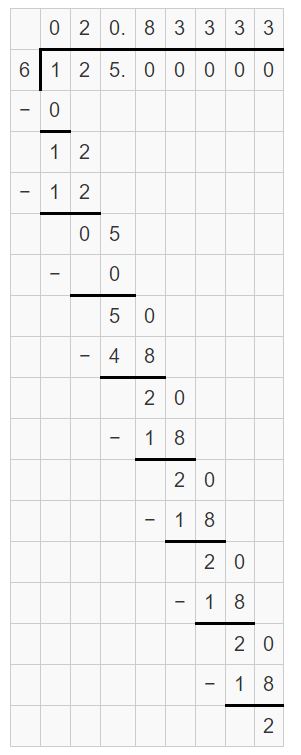
(iii) The given fraction is 125/6

Using the long division method

Converting Fractions To Decimals 1

So, 125/6 = 20.83333

Example 2:

Convert the following fractions to decimals.

(i) 3/10

(ii) 101/100

(iii) 856/9

Solution:

(i) The given fraction is 3/10

As the denominator is the multiple of 10, add point to the numerator.

So, 3/10 = 0.3

(ii) The given fraction is 101/100

As the denomintaor is 100, add point after two digits from the left side

So, 101/00 = 1.01

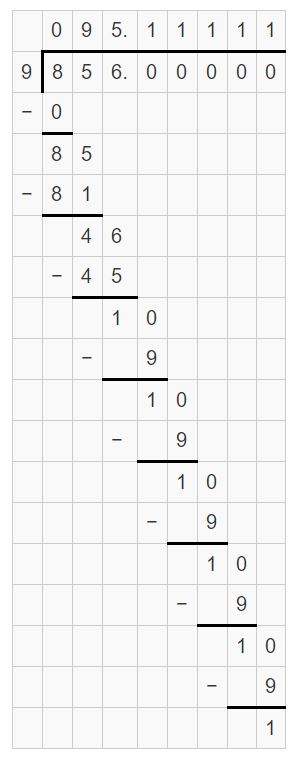
(iii) The given fraction is 856/9

Using the long division method

Converting Fractions To Decimals 2

So, 856/9 = 95.11111

Example 3:

Convert the following fractions to decimals.

(i) 18/7

(ii) 2/5

(iii) 3/5

Solution:

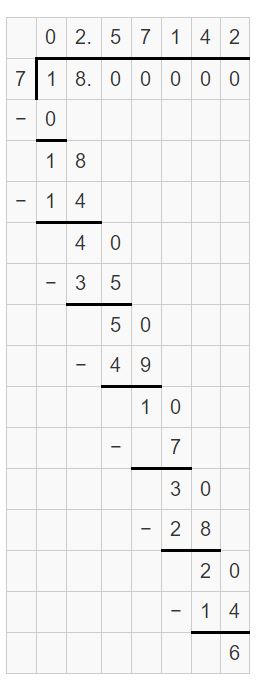
(i) The given fraction is 18/7

Using the long division method

Converting Fractions To Decimals 3

So, 18/7 = 2.571428571

(ii) The given fraction is 2/5

Multiply both numerator and denominator by 2

2/5 = (2 x 2)/(5 x 2)

= 4/10 = 0.4

So, 2/5 = 0.4

(iii) The given fraction is 3/5

Multiply both numerator and denominator by 2

3/5 = (3 x 2)/(5 x 2)

= 6/10 = 0.6

So, 3/5 = 0.6

Convex and Concave Polygons – Definitions, Properties, Formulas, and Examples

Convex and Concave Polygons

Polygon is a two-dimensional geometric figure which has a finite number of sides. Each side of the polygon is a straight line and all line segments form a closed figure. Convex and Concave Polygons are the two different types of polygons. A polygon that has all the interior angles lesser than 180°, then it is called the convex polygon. If the polygon contains one or more interior angles greater than 180°, then it is called the concave polygon. Check out the definitions, properties, and examples in the remaining sections of this article.

Convex and Concave Polygons

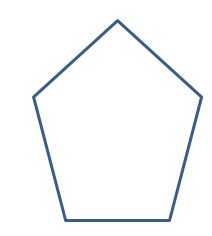
A polygon is said to be a convex polygon when the measures of the interior angles are lesser than 180 degrees. The vertices of the convex polygon always point outwards.

Convex and Concave Polygons 1

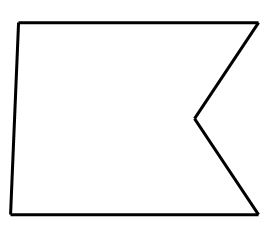
A polygon that measures at least one angle greater than 180 degrees is called the concave polygon. The vertices of this are inwards and outwards also. Convex, concave polygons are opposite to each other.

Convex and Concave Polygons 2

Other Types of Polygons

The various types of polygons are described here with their definitions.

  • Regular polygons: All sides of the polygons measure equal dimensions.
  • Irregular Polygons: All sides of the polygons measure unequal dimensions.
  • Quadrilateral Polygons: It is a four-sided quadrilateral
  • Convex Polygons: Examples are rhombus, parallelogram, square, rectangle, pentagon, etc
  • Concave Polygons

Also, read Regular and Irregular Polygons

Regular Convex Polygons

A regular convex polygon has all sides of equal length, all interior angles are the same and below 180 degrees. The distance between the center point to all vertices is equal. An example is square.

Irregular, Regular Concave Polygons

All the concave polygons are irregular concave polygons. Because concave polygons must have at least one angle greater than 180 degrees and irregular polygons measure interior angles differently. There is no concave polygon that is regular.

Convex and Concave Polygons – Formulas

The perimeter of a convex and concave polygon is the sum of all sides or the total region coved around the boundary.

Perimeter = Sum of all sides

Area of convex polygon is given as A = ½ | (x₁ • y₂ – x₂ • y₁) + (x₂ • y₃ – x₃ • y₂) + . . . + (xn • y₁ – x₁ • yn) |

Where (x₁, y₁), (x₂, y₂), (x₃, y₃), . . . (xn, yn) are the vertices of the convex polygon

Area of a concave polygon

Like regular polygons, there is no formula to calculate the area of the irregular concave polygons. Here, on each side, interior angles will be of different lengths. So, we need to split the polygons into triangles or other shapes to find the area.

Properties of Concave and Convex Polygons

  • The interior angles of convex polygons have to be less than 180 degrees. The concave polygon should have at least one reflex angle.
  • A concave polygon must have one vertex that points inwards to give the concave shape.
  • Sum of all interior angles of the convex polygon of n sides = (n – 2) x 180°
  • If a line segment is drawn crossing the concave polygon, then it will intersect the boundary more than two times.
  • Concave polygons have more than one diagonal that lie outside the boundary.
  • Concave polygons need to have one pair of sides joining a vertex that goes outside the vertex.

Interior, Exterior Angles

The interior angles are defined as the angles inside the polygon. The number of interior and exterior angles in a polygon are the same. According to the convex and concave polygon sum formula, for any n sided polygon, the sum of interior angles is (n – 2)180°. By knowing the sum, divide the sum by a total number of sides to get each interior angle measurement.

The exterior angle is defined as the angle formed by extending the side of the polygon. We already know that the sum of exterior angles of any polygon is 360°. Divide the sum by the total number of sides to get the measure of each exterior angle of Convex and Concave Polygons.

Examples of Convex and Concave Polygon

Example 1:

Find the area of the convex polygon with three sides, and vertices are (5, 7), (8, 4), (-2, 1).

Solution:

Given that,

Vertices of the polygon are (5, 7), (8, 4), (-2, 1).

(x₁, y₁) = (5, 7), (x₂, y₂) = (8, 4), (x₃, y₃) = (-2, 1)

The formula to calculate the area of a convex polygon is A = ½ | (x₁ • y₂ – x₂ • y₁) + (x₂ • y₃ – x₃ • y₂) + (x₃ • y₁ – x₁ • y₃) |

= ½ | (5 • 4 – 8 • 7) + (8 • 1 – (-2) • 4) + (-2 • 7 – 5 • 1) |

= ½ | (20 – 56) + (8 + 8) + (-14 – 5) |

= ½ | -36 + 16 – 19 |

= ½ | -55 + 16 |

= ½ | -39 |

= 19.5

Therefore, the area is 19.5 sq units.

Example 2:

Calculate the perimeter and area of the pentagon has a side length of 4 cm.

Solution:

Given that,

The side length of pentagon s = 4 cm

n = 5

The regular polygon area formula is A = n x s² x cot(π/n) / 4

A = 5 x 4² x cot(π/5) / 4

= 5 x 16 x 1.3763 / 4

= 110.104 / 4

= 27.526 cm²

Perimeter p = Sum of all sides

= 4 + 4 + 4 + 4 + 4

= 20 cm

Hence the area, perimeter of the pentagon is 27.526 cm², 20 cm.

Example 3:

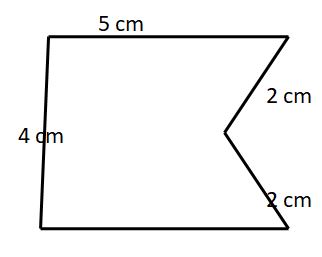
Find the perimeter, area of the below given concave polygon.

Convex and Concave Polygons 3

Solution:

The perimeter of the polygon = sum of all sides

= 4 + 5 + 2 + 2 + 5

= 18 cm

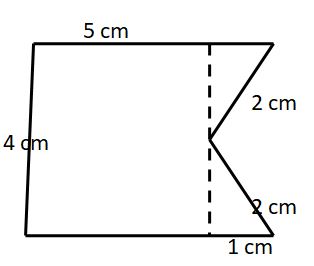
To find the area divide the given polygon into a square and two triangles by drawing a dotted line.

Convex and Concave Polygons 4

Area of square = side²

= 4² = 16 cm²

Area of triangle = 1/2 x base x height

hypotenuese² = base² + height²

2² =1² + height²

4 = 1 + h²

h² = 4 – 1

h² = 3

h = √3

So, area = 1/2 x 1 x √3

= √3/2 cm²

So, area of polygon = area of square + 2 x area of the triangle

= 16 + 2(√3/2)

= 16 + √3

Therefore, the perimeter, area of the concave polygon is 18 cm, (16 + √3) cm²

Example 4:

Find the measure of each interior, exterior angle of a regular octagon.

Solution:

Octagon has 8 sides

The sum of interior angles of polygon = (n – 2)180°

= (8 – 2) 180°

= 6 x 180°

= 1080°

The measure of each interior angle of an octagon = sum of interior angles/ number of sides

= 1080°/8

= 135°

The sum of exterior angles = 360°

The measure of each exterior angle of an octagon = sum of exterior angles/ number of sides

= 360/8

= 45°

So, the measure of each interior angle, exterior angle of the octagon is 135°, 45°. Hence, it is a convex polygon.

FAQs on Convex and Concave Polygons

1. Write the differences between concave and convex polygons?

Each and every polygon is either convex or concave. The main difference between them is angles. For a polygon to be convex, it must have all interior angles lower than 180 degrees. If any of the interior angles is greater than 180 degrees, then it is a concave polygon.

2. How do you know if a polygon is convex?

Get the measure of each interior angle of the polygon. If all the angles are below 180 degrees, then you can say it is a convex polygon.

Roman Numerals Chart | Rules, Conversion from Roman Numerals to Numbers and Vice Versa, Examples

Roman Numerals

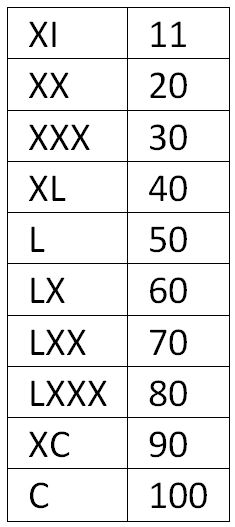
Roman Numerals are the numeral system which is originated in ancient Rome. It is a decimal or base 10 number system. It is an additive or subtractive system in which letters are used to denote some base numbers and arbitrary numbers in the number system and denoted using a different combination of symbols. Here, students can check the Roman Numerals Chart, how to convert roman numerals to numbers, and solved examples in the following sections.

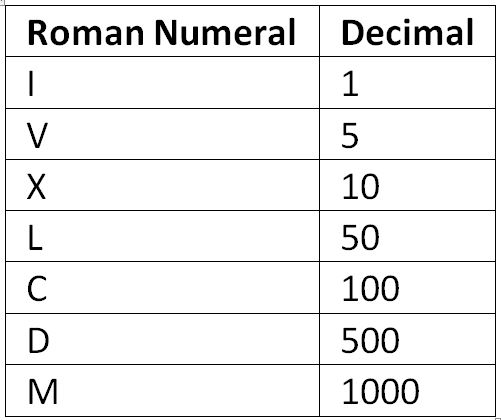
Roman Numerals List

Here provided are some basic roman numerals.

Roman Numerals 1

Roman Numerals Chart:

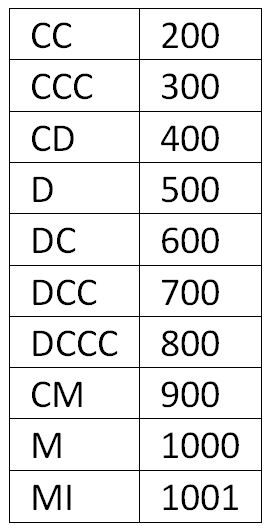
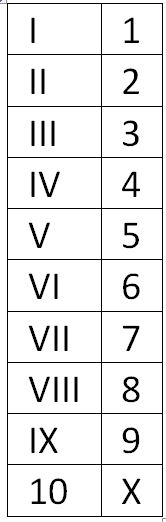
Roman numerals Chart has particular roman numbers for the decimal numbers from 1 to 1000.

Roman Numerals 2    Roman Numerals 3    Roman Numerals 4

Rules for formation of Numbers

We have three different rules to form the roman numerals as numbers. They are multiplication rule, addition rule, and subtraction rule.

Multiplication Rule:

When a roman symbol is repeated in sequence, then we have to multiply the value of the numeral by the number of times it is repeated. A symbol cannot be repeated more than three times in series.

Example:

II = 1 x 2 = 2

XX = 10 x 2 = 20

III = 1 x 3 = 3

We cannot express 4 as IIII. Because the symbol cannot be repeated more than three times.

Addition Rule:

If a smaller number is located to the right of a larger number, then you need to add numbers.

Example:

VII = 5 + 1 + 1 = 7

VIII = 5 + 1 + 1 + 1 = 8

XXII = 10 + 10 + 1 + 1 = 22

Subtraction Rule:

Writing a smaller number to the left side of a larger number means that the smaller number has to be subtracted from the larger number. The symbol I can be subtracted from V and X and X can be subtracted from L and C.

Example:

IV = 5 – 1 = 4

IL = 50 – 1 = 49

We do not repeat V twice to get 10. We already have a symbol for 10. So VV for writing 10 is not correct.

We do not subtract 5 from any symbol. VX is not correct.

Roman Numerals Questions with Solutions

Example 1:

Write the Roman Numerals for 57.

Solution:

The given decimal number is 57

Break up the number into Tens and Ones.

57 = 50 + 7

The symbol for 50 is L

7 = 5 + 2 = 5 + 1 + 1

The symbol for 7 is VII.

57 convert roman numerals as LVII.

Example 2:

Write the number for XXIV.

Solution:

Given roman numeral is XXIV

V = 5

IV = 5 – 1 = 4

X = 10

XX = 10 + 10 = 20

Therefore, XXIV = 20 + 4

XXIV = 24.

Example 3:

Write the Roman Numerals for 18.

Solution:

The given decimal number is 18.

Break up the number into Tens and Ones.

18 = 10 + 8

The symbol for 10 is X.

8 = 5 + 1 + 1 + 1

The symbol for 5 is V, 1 is I

So, the symbol for 8 is VIII

18 convert roman numerals as XVIII.

Example 4:

Write the number for XXXIX.

Solution:

Given roman numeral is XXXIX

X = 10

IX = 10 – 1 = 9

XXX = 10 x 3 = 30

Therefore, XXXIX = 30 + 9 = 39

FAQs on Roman Numerals

1. How do you write roman numerals?
Roman numerals can be written by using seven different alphabets. They are I for 1, V for 5, X for 10, L for 50, C for 100, D for 500, M for 1000. By using these symbols, you can write all roman numerals easily.

2. How to evaluate 550 in roman numerals?

550 = 500 + 50

500 = D, 50 = L

Therefore, 550 = DL.

3. What is the use of roman numerals?

Roman numerals can be used for labeling the name or position of a person or an object. Examples are Kiran came IInd in the class. Prince Charles III, Schools have Classes from VIth to Xth.

4. Write roman numerals from 1 to 10?

The roman numerals from 1 to 10 are I, II, III, IV, V, VI, VII, VIII, IX, and X.

Correct to Two Decimal Places Definition, Rules, Examples | Rounding Decimals to 2 Places

Correct to Two Decimal Places

Looking for help on Correcting Decimals to 2 Places? If so, you have arrived at the right place and get complete knowledge regarding the Rounding Off Decimals to Hundredths Place. Here you will find how to round off to hundredths place or Correct to Two Decimal Places. Get the definition, rules, detailed step-by-step process of rounding numbers to the nearest hundredths place. Solved Examples on Rounding Decimals to 2 Places help you understand the concept clearly and learn the approach used to solve them.

Correct to Two Decimal Places – Definition

The process of Correct to Two Decimal Places is nothing but rounding the to hundredths. Rounding off to decimal places is a technique used to find the approximate values of the decimal number. Here, the decimal numbers are rounded off to 2 decimal places to make them easy to read, understand, and manageable instead of having lengthy string decimal places. We will keep the original 1st decimal number as it is, may change the second decimal number, and eliminate the remaining decimal numbers.

Rules for Rounding off to Two Decimal Places

For rounding the given numbers to the nearest hundredths, you need to check the below-provided rules.

  • Rule 1: If the digit in the thousands place is less than 5, then remove the following digits or place 0 in place of them
  • Rule 2: When the digit in the thousands place is equal to or more than 5, then the digit in the hundredths place is increased by 1 and the following digits are replaced by 0.

Also, check:

How to Correct to Two Decimal Places?

Follow the below-listed procedure to learn Rounding Decimals to Two Places. They are along the lines

  • Identify the number for which you need to round off to two decimal places.
  • See the digit in the thousands place of the given number.
  • If the digit is equal to or greater than 5, then add 1 to the digit in the hundredth place of the number and remove the following digits.
  • When the digit is smaller than 5, then replace the following digits with 0.

Solved Examples on Correcting Decimals to 2 Places

Example 1:

Round off the following to the two decimal places.

(i) 186. 256

(ii) 25. 532

Solution:

(i) 186. 256

The given number is 186. 256

We can see the digit in the thousandths place is 6 then round it to the nearest hundredths which is greater than the given decimal number. Since 6 > 5 then the decimal number is rounded to 186.260.

Therefore, the solution is 186.260.

(ii) 25. 532

The given number is 25. 53256

We can identify the digit in the thousandths place is 2 then round it to the nearest hundredths which is smaller than the given decimal number. Since 2 < 5 then the decimal number is rounded to 25.5300.

Therefore, the solution is 25.53.

Example 2:

(i) 120.085

(ii) 12,856.558

Solution:

(i) 120.085

The given number is 120.085

The digit in the thousands place is 5 which is equal to 5.

So, increase the hundreds place digit by 1 i.e 8 + 1 = 9, and remove the following digits.

Therefore, the solution is 120.09.

(ii) 12,856.558

The given number is 12,856.558

We can see the digit in the thousandths place is 5 then round it to the nearest hundredths which is greater than the given decimal number. Since 5 = 5 then the decimal number is rounded to 12,856.56.

Therefore, the solution is 12,856.56.

Example 3:

(i) 0.042

(ii) 12.567

Solution:

(i) 0.042

The given number is 0.042

The digit in the thousand’s place of the given number is 2

Since 2 is less than 5, then replace the following digits with 0.

Therefore, the solution is 0.04.

(ii) 12.567

The given number is 12.567

The digit in the thousand’s place of the given number is 7

Since 2 > 5 add 1 to the hundredths place of the number and remove the following digits.

So, the rounds off number is 12.57.

Hexadecimal Addition and Subtraction | How to Add & Subtract Hexadecimal Numbers? | Hexadecimal Arithmetic Examples

Hexadecimal Addition and Subtraction

In the hexadecimal number system, the numbers are expressed with the base 16. Hexadecimal is also called as Hex. It is like decimal, binary or octal numbers. The list of 16 hexadecimal numbers are 0, 1, 2, 3, 4, 5, 6, 7, 8, 9, A, B, C, D, E, F. Here, we are going to learn how to perform addition, subtraction operations in between two hexadecimal numbers with the examples for the better understanding of the concept. So, interested people can check out this complete page.

What is Hexadecimal Number System?

A hexadecimal number is a number having a base of 16. These numbers are also called the 16 number system. It has 16 different symbols, 0 to 9 represent the binary values, A, B, C, D, E, F represent 10 to 15 values respectively. Each position in the hexadecimal number represents 0 power of the base 16. The last position in the number represents an x power of base 16.

Examples of Hexadecimal Numbers:

1. B84F

The decimal value of B84F is 11 x 16 + 8 x 16 + 4 x 16 + 16 x 16

= 176 + 128 + 64 + 256

= 624

2. Convert 857 to hexadecimal

857 ÷ 16 = 53.5625

0.5625 x 16 = 9 (Remainder 9)

53 ÷ 16 = 3.3125

0.3125 x 16 = 5 (Remainder 5)

3 ÷ 16 = 0.1875

0.1875 x 16 = 3 (Remainder 3)

Read remainders from bottom to top

So, 857 = (359)16

Also, Read: Binary Subtraction

Procedure for Adding & Subtracting in Hexadecimal

Below provided are the simple steps that are helpful to compute the addtion and subtraction of two hexadecimal numbers.

1. Hexadecimal Numbers Addition

  • Write two hexadecimal numbers one after another in two different lines
  • Begin adding from the rightmost digits.
  • If the digit is in the form of an alphabet then convert it to the respective decimal number to make the process easy
  • Add those digits and convert the sum to the hexadecimal
  • If you got the carry, then represent it on the top of the first number next digit and result on the bottom of the second number added digit.
  • Continue the process until you left nothing on the left side.

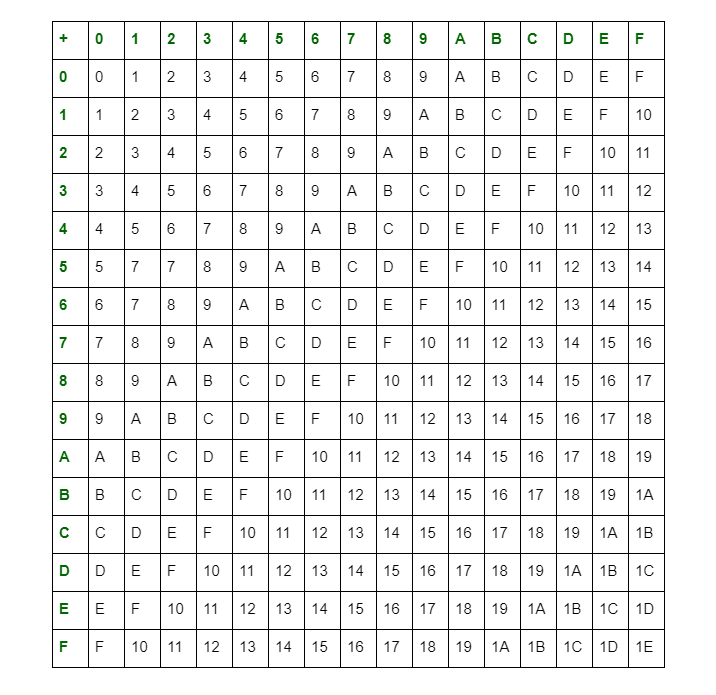
We can also add two hexadecimal numbers by following this table.

Hexadecimal Addition and Subtraction

For Example:

926 + 1A2

9 2 6

(+) 1 A 2

=    A C 8

So, 926 + 1A2 = AC8

2. Hexadecimal Numbers Subtraction

  • Write two hexadecimal numbers in different lines
  • Subtraction starts from the rightmost digits of the numbers.
  • Convert the alphabets into decimals and subtract two digits and again convert the difference value as hexadecimal.
  • In case the first number digit is smaller than the second number digit, then barrow from the left side digit.
  • The borrowed value is always 16 as its base is 16. Then add borrowed value and first number digit and subtract.
  • Don’t forget to mention the borrowed value on the top of the first number digit.
  • After borrowing, the left side digit decreased by 1.
  • Repeat the process till you have nothing remaining on the left side.

For Example:

938 – 1A2

8 – 2 = 6

3 – A(10) = (16 + 3) – 10 = 19 – 10 = 9

(9 – 1) – 1 = 8 – 1 = 7

So,  938 – 1A2 = 796.

Hexadecimal Addition and Subtraction Examples

Example 1:

Evaluate (1AB2)16 + (2198)16

Solution:

Given expression is (1AB2)16 + (2198)16

From the table,

2 + 8 = A

B + 9 = 4 and 1 is carry

1 + A + 1 = C

1 + 2 = 3

Therefore, (1AB2)16 + (2198)16 = 3C4A

Example 2:

Find subtraction of (B84F)16 and (A53)16.

Solution:

F means 15. F – 3 = 15 – 3 = 12 = C

4 + 16 = 20 – 5 = 15 = F

8 – 1 = 7

7 + 16 = 23 – A = 23 – 10 = 13 = D

8 – 1 = 7
23
10 7 20

B 8 4 F

(-) 0 A 5 3

= 7 D F C

So, (B84F)16 – (A53)16 = (7DFC)16

Example 3:

Find the addition, subtraction of (AB53)16, (155)16

Solution:

The addition of numbers is (AB53)16 + (155)16

3 + 5 = 8

5 + 5 = 10 = A

B + 1 = 11 + 1 = 12 = C

A + 0 = 10 + 0 = 10 = A

So, (AB53)16 + (155)16 = (ACA8)16

Subtraction of numbers is (AB53)16 – (155)16

(3 + 16) – 5 = 19 – 5 = 14 = E

(5 – 1) – 5 = 4 – 5

(4 + 16) – 5 = 20 – 5 = 15 = F

(B – 1) – 1 = (11 – 1) – 1 = 10 – 1 = 9

A – 0 = A

A B 5 3

(-) 0 1 5 5

= A 9 F E

So, (AB53)16 – (155)16 = (A9FE)16

Example 4:

(i) Calculate (9AB)16 + (12C)16

(ii) Compute (CB5)16 – (223)16

Solution:

(i) (9AB)16 + (12C)16

B + C = 11 + 12 = 23 = 7 and 1 is carry

1 + A + 2 = 3 + 10 = 13 = D

9 + 1 = 10 = A

So, (9AB)16 + (12C)16 = (AD7)16

(ii) (CB5)16 – (223)16

5 – 3 = 2

B – 2 = 11 – 2 = 9

C – 2 = 12 – 2 = A

So, (CB5)16 – (223)16 = (A92)16

Trigonometrical Ratios of 90 Degree Minus Theta | Relation between Quadrants | Solved Examples

Trigonometrical Ratios of 90 Degree Minus Theta

Are you looking for any material to know the relation between all Trigonometrical Ratios of 90 Degree Minus Theta? Then, you can relax now. On this page, we have enclosed the detailed information on the relation between Trigonometric Ratios of (90° – θ) along with the proofs. Get the example questions and step-by-step solutions in the following sections of this article. Check out the simple formula to memorize the Trigonometric Functions.

How to Determine the Trigonometric Ratios of 90 Degree Minus Theta?

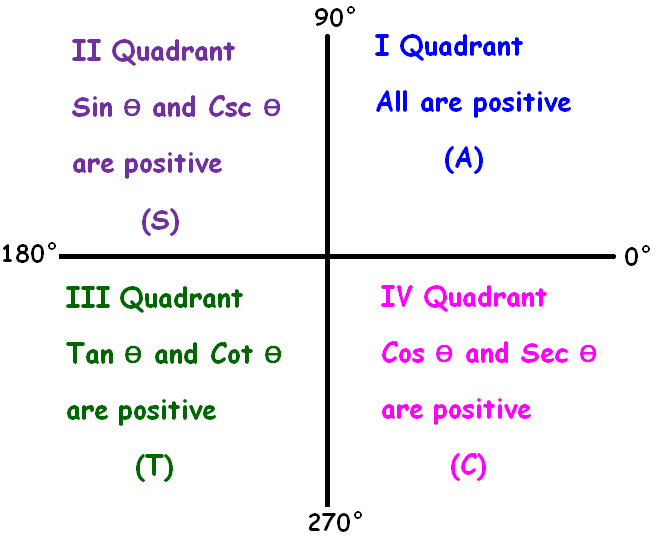
Here, you can see Trigonometrical Functions of 90 Degree Minus Theta can be determined. As per the ASTC “All Silver Tea Cups” or “All Students Take Calculus”

A means All, S means “Sinθ, Cosecθ”, T means “Tanθ, Cotθ”, C means Cosθ, Secθ.

The pictorial representation of the ASTC formula is as follows:

ASTC Formula

From the above picture, (90° – θ) falls in the first quadrant.

sin (90° – θ) = cos θ

cos (90° – θ) = sin θ

tan (90° – θ) = cot θ

cosec (90° – θ) = sec θ

sec (90° – θ) = cosec θ

cot (90° – θ) = tan θ

Evaluate Trigonometrical Ratios of 90 Degree Minus Theta

1. Evaluate Sin(90° – θ)?

To evaluate sin (90° – θ), we have to consider the following important points.

  •  (90° – θ) will fall in the 1st quadrant.
  •  When we have 90°, “sin” will become “cos”.
  •  In the 1st quadrant, the sign of “sin” is positive.

Considering the above points, we have

Sin (90° – θ) = Cos θ

2. Evaluate Cos(90° – θ)?

To evaluate cos (90° – θ), we have to consider the following important points.

  • (90° – θ) will fall in the 1st quadrant.
  •  When we have 90°, “cos” will become “sin”.
  •  In the 1st quadrant, the sign of “cos” is positive.

Considering the above points, we have

Cos (90° – θ) = Sin θ

3. Evaluate Tan(90° – θ)?

To evaluate tan (90° – θ), we have to consider the following important points.

  •  (90° – θ) will fall in the 1st quadrant.
  •  When we have 90°, “tan” will become “cot”.
  •  In the 1st quadrant, the sign of “tan” is positive.

Considering the above points, we have

Tan (90° – θ) = Cot θ

4. Evaluate Cot(90° – θ)?

To evaluate cot (90° – θ), we have to consider the following important points.

  •  (90° – θ) will fall in the 1st quadrant.
  •  When we have 90°, “cot” will become “tan”
  •  In the 1st quadrant, the sign of “cot” is positive.

Considering the above points, we have

Cot (90° – θ) = Tan θ

5. Evaluate Cosec(90° – θ)?

To evaluate Cosec (90° – θ), we have to consider the following important points.

  • (90° – θ) will fall in the 1st quadrant.
  •  When we have 90°, “Cosec” will become “sec”.
  •  In the 1st quadrant, the sign of “Cosec” is positive.

Considering the above points, we have

Cosec (90° – θ) = Sec θ

6. Evaluate Sec(90° – θ)?

To evaluate sec (90° – θ), we have to consider the following important points.

  •  (90° – θ) will fall in the 1st quadrant.
  •  When we have 90°, “sec” will become “cosec”.
  •  In the 1st quadrant, the sign of “sec” is positive.

Considering the above points, we have

Sec (90° – θ) = Cosec θ

More Related Articles:

Solved Examples on Trigonometric Ratios of 90° – θ

Example 1:

Find the value of Tan 45°?

Solution:

Tan 45° = Tan (90° – 45°)

We know that Tan (90° – θ) = Cot θ

So, Tan 45° = Cot 45°

= 1  [Cot 45° = 1]

Therefore, Tan 45° = 1.

Example 2:

Find the value of Sin 65°?

Solution:

Sin 65° = Sin (90° – 25°)

We know that Sin (90° – θ) = Cos θ

So, Sin 65° = Cos 25°

= 0.906308 [ Cos 25° = 0.906308]

Therefore, Sin 65° = 0.906308

Example 3:

Find the value of Cot 80°?

Solution:

Cot 80° = Cot (90° – 10°)

We know that Cot (90° – θ) = Tan θ

So, Cot 80° = Tan 10°

= 0.17633 [ Tan 10° = 0.17633]

Therefore, Cot 80° = 0.17633

Example 4:

Find the value of Cos 50°?

Solution:

Cos 50° = Cos (90° – 40°)

We know that Cos (90° – θ) = Sin θ

So, Cos 50° = Sin(40°)

= 0.64278760968 [ Sin(40°) = 0.64278760968]

Therefore, Cos 50° = 0.64278760968.

What is Place Value? – Definition, Properties of Place, Face Value, Place Value, Examples

Place Value

Place value is nothing but the position or place of a digit in the decimal number. In a number, every digit has someplace. The positions of digits in number starts from one’s place. The order of place value of digits of a number of right to left is units, tens, hundreds, thousands, ten thousand’s, and so on. Generally, a number is formed by grouping digits together.

Place, Place Value and Face Value Definitions

In a number, every digit has a fixed position known as the digit place. And each digit has a value depending on its place called the place value of the digit. Face value of a digit for any place in the value of the digit itself.

Place Value of a digit = (face value of the digit) x (value of the place)

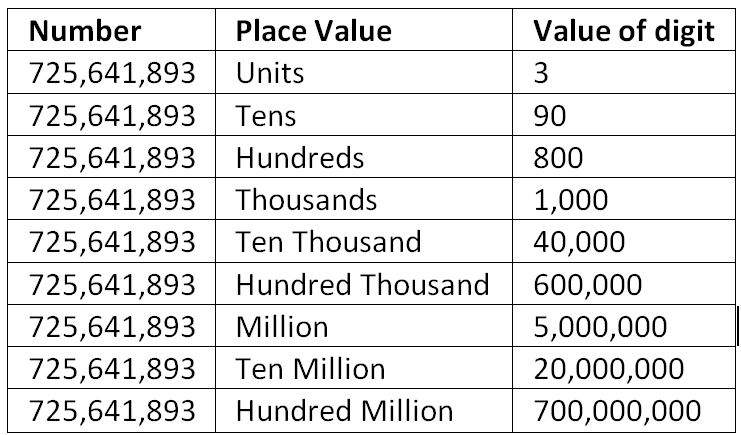
Place Value Table

Place value chart is helpful to ensure that the digits are in the correct places. Place value tells us how much each digit stands for. The place value table is mentioned here.

place value 1

Properties of Place Value

  • The place value of every one-digit number is the same as the face value.

The place value and face value of 1, 2, 3, 4, 5, 6, 7, 8, and 9 are 1, 2, 3, 4, 5, 6, 7, 8, and 9. The place value of 0 is always 0. It may present at any place in the number, its value is always zero.

Example:

(i) In the numbers 105, 270, 1025 the place of value 0 is 0.

(ii) The place of 1 in 251 is 1, 7 in 8567 is 7.

  • In a two-digit number, the place value of the ten-place digit is equal to 10 times of the digit.

Example:

(i) The place value of 6 in 67 is 6 x 10 = 60

(ii) The place value of 2 in 526 is 2 x 10 = 20

  • In the number 567, the digit 7 is at one’s place, the digit 6 is at ten’s place and the digit 5 is at the hundred’s place.

So, the place value of 7 is 7, 6 is 6 x 10 = 60, and 5 is 5 x 100 = 500

Thus, for the place value of a digit, the digit is multiplied by the place value of 1 it has to be that place.

Example:

In the number 286,

The place value of 6 is 6 x 1 = 6

The place value of 8 is 8 x 10 = 80

The place value of 2 is 2 x 100 = 200

  • Now it is the general law that the digit possesses its place value as the product of the digit and place value of one to be at that position.

Examples:

(i) In the number 3578,

The place value of 8 is 8 x 1 = 8 because 8 is at the unit’s place.

The place value of 7 is 7 x 10 = 70 because 7 is at ten’s place.

The place value of 5 is 5 x 100 = 500 because 5 is at hundred’s place

The place value of 3 is 3 x 1000 = 3000 because 3 is at thousand’s place.

(ii) In the number 58762, the place value of each digit is as follows

2 is 2 x 1 = 2

6 is 6 x 10 = 60

7 is 7 x 100 = 700

8 is 8 x 1000 = 8000

5 is 5 x 10000 = 50000

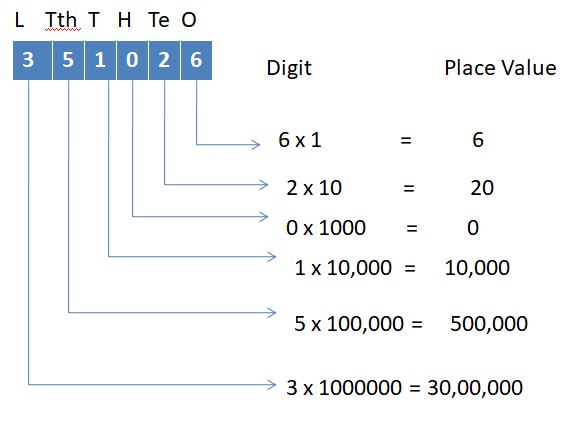
(iii) Find the place value of digits 30589

place value 2

Also, check out

Example Questions on Place Value

Example 1:

Write the place value of the given numbers.

(i) 5 in 38956

(ii) 2 in 2587

(iii) 6 in 6845321

Solution:

(i) The given number is 38956

The place value of 5 in 38956 is 5 x 10 = 50. Because 5 is at tens place.

(ii) The given number is 2587

The place value of 2 in 2587 is 2 x 1000 = 2000. Because 2 is at thousands place.

(iii) The given number is 6845321

The place value of 6 in 6845321 is 6 x 1000000 = 60,00,000. Because 6 is at ten lakhs place.

Example 2:

Write the place value of a highlighted digit in the given numbers

(i) 2589

(ii) 67525

(iii) 2515963

Solution:

(i) The given number is 2589

The place value of highlighted 8 in 2589 is 8 x 10 = 80 as it is located at the tens position.

(ii) The given number is 67525

The place value of highlighted digit 5 in 67525 is 5 x 100 = 500 as it is located at the hundred’s position.

(iii) The given number is 2515963

The place value of highlighted digit 1 in 2515963 is 1 x 10000 = 10000 as it is located at the ten thousand’s position.

Example 3:

Circle the following.

(i) Digit at the hundreds place in 5289.

(ii) Digit at the lakhs place in 2563891

(iii) Digit at the units place in 5280

Solution:

(i) In the number 5289,

9 is at units place, 8 is at tens place, 2 is at hundreds place and 5 is at thousand’s place

So, Digit at the hundreds place in 5289 is 2.

(ii) In the number 2563891,

1 is at units place, 9 is at tens place, 8 is at hundreds place, 3 is at thousand’s place, 6 is at ten thousand’s place, 5 is at lakhs place, 2 is at ten lakhs place.

Therefore, Digit at the lakhs place in 2563891 is 5.

(iii) In the number 5280,

0 is at the unit’s place, 8 is at the ten’s place, 2 is at the hundred’s place and 5 is at the thousand’s place.

Hence, the digit at the units place in 5280 is 0.

Example 4:

Find the place value of 5 in the given numbers.

(i) 6,00,521

(ii) 5,23,168

(iii) 2,05,387

Solution:

(i) The given number is 6,00,521

The place value of 5 is 5 x 100 = 500.

(ii) The given number is 5,23,168

The place value of 5 is 5 x 10,000 = 50,000.

(iii) The given number is 2,05,387

The place value of 5 is 5 x 1000 = 5000.

FAQs on Place Value

1. Write the differences between place value and face value?

Place value means the position of a particular digit in the number but face value represents the exact value of a digit in that number. For example in the number 2556, the place value of 2 is thousands but the face value is 2.

2. Define place value with an example?

The place value is the position of a digit in a number. The place values of digits are represented as ones, tens, hundreds, thousands, ten thousand, and so on. The example is the place value of 8 in 589 is 8 tens i.e 80.

Cuboid – Definition, Properties, Formulas and Examples

Cuboid

A cuboid is a three-dimensional shape having three axes. It has 3 faces which are convex polyhedrons, 12 edges, 12 vertices. Find the different formulas of the cuboid like perimeter, total surface area, lateral surface area, base surface area, and diagonal in the following sections of this page. One can also find the cuboid definition, properties, and solved example questions here.

Cuboid Definition

The cuboid is a closed three-dimensional geometric figure having 6 rectangular regions. Each rectangular region is called the face. The point of intersection of three edges in the cuboid is called the vertices or corners. The sides of all rectangular faces are called the edges of the cuboid. Some of the examples for the objects in the cuboid shape are matchbox, shoebox, bricks, matrices.

The shape of the cuboid is shown here.


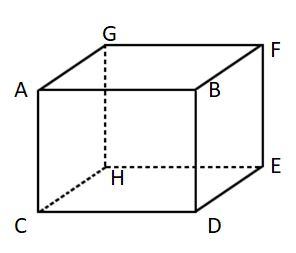
cuboid

Faces, Edges, Vertices of the Cuboid

The cuboid is made up of 6 rectangular faces, 12 edges, 8 corners. The faces, edges, and corners for the above-mentioned cuboid image are as follows:

  • The six faces are ABCD, BDEF, ABGF, AGCH, CDHE, EFGH.
  • Eight corners or vertices are A, B, C, D, E, F, G, H.
  • Twelve edges and opposite sides of the rectangle are AB = CD = EH = GF, AC = BD = EF = GH, DE = BF = CH = AG.

Cuboid Formulas

The cuboid formulas are provided-below. Get the total surface area, diagonal, perimeter, and volume of the cuboid. Let us consider l, b, h are the length, breadth, and height of the cuboid respectively.

Cuboid Surface Area

The surface area is nothing but the total region covered by all the faces. Generally, the cuboid surface area is classified into two types they are lateral surface area and total surface area. It is also defined as the sum of areas of six faces of the cuboid.

Lateral Surface Area

The lateral surface area is the sum of the areas of all faces except the top and bottom faces.

Cuboid Lateral Surface Area = (Area of ABCD + Area of BDEF + Area of EFGH + Area of AGCH)
= (b × h) + (b × h) + (l × h) + (l × h)

= 2h(l + b)

Total Surface Area

Cuboid Total Surface Area is the sum of the faces.

Total Surface Area of the Cuboid = (Area of ABCD + Area of BDEF + Area of EFGH + Area of AGCH + Area of ABGF + Area of CDHE)

= (l × b) + (l × b) + (b × h) + (b × h) + (l × h) + (l × h)

= 2lb + 2bh + 2hl

= 2(lb + bh + lh)

Cuboid Diagonal

The length of the diagonal of a cuboid is along the lines.

Diagonal = √(l² + b² + h²)

Cuboid Perimeter

The perimeter is the sum of the edges of all edges.

The perimeter of the Cuboid = AB + BF + FE + BD + DE + CD + CH + AC + GH + AG + GF + HE

= l + l + l + l + b + b + b + b + h + h + h + h

= 4(l + b + h)

Cuboid Volume

Cuboid volume is the product of the base area and height.

Volume = length x breadth x height

= lbh

Read More Related Articles:

Properties of Cuboid

Here is the list of Properties of Cuboids such as faces, edges, vertices, angles, etc. They are as follows

  • A cuboid has 6 faces, twelve edges, and 8 vertices.
  • It has rectangular-shaped faces.
  • The angles are plane and at a right angle.
  • Opposite edges are parallel to each other.

Solved Examples on Cuboid

Example 1:

Calculate the volume, diagonal, surface area, and perimeter of the cuboid, if the cuboid length is 8 cm, width is 5 cm, and height is 10 cm.

Solution:

Given that,

Cuboid length l = 8 cm

breadth b = 5 cm

height h = 10 cm

Cuboid volume v = lbh

= 8 x 5 x 10

= 400 cm³

Diagonal of the cuboid = √(l² + b² + h²)

= √(8² + 5² + 10²)

= √(64 + 25 + 100)

= √(189)

= 3√(21) cm

Perimeter = 4(l + b +h)

= 4(8 + 5 + 10)

= 4(23)

= 92 cm

Total Surface Area = 2(lb + bh + lh)

= 2(8 x 5 + 5 x 10 + 8 x 10)

= 2(40 + 50 +80)

= 2(170)

= 340 cm²

∴ Perimeter, diagonal, total surface area, and volume of the cuboid are 92 cm, 3√(21) cm, 340 cm² & 400 cm³.

Example 2:

The lunchbox measures 20 cm long, 10 cm wide, and 5 cm high. what is the total surface area, the lateral surface area of the box?

Solution:

Given that,

Lunchbox length l = 20 cm

Width b = 10 cm

Height h = 5 cm

Total Surface Area of the lunchbox = 2(lb + bh + lh)

= 2(20 x 10 + 10 x 5 + 20 x 5)

= 2(200 + 50 + 100)

= 2(350)

= 700 cm²

Lateral Surface Area of the lunchbox = 2h(l + b)

= 2 x 5(20 + 10)

= 10(30)

= 300 cm²

∴ The total surface area of the lunchbox is 700 cm², lateral surface area is 300 cm².

Example 3:

If the cuboid volume is ∛(126) m³, breadth is 2 m and height is 3 m. Find its length?

Solution:

Given that,

The volume of the cuboid = ∛(126) m³

lbh = ∛(126) m³

l x 2 x 3 = ∛(126)

l x 6 = ∛(126)

l = ∛(126) / 6

l = 21 m

∴ The cuboid length is 21 m.

Example 4:

If the volume of a room is 792 m³ and the area of the floor is 132 m², find the height of the room.

Solution:

Given that,

The volume of a room = 792 m³

Area of the floor = 132 m²

Height of the room = Volume of a room / Area of the floor

= 792/132

= 6 m

Therefore, the height of the room is 6 m.

Conversion of Minutes into Hours Definition, Formula, Examples | How to Convert Min to Hr?

Conversion of Minutes into Hours

Here you can convert minutes to hours easily in a fraction of seconds. We are providing three simple and easy steps that are helpful for the students during their calculations. We already know that 1 hour means 60 minutes. So, divide the number of minutes by 60 to get hours. Get the solved example questions on Conversion Of Minutes Into Hours in the following sections. The formula to convert minutes into hours is the number of minutes/60.

Minutes to Hours Conversion Definition

Conversion of minutes into hours means you need express minutes measurement of time as hours measurement. As we know, both minutes and hours are the unit measurement of the time. One minute is 1/60th of the hour. So, multiply the minutes by (1/60) to get the hours version.

60 minutes = 1 hour

So, 1 minute = 1/60 hour

Ways to Convert Minutes into Hours

We have 3 different and simple ways for conversion of minutes into hours. Those methods with detailed step by step explanation is mentioned below.

Method 1:

  • Make a note of the number of minutes from the question.
  • Multiply the given number of minutes by (1 hour /60 minutes)
  • After performing the multiplication, the product is answer.

Method 2:

  • Observe from the questions, how many minutes are to be converted to hours.
  • We know that 1 hour = 60 minutes, 1 minute = 1/60 hour
  • So, divide minutes by 60 to check the hour conversion of minutes.

Method 3:

  • Get an idea of how many minutes are to be converted into hours.
  • And use the calculator to get the solution.

See More Related Articles:

Solved Examples on Minutes to Hours Conversions

Example 1:

Convert 125 minutes into hours.

Solution:

Given that,

Number of minutes = 125

The formula to convert minutes into hours = Number of minutes/60

So, 125 minutes = 125/60

= 25/12 hour

Therefore, 125 minutes = 25/12 hours.

Example 2:

Convert 60 minutes into hours

Solution:

Given that,

Number of minutes = 60 minutes

The formula to convert minutes into hours = Number of minutes/60

So, 60 minutes = 60/60

= 1 hour
Therefore, 60 minutes = 1 hour

Example 3:

Convert 45 minutes into hours.

Solution:

Given that,

Number of minutes = 45 minutes

We know that,

60 minutes = 1 hour

1 minute = 1/60 hour

So, 45 minutes = 45/60

= 3/4

Therefore, 45 minutes = 3/4 hour

FAQs on Conversion Of Minutes Into Hours

1. How do you convert minutes into hours and minutes?

Just simply divide the number of minutes by 60 to get the solution. The division gives minutes in the form of hours.

2. What is the rule for converting hours to minutes?

To convert the hours into minutes, multiply hours by 60. The time measurement in minutes is equal to hours measurement when it is multiplied by 60.

3. What is the formula to convert minutes into hours?

The simple formula to convert minutes measurement into hours measurement is the number of minutes/60. Because 1 hour = 60 minutes. So, 1 minute = 1/60 hour.

Signed Magnitude Representation of Binary Numbers with Examples | How to Represent Sign Magnitude Form?

Signed Magnitude Representation

In mathematics, every number has a sign. Negative numbers with any base are denoted by a prefix symbol ‘-‘. Binary numbers are the numbers that are expressed in base 2 having two symbols 0 and 1. Generally, the computer uses binary numbers. The sign of numbers in binary form is represented by the first binary digit in the number. Get the definition of signed magnitude representation and convert binary numbers into decimal and solved examples in the below sections. You can also find the difference between signed binary numbers and two’s complement numbers on this page.

Signed Magnitude Representation – Introduction

Every 8-bit binary number has magnitude and symbol which is used to indicate either the magnitude is positive or negative. The symbol defines the magnitude of the number. The sign bit is the left-most bit in the binary number. It is also known as the most significant bit. If the sign bit is 1, then it is a negative number, if the sign bit is 0, then it is a positive number.

The 8-bit binary numbers range from -127 to +127. To know the magnitude of the binary number, convert it into a decimal by following the below-mentioned rules and guidelines.

How to Convert Binary Numbers to Decimal Numbers?

Follow the below-listed steps to convert from a binary number to a decimal number. They are along the lines

  • Let us take any 8-bit binary number.
  • By checking the MSB digit, identify whether the number is positive or negative.
  • Now, take the remaining 7 digits into consideration.
  • Write the number 2 to the power 0 to n from the right side
  • And multiply the 2 power number by the binary number
  • Add all the terms to get the decimal number.

Also, Read:

Signed Magnitude Representation Examples

Example 1:

(10101011)2

Solution:

Given binary number is (10101011)2

The most significant digit is 1. So, the sign is negative

Decimal number = 26 x 0 + 25 x 1 + 24 x 0 + 23 x 1 + 22 x 0 + 21 x 1 + 20 x 1

= 64 x 0 + 32 x 1 + 16 x 0 + 8 x 1 + 4 x 0 + 2 x 1 + 1 x 1
= 32 + 8 + 2 + 1
= 43

Therefore, (10101011)2 = -(43)10

Example 2:

(01111111)2

Solution:

Given binary number is (01111111)2

The most significant digit is 0. So, the sign of the number is positive.

Decimal number = 26 x 1 + 25 x 1 + 24 x 1 + 23 x 1 + 22 x 1 + 21 x 1 + 20 x 1

= 64 x 1 + 32 x 1 + 16 x 1 + 8 x 1 + 4 x 1 + 2 x 1 + 1 x 1

= 64 + 32 + 16 + 8 + 4 + 2 + 1

= 127

Therefore, (01111111) = +(127)10

Example 3:

(01001101)2

Solution:

Given binary number is (01001101)2

The most significant digit is 0. So, the sign of the number is positive.

The decimal form of the number = 26 x 1 + 25 x 0 + 24 x 0 + 23 x 1 + 22 x 1 + 21 x 0 + 20 x 1

= 64 x 1 + 32 x 0 + 16 x 0 + 8 x 1 + 4 x 1 + 2 x 0 + 1 x 1

= 64 + 0 + 0 + 8 + 4 + 0 + 1

= 77

Therefore, (01001101) = +(77)10

Example 4:

(10010000)2

Solution:

Given binary number is (10010000)2

The most significant digit is 1. So, the sign is negative.

The decimal form of the number = 26 x 0 + 25 x 0 + 24 x 1 + 23 x 0 + 22 x 0 + 21 x 0 + 20 x 0

= 64 x 0 + 32 x 0 + 16 x 1 + 8 x 0 + 4 x 0 + 2 x 0 + 1 x 0

= 0 + 0 + 16 + 0 + 0 + 0 + 0

= 16

Therefore, (10010000) = -(16)10

FAQs on Signed Magnitude Representation

1. What is signed magnitude representation?

Sign and magnitude are two parts of a binary 8-bit number. The sign of numbers can be either positive or negative. The left-most digit of the number decides the sign of a decimal number. If the digit is 1, then negative sign, otherwise positive sign.

2. What is MSB?

MSB full form is the most significant bit. In a binary number, the bit at the left most corner is called the MSB, and the bit furthest to the right side is called the least significant bit.

3. Which digit in the binary number represents the sign?

The left-most digit in the binary number represents the sign of the decimal number. So, it is not included in the magnitude part of the number.