Worksheet on Pythagorean Theorem is helpful for the students who are willing to solve the problems based on the right-angled triangle, Pythagorean theorem. If you are preparing for any exam, then you can begin preparation by referring Pythagorean Theorem Worksheet. Make use of these Pythagoras Theorem Questions during practice and perform well in the test. We have covered various types of questions that use Pythagorean Statements. So, Practice all the questions from the worksheet as many times as possible so that you will understand the concept easily.
What is Pythagorean Theorem?
Pythagoras theorem states that “In a right-angled triangle, the square of the hypotenuse is equal to the sum of the squares of other two sides”. The three sides of the right-angled triangle are the perpendicular side, base, and hypotenuse side, where the hypotenuse is the largest side. Pythagorean formula is hypotenuse² = base² +perpendicular_side².
c² = a² + b²
Where a is base side
b is perpendicular side
c is hypotenuse side
How to Solve Problems on Pythagorean Theorem?
Check out the manual procedure in the below sections. Follow these guidelines to solve the Pythagorean theorem.
- Look at all terms in the question.
- Find out which vertex has the right angle.
- Start with those right triangles and apply the Pythagorean theorem.
Also, Read
Question 1:
In ∆ABC right angled at A. If AB = 16 m and BC = 8 cm, then find the length of AC?
Solution:
Given that,
The sides of the right-angled triangle AB = 8 cm, BC = 10 cm
As per the Pythagorean Theorem,
hypotenuse² = base² +perpendicular_side²
BC² = AC² + AB²
AC² = BC² – AB²
AC = √(BC² – AB²)
Substitute AB, BC values in the above formula
AC = √(10² – 8²)
= √(100 – 64)
= √(36)
= 6
Therefore AC = 6 cm.
Question 2:
A ladder 7 m long when set against the wall of the house just reaches a window at a height of 24 m from the ground. How far is the lower end of the ladder from the base of the wall?
Solution:
Let the ladder be AC = 7 m
Let the vertical height reached be BC = 24 m
Let the distance between the foot of the ladder and wall be AB = x meters
By Pythagoras Theorem,
AB² = AC² + BC²
x² = 7² + 24²
x² = 49 + 576
x² = 625
x = 25
Therefore, the foot of the ladder is 25 m away from the wall.
Question 3:
A carpet measures 7 feet long and has a diagonal measurement of 74 square feet. Find the width of the carpet.
Solution:
Given that,
Length of the carpet = 7 feet
Diagonal of the carpet = 74 sq ft
In a rectangle,
diagonal² = length² + width²
width² = diagonal² – length²
= 74 – 7²
= 74 – 49
= 25
width = √(25)
= 5 ft
Therefore, the width of the carpet is 5 ft.
Question 4:
Jim starts driving east for 9 miles, then takes a left turn, and then he drives north for another 40 miles. At the end of driving, what is the distance of a straight line from the starting point?
Solution:
As given in the question,
Driving for east = 9 miles
Driving for north = 40 miles
Let the straight line distance = x
The equation will be
a² + b² = c²
9² + 40² = x²
81 + 1600 = x²
1681 = x²
x = √(1681)
x = 41
Therefore, the straight line distance from the starting point is 41 miles
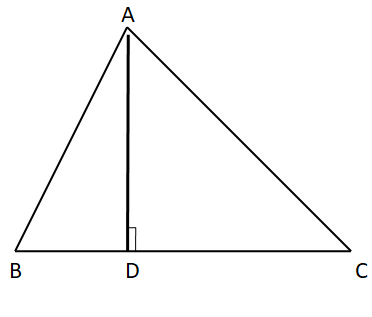
Question 5:
The base of an isosceles triangle is 24 cm and the two equal sides are 37 cm each. Find the altitude AD of the triangle.
Solution:
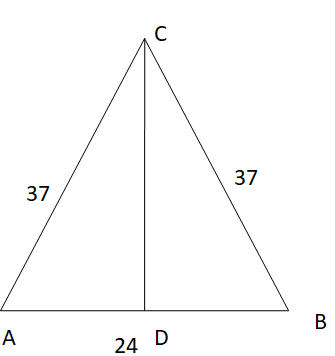
Altitude AD divides the triangle ABC into two equal parts.
By using the pythagorean theorem for △ ADC, △BCD
hypotenuse² = base² + perpendicular_side²
37² = 12² + x²
1369 = 144 + x²
1369 – 144 = x²
x² = 1225
x = √(1225)
x = 35
So, the length of the altitude is 35 cm.
Question 6:
The length of a living room is 2 feet less than twice its width. If the diagonal is 2 feet more than twice the width, find the dimensions of the room?
Solution:
Let the width of the living room = x
Given that,
Length of the living room = 2 feet less than twice its width
= 2x – 2
Diagonal = 2 feet more than twice the width
= 2x + 2
From the given equations
diagonal² = length² + width²
(2x + 2)² = (2x – 2)² + x²
4x² + 8x + 4 = 4x² – 8x + 4 + x²
8x + 8x = 5x² – 4x² + 4 – 4
16x = x²
x = 16
So, the width of the living room is 16 ft
Length of the living room = 2(16) – 2 = 32 – 2 = 30 ft
Diagonal of the living room = 2(16) + 2 = 32 + 2 = 34 ft
Question 7:
A bird was sitting 9 feet from the base of an oak tree and flew 15 feet to reach the top of the tree. How tall is the tree?
Solution:
The distance between bird sitting position and tree is 9 ft
The bird flew 15 ft to reach top of the tree
According to the Pythagorean theorem
c² = a² + b²
15² = 9² + b²
225 = 81 + b²
b² = 225 – 81
b² = 144
b = √(144)
b = 12
Therefore, the height of the tree is 12 ft.
Question 8:
Mary wants to cut across a rectangular lot rather than walk around it. Of the lot is 120 feet long and 50 feet wide. Mary walks diagonally across the lot, how many feet is the short cut?
Solution:
Given that,
Length of the lot = 120 ft
Width of the lot = 50 ft
Let the shortcut distance be x
As per the Pythagorean theorem,
a² + b² = c²
50² + 120² = x²
2500 + 14400 = x²
16900 = x²
x = √(16900)
x = 130
Therefore, 130 ft is the shortcut.