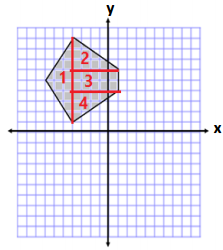
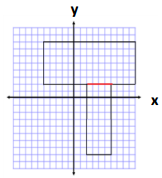
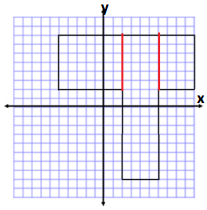
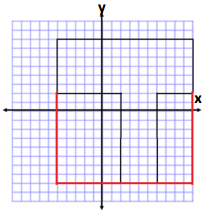
Eureka Math Grade 6 Module 5 Lesson 11 Answer Key

Engage NY Eureka Math Grade 6 Module 5 Lesson 11 Answer Key

Eureka Math Grade 6 Module 5 Lesson 11 Example Answer Key

Example 1.
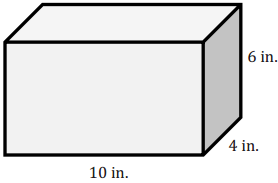
A box with the same dimensions as the prism in the Opening Exercise is used to ship miniature dice whose side lengths have been cut in half. The dice are \(\frac{1}{2}\) in. × \(\frac{1}{2}\) in. × \(\frac{1}{2}\) in. cubes. How many dice of this size can fit in the box?
Eureka Math Grade 6 Module 5 Lesson 11 Example Answer Key 2
Answer:

→ How many cubes could we fit across the length? The width? The height?
Two cubes would fit across a 1-inch length. So, I would need to double the lengths to get the number of cubes. Twenty cubes will fit across the 10-inch length, 8 cubes will fit across the 4 -inch width and 12 cubes will fit across the 6-inch height.

→ How can you use this information to determine the number of \(\frac{1}{2}\) in. × \(\frac{1}{2}\) in. × \(\frac{1}{2}\) in. cubes it takes to fill the box?
I can multiply the number of cubes in length, width, and height.
20 × 8 × 12 = 1,920, so 1,920 of the smaller cubes will fill the box.

→ How many of these smaller cubes can fit into the 1 in. × 1 in. × 1 in. cube?
Two confits across the length, two across the width, and two for the height. 2 × 2 × 2 = 8. Eight smaller cubes confit in the larger cube.

→ How does the number of cubes in this example compare to the number of cubes that would be needed in the
Opening Exercise?
\(\frac{\text { new }}{\text { old }}=\frac{1,920}{240}=\frac{8}{1}\)
If I fill the same box with cubes that are half the length, I need 8 times as many.

→ How is the volume of the box related to the number of cubes that will fit in it?
The volume of the box is of the number of cubes that will fit in it.

→ What is the volume of 1 cube?
V= \(\frac{1}{2}\) in. × \(\frac{1}{2}\) in. × \(\frac{1}{2}\) in.

→ What is the product of the number of cubes and the volume of the cubes? What does this product represent?
1920 × \(\frac{1}{8}\) = 240
The product represents the volume of the original box.

Example 2.
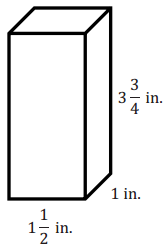
A \(\frac{1}{5}\) in. cube is used to fill the prism. How many in. cubes does it take to fill the prism? What is the volume of the prism? How is the number of cubes related to the volume?
Eureka Math Grade 6 Module 5 Lesson 11 Example Answer Key 3
Answer:

→ How would you determine, or find, the number of cubes that fill the prism?
One method would be to determine the number of cubes that will fit across the length, width, and height. Then, I would multiply. 6 will fit across the length, 4 across the width, and 15 across the height. 6 × 4 × 15 = 360, so 360 cubes will fill the prism.

→ How is the number of cubes and the volume related?
The volume is equal to the number of cubes times the volume of one cube.
The volume of one cube is \(\frac{1}{4}\) in. × \(\frac{1}{4}\) in. × \(\frac{1}{4}\) in. = \(\frac{1}{64}\) in3.

360 cubes × \(\frac{1}{64}\) in3 = \(\frac{360}{64}\) in3 = \(\frac{540}{64}\) in3 =5 \(\frac{5}{8}\)in3

→ What other method can be used to determine the volume?
V = l w h
V = (1 \(\frac{1}{2}\) in.) (1 in.) (3 \(\frac{3}{4}\) in.)
V = \(\frac{3}{2}\) in. × \(\frac{1}{1}\) in. × \(\frac{15}{4}\) in.
V = \(\frac{45}{8}\) in3 = 5 \(\frac{5}{8}\) in3

→ Would any other size cubes fit perfectly inside the prism with no space left over?
We would not be able to use cubes with side lengths of \(\frac{1}{2}\) in., \(\frac{1}{3}\) in., or \(\frac{2}{3}\) in. because there would be spaces left over. However, we could use a cube with a side length of \(\frac{1}{8}\) in. without having spaces left over.

Eureka Math Grade 6 Module 5 Lesson 11 Exercise Answer Key

Opening Exercise:

Exercise 1.
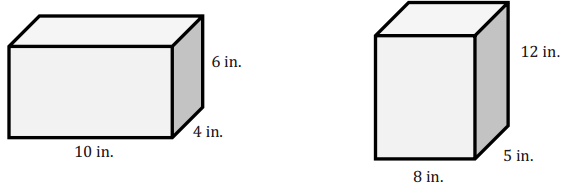
Which prism holds more 1 in. × 1 in. × 1 in. cubes? How many more cubes does the prism hold?
Eureka Math Grade 6 Module 5 Lesson 11 Exercise Answer Key 1
Answer:
Students discuss their solutions with a partner.

→ How many 1 in. × 1 in. × 1 in. cubes can fit across the bottom of the first rectangular prism?
Answer:
40 cubes can fit across the bottom.

→ How did you determine this number?
Answer:
Answers will vary. I determined how many cubes could fill the bottom layer of the prism and then decided how many layers were needed.

Students who are English language learners may need a model of what “layers” means in this context.

→ How many layers of 1 in. × 1 in. × 1 in. cubes can fit inside the rectangular prism?
There are 6 inches in the height; therefore, 6 layers of cubes can fit inside.

→ How many 1 in. × 1 in. × 1 in. cubes can fit across the bottom of the second rectangular prism?
40 cubes can fit across the bottom.

→ How many layers do you need?
I need 12 layers because the prism is 12 in. tall.

→ Which rectangular prism can hold more cubes?
The second rectangular prism can holds more cubes.

→ How did you determine this?
Both rectangular prisms hold the same number of cubes in one layer, but the second rectangular prism has more layers.

→ How many more layers does the second rectangular prism hold?
It holds 6 more layers.

→ How many more cubes does the second rectangular prism hold?
The second rectangular prism has 6 more layers than the first, with 40 cubes in each layer.
6 × 40 = 240, so the second rectangular prism holds 240 more cubes than the first.

> What other ways can you determine the volume of a rectangular prism?
We can also use the formula V = l. w . h.

Exercises:

Exercise 1.
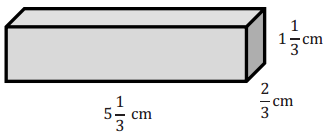
Use the prism to answer the following questions.
Eureka Math Grade 6 Module 5 Lesson 11 Exercise Answer Key 4

a. Calculate the volume.
Answer:
Eureka Math Grade 6 Module 5 Lesson 11 Exercise Answer Key 5

b. If you have to fill the prism with cubes whose side lengths are less than 1 cm, what size would be best?
Answer:
The best choice would be a cube with side lengths of \(\frac{1}{3}\) cm.

c. How many of the cubes would fit in the prism?
Answer:
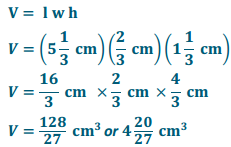
16 × 2 × 4 = 128, so 128 cubes will fit in the prism.

d. Use the relationship between the number of cubes and the volume to prove that your volume calculation Is correct.
Answer:
The volume of one cube would be \(\frac{1}{3}\) cm × \(\frac{1}{3}\)cm × \(\frac{1}{3}\) cm = \(\frac{1}{27}\) cm3

Since there are 128 cubes, the volume would be 128 × \(\frac{1}{27}\) cm3 = \(\frac{128}{27}\) cm3 or 4\(\frac{20}{27}\) cm3.

Exercise 2.
Calculate the volume of the following rectangular prisms.

a. Eureka Math Grade 6 Module 5 Lesson 11 Exercise Answer Key 6
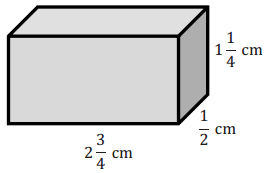
Answer:
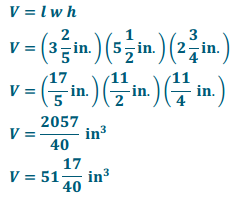
Eureka Math Grade 6 Module 5 Lesson 11 Exercise Answer Key 7

b. Eureka Math Grade 6 Module 5 Lesson 11 Exercise Answer Key 8
Answer:
Eureka Math Grade 6 Module 5 Lesson 11 Exercise Answer Key 9

Exercise 3.
A toy company is packaging its toys to be shipped. Each small toy is placed inside a cube-shaped box with side lengths of \(\frac{1}{2}\) in. These smaller boxes are then placed into a larger box with dimensions of 12 in. × 4\(\frac{1}{2}\) in. × 3\(\frac{1}{2}\) in.

a. What is the greatest number of small toy boxes that can be packed into the larger box for shipping?
Answer:
24 × 9 × 7 = 1,512, so 1,512 toys can be packed into the larger box.

b. Use the number of small toy boxes that can be shipped in the larger box to help determine the volume of the shipping box.
Answer:
One small box would have a volume of \(\frac{1}{2}\) in. × \(\frac{1}{2}\) in. × \(\frac{1}{2}\) in. = \(\frac{1}{8}\) in3.
Now, I multiply the number of cubes by the volume of the cube.
1,512 × \(\frac{1}{8}\) in3 = \(\frac{1512}{8}\) in3 = 189 in3

Exercise 4.
A rectangular prism with a volume of 8 cubic units is filled with cubes twice: once with cubes with side lengths of \(\frac{1}{2}\) unit and once with cubes with side lengths of \(\frac{1}{3}\) unit.

a. How many more of the cubes with \(\frac{1}{3}\) unit side lengths than cubes with \(\frac{1}{2}\) unit side lengths are needed to fill the prism?
Answer:
There are 8 cubes with \(\frac{1}{2}\) unit side lengths in 1 cubic unit because the volume of one cube is \(\frac{1}{8}\) cubic unit. Since we have 8 cubic units, we would have 64 total cubes with \(\frac{1}{2}\) unit side lengths because 8 × 8 = 64.

There are 27 cubes with \(\frac{1}{3}\) unit side lengths in 1 cubic unit because the volume of one cube is \(\frac{1}{27}\) cubic units. Since we have 8 cubic units, we would have 216 total cubes with \(\frac{1}{3}\) unit side lengths because 8 × 27 = 216. 216 – 64 = 152, so 152 more cubes with \(\frac{1}{3}\) unit side lengths are needed to fill the prism.

b. Why does it take more cubes with \(\frac{1}{3}\) unit side lengths to fill the prism than it does with cubes with \(\frac{1}{2}\) unit side lengths?
Answer:
\(\frac{1}{3}\) < \(\frac{1}{2}\). The side length is shorter for the cube with a \(\frac{1}{3}\) unit side length, so it takes more to fill the rectangular prism.

Exercise 5.
Calculate the volume of the rectangular prism. Show two different methods for determining the volume.
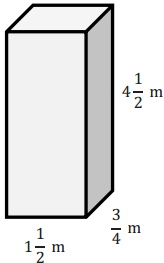
Eureka Math Grade 6 Module 5 Lesson 11 Exercise Answer Key 10
Answer:
Method 1:
Eureka Math Grade 6 Module 5 Lesson 11 Exercise Answer Key 11

Method 2:
Fill the rectangular prism with cubes that are \(\frac{1}{4}\) m × \(\frac{1}{4}\) m × \(\frac{1}{4}\) m.
The volume of each cube is \(\frac{1}{64}\) m3.
We would have 6 cubes across the length, 3 cubes across the width, and 18 cubes across the height.
6 × 3 × 18 = 324, so the rectangular prism could be filled with 324 cubes with \(\frac{1}{4}\) m side lengths.
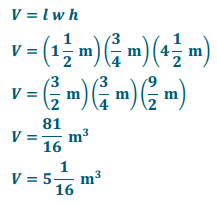
324 × \(\frac{1}{64}\) m3 = 5 \(\frac{1}{16}\) m3.

Eureka Math Grade 6 Module 5 Lesson 11 Problem Set Answer Key

Question 1.
Answer the following questions using this rectangular prism:
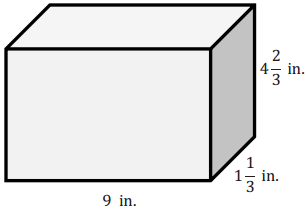
Eureka Math Grade 6 Module 5 Lesson 11 Problem Set Answer Key 12

a. What is the volume of the prism?
Answer:
V = l w h
V = (9 in.) (1 \(\frac{1}{3}\) in.) (4 \(\frac{2}{3}\)in.)
V = ( \(\frac{9}{1}\) in.) (\(\frac{4}{3}\) in.) (\(\frac{14}{3}\) in.)
V = \(\frac{504}{9}\) in3
V = 56 in3.

b. Linda fills the rectangular prism with cubes that have side lengths of \(\frac{1}{3}\) in. How many cubes does she need to fill the rectangular prism?
Answer:
She needs 27 across by 4 wide and 14 high.
Number of cubes = 27 × 4 × 14 = 1,512.
Linda needs 512 cubes with \(\frac{1}{3}\) in. side lengths to fill the rectangular prism.

c. How is the number of cubes related to the volume?
Answer:
56 × 27 = 1,512
The number of cubes needed is 27 times larger than the volume.

d. Why is the number of cubes needed different from the volume?
Answer:
Because the cubes are not each 1 in., the volume is different from the number of cubes. However, I could multiply the number of cubes by the volume of one cube and still get the original volume.

e. Should Linda try to fill this rectangular prism with cubes that are \(\frac{1}{2}\) in. long on each side? Why or why not?
Answer:
Because some of the lengths are \(\frac{1}{3}\) in. and some are \(\frac{2}{3}\) in., it would not be possible to use side lengths of \(\frac{1}{2}\) in. to fill the prism.

Question 2.
Calculate the volume of the following prisms.

a. Eureka Math Grade 6 Module 5 Lesson 11 Problem Set Answer Key 13
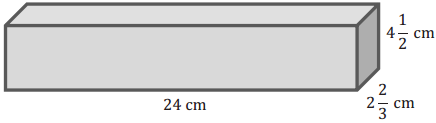
Answer:
V = l w h
V = (24 cm) (2\(\frac{2}{3}\) cm) (4\(\frac{1}{2}\) cm)
V = (24cm) (\(\frac{8}{3}\) cm) (\(\frac{9}{2}\) cm)
V = \(\frac{1728}{6}\) cm3
V = 288 cm3

b. Eureka Math Grade 6 Module 5 Lesson 11 Problem Set Answer Key 14
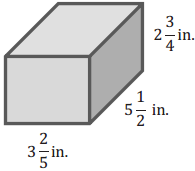
Answer:
Eureka Math Grade 6 Module 5 Lesson 11 Problem Set Answer Key 15

Question 3.
A rectangular prism with a volume of 12 cubic units is filled with cubes twice: once with cubes with \(\frac{1}{2}\) unit side lengths and once with cubes with \(\frac{1}{3}\)-unit side lengths.

a. How many more of the cubes with \(\frac{1}{3}\)-unit side lengths than cubes with \(\frac{1}{2}\)-unit side lengths are needed to fill the prism?
Answer:
There are 8 cubes with \(\frac{1}{2}\)-unit side lengths in 1 cubic unit because the volume of one cube is \(\frac{1}{8}\) cubic unit. Since we have 12 cubic units, we would have 96 total cubes with \(\frac{1}{2}\)-unit side lengths because 12 × 8 = 96.

There are 27 cubes with \(\frac{1}{3}\)-unit side lengths in 1 cubic unit because the volume of one cube is \(\frac{1}{27}\) cubic unit. Since we have 12 cubic units, we would have 324 total cubes with \(\frac{1}{3}\)-unit side lengths because 12 × 27 = 324.

324 – 96 = 228, so there are 228 more cubes with \(\frac{1}{3}\)-unit side lengths needed than there are cubes with \(\frac{1}{2}\)-unit side lengths needed.

b. Finally, the prism is filled with cubes whose side lengths are \(\frac{1}{4}\) unit. How many \(\frac{1}{4}\) unit cubes would it take to fill the prism?
Answer:
There are 64 cubes with \(\frac{1}{4}\)-unit side lengths in 1 cubic unit because the volume of one cube is \(\frac{1}{64}\) cubic unit.
Since there are 12 cubic units, we would have 768 total cubes with side lengths of \(\frac{1}{4}\) unit because 12 × 64 = 768.

Question 4.
A toy company is packaging its toys to be shipped. Each toy is placed inside a cube-shaped box with side lengths of 3\(\frac{1}{2}\) in. These smaller boxes are then packed into a larger box with dimensions of 14 in. × 7 in. × 3\(\frac{1}{2}\) in.

a. What is the greatest number of toy boxes that can be packed into the larger box for shipping?
Answer:
4 × 2 × 1 = 8, so 8 toy boxes can be packed into the larger box for shipping.

b. Use the number of toy boxes that can be shipped in the large box to determine the volume of the shipping box.
Answer:
One small box would haveavolume of 3\(\frac{1}{2}\) in. × 3\(\frac{1}{2}\) in. × 3\(\frac{1}{2}\) in. = 42\(\frac{7}{8}\) in3.
Now, I will multiply the number of cubes by the volume of the cube. 8 × 42\(\frac{7}{8}\) in3 = 343 in3

Question 5.
A rectangular prism has a volume of 34.224 cubic meters. The height of the box is 3. 1 meters, and the length is 2.4 meters.

a. Write an equation that relates the volume to the length, width, and height. Let w represent the width, in meters.
Ans;
34.224 = (3.1) (2. 4)w

b. Solve the equation.
Answer:
34.224 = 7.44 w
w = 4.6
The width is 4.6 m.

Eureka Math Grade 6 Module 5 Lesson 11 Exit Ticket Answer Key

Question 1.
Calculate the volume of the rectangular prism using two different methods. Label your solutions Method 1 and Method 2.
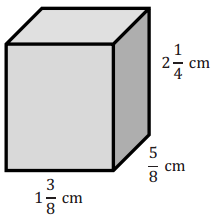
Eureka Math Grade 6 Module 5 Lesson 11 Exit Ticket Answer Key 16
Answer:
Method 1:
V = l w h
V = (1\(\frac{3}{8}\) cm) (\(\frac{5}{8}\) cm) (2\(\frac{1}{4}\) cm)

V = \(\frac{11}{8}\) cm × \(\frac{5}{8}\) cm × \(\frac{9}{4}\) cm

V = \(\frac{495}{256}\) cm3

Method 2:
Fill shape with \(\frac{1}{8}\) cm cubes.
11 × 5 × 18 = 990, so 990 cubes could be used to fill the prism.
Each cube has a volume of \(\frac{1}{8}\) cm × \(\frac{1}{8}\) cm × \(\frac{1}{8}\) cm = \(\frac{1}{512}\) cm3

V = 990 × \(\frac{1}{512}\) cm3 = \(\frac{990}{512}\) cm3 = \(\frac{495}{256}\) cm3

Eureka Math Grade 6 Module 5 Lesson 11 Multiplication of Fractions II Answer Key

Multiplication of Fractions II – Round 1:

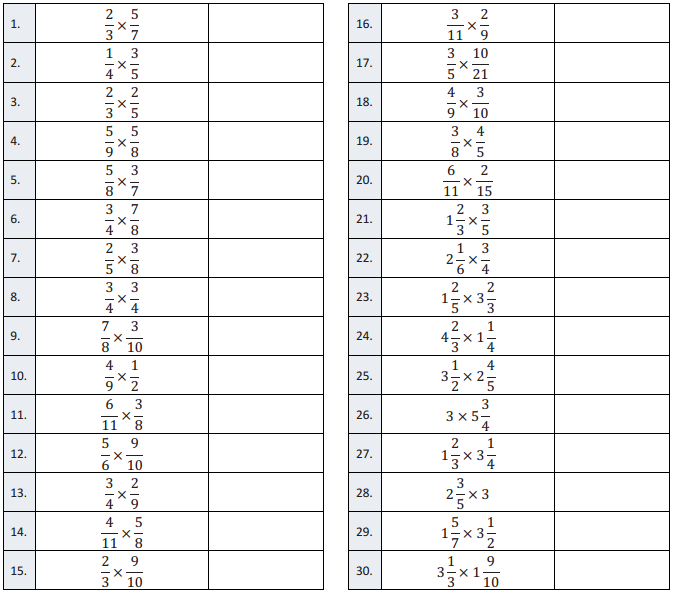
Directions: Determine the product of the fractions and simplify.
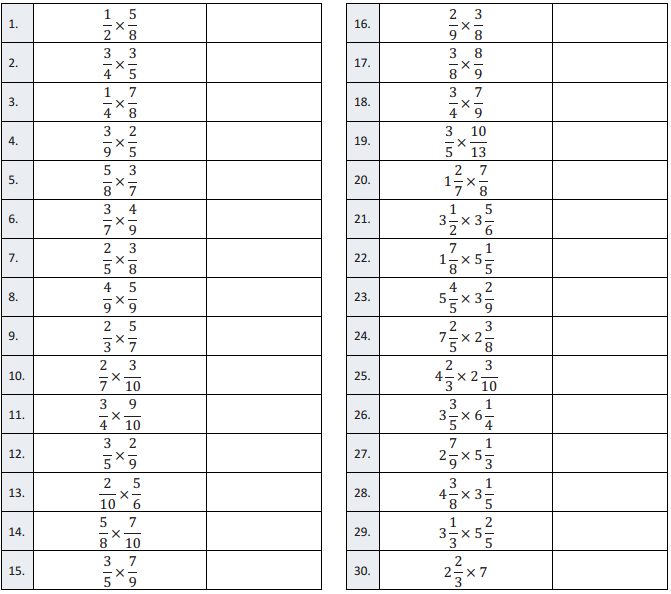
Eureka Math Grade 6 Module 5 Lesson 11 Multiplication of Fractions II Answer Key 17

Eureka Math Grade 6 Module 5 Lesson 11 Multiplication of Fractions II Answer Key 18

Question 1.
\(\frac{1}{2}\) × \(\frac{5}{8}\)
Answer:
\(\frac{5}{16}\)

Question 2.
\(\frac{3}{4}\) × \(\frac{3}{5}\)
Answer:
\(\frac{9}{20}\)

Question 3.
\(\frac{1}{4}\) × \(\frac{7}{8}\)
Answer:
\(\frac{7}{32}\)

Question 4.
\(\frac{3}{9}\) × \(\frac{2}{5}\)
Answer:
\(\frac{6}{45}\) = \(\frac{2}{15}\)

Question 5.
\(\frac{5}{8}\) × \(\frac{3}{7}\)
Answer:
\(\frac{15}{56}\)

Question 6.
\(\frac{3}{7}\) × \(\frac{4}{9}\)
Answer:
\(\frac{12}{63}\) = \(\frac{4}{21}\)

Question 7.
\(\frac{2}{5}\) × \(\frac{3}{8}\)
Answer:
\(\frac{6}{40}\) = \(\frac{3}{20}\)

Question 8.
\(\frac{4}{9}\) × \(\frac{5}{9}\)
Answer:
\(\frac{20}{81}\)

Question 9.
\(\frac{2}{3}\) × \(\frac{5}{7}\)
Answer:
\(\frac{10}{21}\)

Question 10.
\(\frac{2}{7}\) × \(\frac{3}{10}\)
Answer:
\(\frac{6}{70}\) = \(\frac{3}{35}\)

Question 11.
\(\frac{3}{4}\) × \(\frac{9}{10}\)
Answer:
\(\frac{27}{40}\)

Question 12.
\(\frac{3}{5}\) × \(\frac{2}{9}\)
Answer:
\(\frac{6}{45}\) = \(\frac{2}{15}\)

Question 13.
\(\frac{2}{10}\) × \(\frac{5}{6}\)
Answer:
\(\frac{10}{60}\) = \(\frac{1}{6}\)

Question 14.
\(\frac{5}{8}\) × \(\frac{7}{10}\)
Answer:
\(\frac{35}{80}\) = \(\frac{7}{16}\)

Question 15.
\(\frac{3}{5}\) × \(\frac{7}{9}\)
Answer:
\(\frac{21}{45}\) = \(\frac{7}{15}\)

Question 16.
\(\frac{2}{9}\) × \(\frac{3}{8}\)
Answer:
\(\frac{6}{72}\) = \(\frac{1}{12}\)

Question 17.
\(\frac{3}{8}\) × \(\frac{8}{9}\)
Answer:
\(\frac{24}{72}\) = \(\frac{1}{3}\)

Question 18.
\(\frac{3}{4}\) × \(\frac{7}{9}\)
Answer:
\(\frac{21}{36}\) = \(\frac{7}{12}\)

Question 19.
\(\frac{3}{5}\) × \(\frac{10}{13}\)
Answer:
\(\frac{30}{65}\) = \(\frac{6}{13}\)

Question 20.
1 \(\frac{2}{7}\) × \(\frac{7}{8}\)
Answer:
\(\frac{63}{56}\) = 1 \(\frac{1}{8}\)

Question 21.
3 \(\frac{1}{2}\) × 3 \(\frac{5}{6}\)
Answer:
\(\frac{161}{12}\) = 13 \(\frac{5}{12}\)

Question 22.
\(\frac{1}{4}\) × \(\frac{1}{4}\)
Answer:
\(\frac{1}{4}\)

Question 23.
1 \(\frac{7}{8}\) × 5 \(\frac{1}{5}\)
Answer:
\(\frac{390}{40}\) = 9 \(\frac{3}{4}\)

Question 24.
7 \(\frac{2}{5}\) × 2 \(\frac{3}{8}\)
Answer:
\(\frac{703}{40}\) = 17 \(\frac{23}{40}\)

Question 25.
4 \(\frac{2}{3}\) × 2 \(\frac{3}{10}\)
Answer:
\(\frac{322}{30}\) = 10 \(\frac{11}{15}\)

Question 26.
3 \(\frac{3}{5}\) × 6 \(\frac{1}{4}\)
Answer:
\(\frac{450}{20}\) = 22 \(\frac{1}{2}\)

Question 27.
2 \(\frac{7}{9}\) × 5 \(\frac{1}{3}\)
Answer:
\(\frac{400}{27}\) = 14 \(\frac{22}{27}\)

Question 28.
4 \(\frac{3}{8}\) × 3 \(\frac{1}{5}\)
Answer:
\(\frac{560}{40}\) = 4

Question 29.
3 \(\frac{1}{3}\) × 5 \(\frac{2}{5}\)
Answer:
\(\frac{270}{15}\) = 18 \(\frac{2}{3}\)

Question 30.
2 \(\frac{2}{3}\) × 7
Answer:
\(\frac{56}{3}\) = 18 \(\frac{2}{3}\)

Multiplication of Fractions II – Round 2:

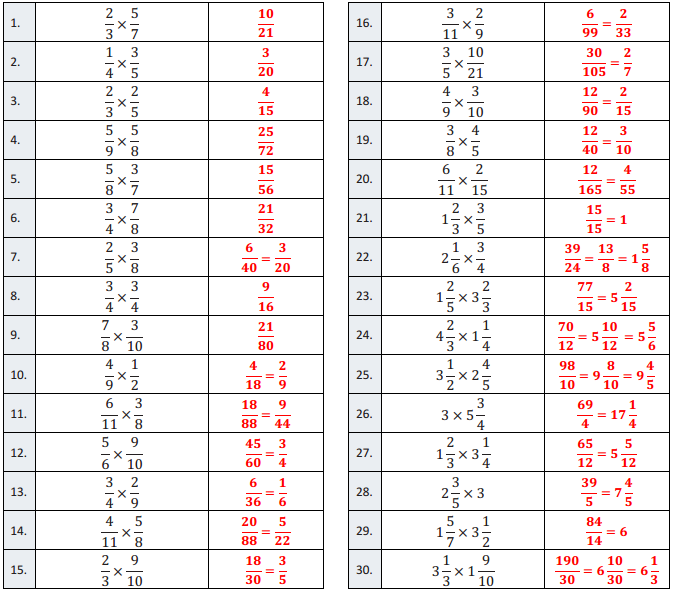
Directions: Determine the product of the fractions and simplify.
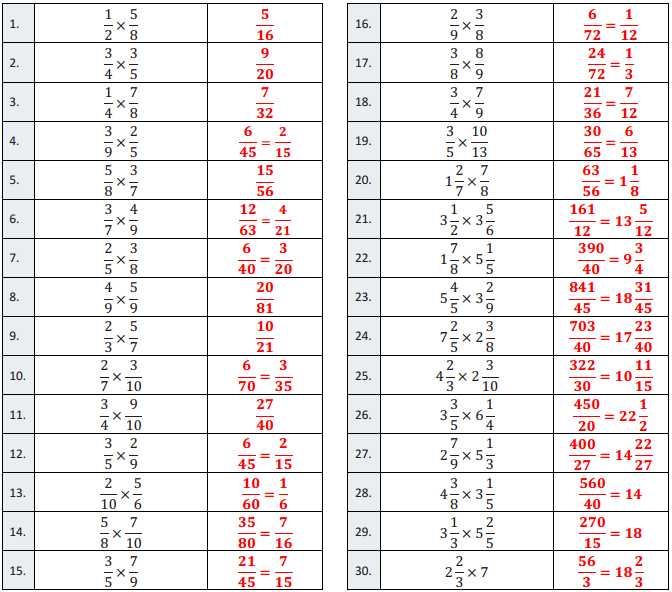
Eureka Math Grade 6 Module 5 Lesson 11 Multiplication of Fractions II Answer Key 19

Eureka Math Grade 6 Module 5 Lesson 11 Multiplication of Fractions II Answer Key 20

Question 1.
\(\frac{2}{3}\) × \(\frac{5}{7}\)
Answer:
\(\frac{10}{21}\)

Question 2.
\(\frac{1}{4}\) × \(\frac{3}{5}\)
Answer:
\(\frac{3}{20}\)

Question 3.
\(\frac{2}{3}\) × \(\frac{2}{5}\)
Answer:
\(\frac{4}{15}\)

Question 4.
\(\frac{5}{9}\) × \(\frac{5}{8}\)
Answer:
\(\frac{25}{72}\)

Question 5.
\(\frac{5}{8}\) × \(\frac{3}{7}\)
Answer:
\(\frac{15}{56}\)

Question 6.
\(\frac{3}{4}\) × \(\frac{7}{8}\)
Answer:
\(\frac{21}{32}\)

Question 7.
\(\frac{2}{5}\) × \(\frac{3}{8}\)
Answer:
\(\frac{6}{40}\) = \(\frac{3}{20}\)

Question 8.
\(\frac{3}{4}\) × \(\frac{3}{4}\)
Answer:
\(\frac{9}{16}\)

Question 9.
\(\frac{7}{8}\) × \(\frac{3}{10}\)
Answer:
\(\frac{21}{80}\)

Question 10.
\(\frac{4}{9}\) × \(\frac{1}{2}\)
Answer:
\(\frac{4}{18}\) = \(\frac{2}{9}\)

Question 11.
\(\frac{6}{11}\) × \(\frac{3}{8}\)
Answer:
\(\frac{18}{88}\) = \(\frac{9}{44}\)

Question 12.
\(\frac{5}{6}\) × \(\frac{9}{10}\)
Answer:
\(\frac{45}{60}\) = \(\frac{3}{4}\)

Question 13.
\(\frac{3}{4}\) × \(\frac{2}{9}\)
Answer:
\(\frac{6}{36}\) = \(\frac{1}{6}\)

Question 14.
\(\frac{4}{11}\) × \(\frac{5}{8}\)
Answer:
\(\frac{20}{88}\) = \(\frac{5}{22}\)

Question 15.
\(\frac{2}{3}\) × \(\frac{9}{10}\)
Answer:
\(\frac{18}{30}\) = \(\frac{3}{5}\)

Question 16.
\(\frac{3}{11}\) × \(\frac{2}{9}\)
Answer:
\(\frac{6}{99}\) = \(\frac{2}{33}\)

Question 17.
\(\frac{3}{5}\) × \(\frac{10}{21}\)
Answer:
\(\frac{30}{105}\) = \(\frac{2}{7}\)

Question 18.
\(\frac{4}{9}\) × \(\frac{3}{10}\)
Answer:
\(\frac{12}{90}\) = \(\frac{2}{15}\)

Question 19.
\(\frac{3}{8}\) × \(\frac{4}{5}\)
Answer:
\(\frac{12}{40}\) = \(\frac{3}{10}\)

Question 20.
\(\frac{6}{11}\) × \(\frac{2}{15}\)
Answer:
\(\frac{12}{165}\) = \(\frac{4}{55}\)

Question 21.
1 \(\frac{2}{3}\) × \(\frac{3}{5}\)
Answer:
\(\frac{15}{15}\) = 1

Question 22.
2 \(\frac{1}{6}\) × \(\frac{3}{4}\)
Answer:
\(\frac{39}{24}\) = \(\frac{13}{8}\) = 1 \(\frac{5}{8}\)

Question 23.
1 \(\frac{2}{5}\) × 3 \(\frac{2}{3}\)
Answer:
\(\frac{77}{15}\) = 5 \(\frac{2}{15}\)

Question 24.
4 \(\frac{2}{3}\) × 1 \(\frac{1}{4}\)
Answer:
\(\frac{70}{12}\) = 5 \(\frac{10}{12}\) = 5 \(\frac{5}{6}\)

Question 25.
3 \(\frac{1}{2}\) × 2 \(\frac{4}{5}\)
Answer:
\(\frac{98}{10}\) = 9 \(\frac{8}{10}\) = 9 \(\frac{4}{5}\)

Question 26.
3 × 5 \(\frac{3}{4}\)
Answer:
\(\frac{69}{4}\) = 17 \(\frac{1}{4}\)

Question 27.
1 \(\frac{2}{3}\) × 3 \(\frac{1}{4}\)
Answer:
\(\frac{65}{12}\) = 5 \(\frac{5}{12}\)

Question 28.
2 \(\frac{3}{5}\) × 3
Answer:
\(\frac{39}{5}\) = 7 \(\frac{4}{5}\)

Question 29.
1 \(\frac{5}{7}\) × 3 \(\frac{1}{2}\)
Answer:
\(\frac{84}{14}\) = 6

Question 30.
3 \(\frac{1}{3}\) × 1 \(\frac{9}{10}\)
Answer:
\(\frac{190}{30}\) = 6 \(\frac{10}{30}\) = 6 \(\frac{1}{3}\)
Eureka Math Grade 6 Module 5 Lesson 10 Answer Key

Engage NY Eureka Math Grade 6 Module 5 Lesson 10 Answer Key

Eureka Math Grade 6 Module 5 Lesson 10 Exercise Answer Key

Opening Exercise:

Question a.
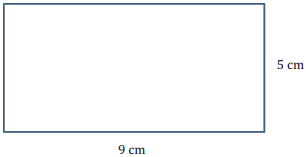
Find the area and perimeter of this rectangle:
Eureka Math Grade 6 Module 5 Lesson 10 Exercise Answer Key 1
Answer:
A = bh = 9 cm × 5 cm = 45 cm2
P = 9 cm + 9 cm + 5 cm + 5 cm = 28 cm

Question b.
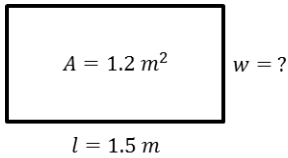
Find the width of this rectangle. The area is 1.2 m2, and the length is 1.5 m.
Eureka Math Grade 6 Module 5 Lesson 10 Exercise Answer Key 2
Answer:
A = l × w
1.2 m2 = 1.5 m × w
\(\frac{1.2 m^{2}}{1.5 m}\) = \(\frac{1.5 \mathrm{~m} \times \mathrm{w}}{1.5 \mathrm{~m}}\)
0.8 m = w

Eureka Math Grade 6 Module 5 Lesson 10 Example Answer Key

Example: Student Desks or Tables

Question 1.
Measure the dimensions of the top of your desk.
Answer:

Question 2.
How do you find the area of the top of your desk?
Answer:

Question 3.
How do you find the perimeter?
Answer:

Question 4.
Record these on your paper in the appropriate column.
Answer:

Exploratory Challenge:

Question 1.
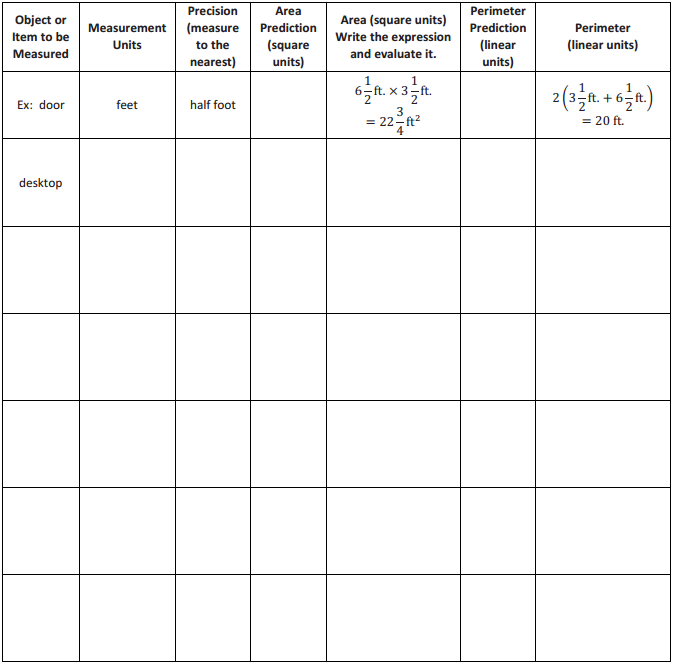
Estimate and predict the area and perimeter of each object. Then measure each object, and calculate both the area and perimeter of each.
Eureka Math Grade 6 Module 5 Lesson 10 Example Answer Key 3
Answer:

Optional Challenge:
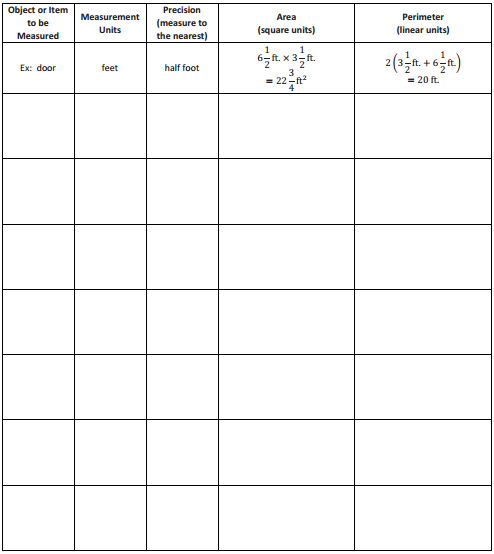
Eureka Math Grade 6 Module 5 Lesson 10 Example Answer Key 4
Answer:

Eureka Math Grade 6 Module 5 Lesson 10 Problem Set Answer Key

Question 1.
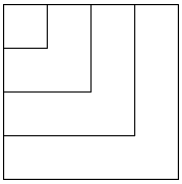
How is the length of the side of a square related to its area and perimeter? The diagram below shows the first four squares stacked on top of each other with their upper left-hand corners lined up. The length of one side of the smallest square is 1 foot.
Eureka Math Grade 6 Module 5 Lesson 10 Problem Set Answer Key 5

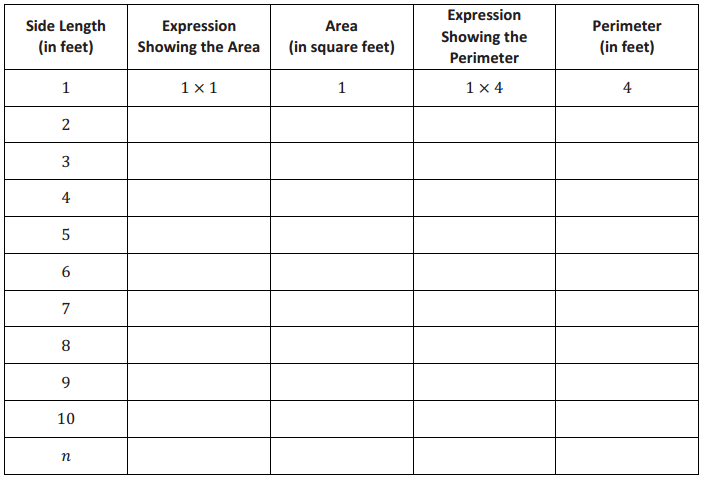
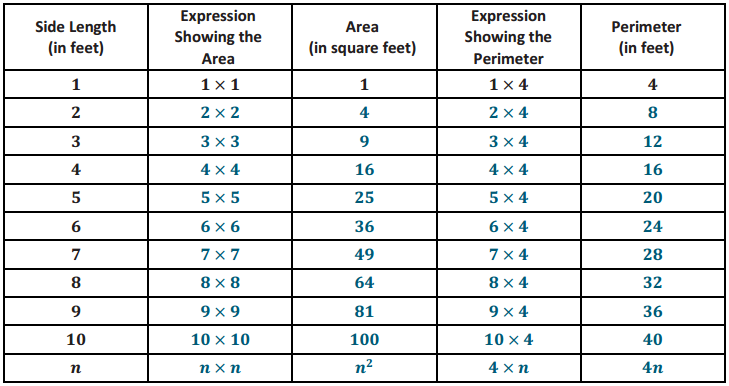
a. Complete this chart calculating area and perimeter for each square.
Eureka Math Grade 6 Module 5 Lesson 10 Problem Set Answer Key 6
Answer:
Eureka Math Grade 6 Module 5 Lesson 10 Problem Set Answer Key 7

b. In a square, which numerical value is greater, the area or the perimeter?
Answer:
It depends. For side length less than 4 feet, perimeter is greater; however, for side length greater than 4 feet, area is greater.

c. When is the numerical value of a square’s area (in square units) equal to Its perimeter (in units)?
Answer:
When the side length is exactly 4 feet.

d. Why is this true?
Answer:
n2 = 4n is only true when n = 4.

Question 2.
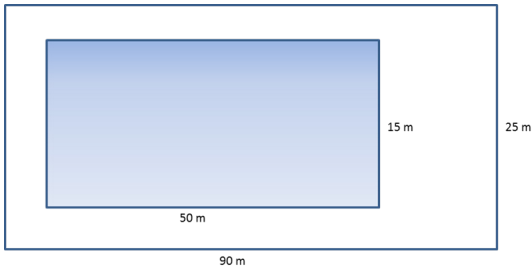
This drawing shows a school pool. The walkway around the pool needs special non skid strips installed but only at the edge of the pool and the outer edges of the walkway.
Eureka Math Grade 6 Module 5 Lesson 10 Problem Set Answer Key 8

a. Find the length of nonskid strips that is needed for the job.
Answer:
50 m+ 50 m + 15 m + 15 m + 90 m + 90 m + 25 m + 25 m = 360 m

b. The nonskid strips are sold only in rolls of 50 m. How many rolls need to be purchased for the job?
Answer:
360 m ÷ 50 \(\frac{\mathrm{m}}{\text { roll }}\) = 7.2 rolls
Therefore, 8 rolls need to be purchased.

Question 3.
A homeowner called in a painter to paint the walls and ceiling of one bedroom. His bedroom is 18 ft. long, 12 ft. wide, and 8 ft. high. The room has two doors, each 3 ft. by 7 ft., and three windows each 3 ft. by 5 ft. The doors and windows will not be painted. A gallon of paint can cover 300 ft2. A hired painter claims he needs a minimum of 4 gallons. Show that his estimate is too high.
Answer:
Area of 2 long walls:        2(18 ft. × 8 ft.) = 288 ft2
Area of 2 short walls:       2(12 ft. × 8 ft.) = 192 ft2
Area of ceiling:                18 ft. × 12 ft. = 216 ft2
Area of2 doors:                2(3 ft. × 7 ft.) 42 ft2
Area of 3 windows:          3(3 ft. × 5 ft.) = 45 ft2
Area to be painted:          (288 ft2 + 192 ft2 + 216 ft2) – (42 ft2 + 45 ft22) = 609 ft2
Gallons of point needed:  609 + 300 = 2.03

The painter will need a little more than 2 gallons. The pointer’s estimate for how much paint Is necessary was too high.

Question 4.
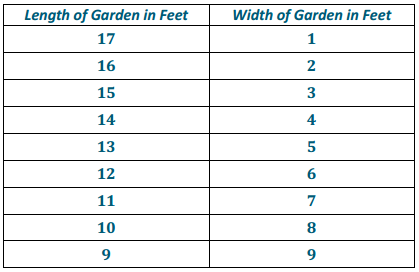
Theresa won a gardening contest and was awarded a roll of deer-proof fencing. The fencing is 36 feet long. She and her husband, John, discuss how to best use the fencing to make a rectangular garden. They agree that they should only use whole numbers of feet for the length and width of the garden.

a. What are all of the possible dimensions of the garden?
Answer:
Eureka Math Grade 6 Module 5 Lesson 10 Problem Set Answer Key 9

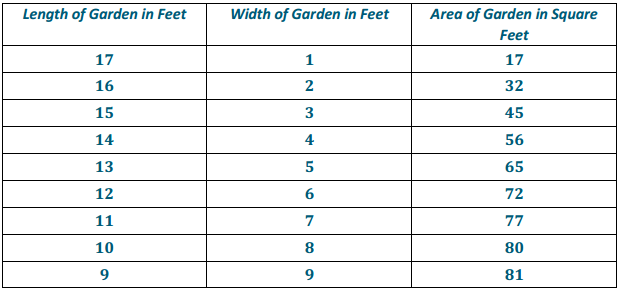
b. Which plan yields the maximum area for the garden? Which plan yields the minimum area?
Answer:
Eureka Math Grade 6 Module 5 Lesson 10 Problem Set Answer Key 10
The 9 ft. by 9 ft. garden would have the maximum area (81 ft2), while the 17 ft. by 1 ft. garden would have only 17 ft2 of garden space.

Question 5.
Write and then solve the equation to find the missing value below.
Eureka Math Grade 6 Module 5 Lesson 10 Problem Set Answer Key 11
Answer:
A = l × w
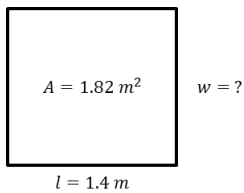
182 m2 = 1.4m × w
\(\frac{1.82 \mathrm{~m}^{2}}{1.4 \mathrm{~m}}\) = w
1.3 m = w

Question 6.
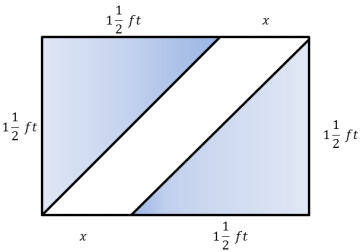
Challenge: This is a drawing of the flag of the Republic of the Congo. The area of this flag is 3\(\frac{3}{4}\) ft2.
Eureka Math Grade 6 Module 5 Lesson 10 Problem Set Answer Key 12

a. Using the area formula, tell how you would determine the value of the base. This figure is not drawn to scale.
Answer:
A = bh
A ÷ h = b
3\(\frac{3}{4}\) ft2 ÷ 1\(\frac{1}{2}\)ft. = b
2\(\frac{1}{2}\) ft. = b

b. Using what you found in part (a), determine the missing value of the base.
Ans:
2\(\frac{1}{2}\) ft. = 1\(\frac{1}{2}\) ft. + x
1 ft. = x

Eureka Math Grade 6 Module 5 Lesson 10 Exit Ticket Answer Key

Question 1.
The local school is building a new playground. This plan shows the part of the playground that needs to be framed with wood for the swing set. The unit of measure is feet. Determine the number of feet of wood needed to frame the area.
Eureka Math Grade 6 Module 5 Lesson 10 Exit Ticket Answer Key 13
Answer:
Perimeter: 10 ft. + 6 ft. + 6 ft. + 3 ft. + 3 ft. + 8 ft. + 8 ft. + 4 ft. = 48 ft.

Question 2.
The school wants to fill the area enclosed with wood with mulch for safety. Determine the number of square feet that needs to be covered by the mulch.
Answer:
Eureka Math Grade 6 Module 5 Lesson 10 Exercise Answer Key 1
Area of Left Rectangle = bh = (6 ft. x 10 ft.) = 60 ft2
Area of Right Rectangle = bh = (8 ft. X 4 ft.) = 32 ft2
Total Area = 60 ft2 + 32 ft2 = 92 ft2

Eureka Math Grade 6 Module 5 Lesson 9 Answer Key

Engage NY Eureka Math Grade 6 Module 5 Lesson 9 Answer Key

Eureka Math Grade 6 Module 5 Lesson 9 Example Answer Key

Example 1
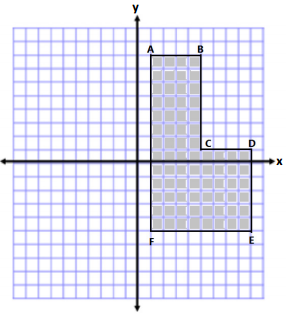
Jasjeet has made a scale drawing of a vegetable garden she plans to make in her backyard. She needs to determine the perimeter and area to know how much fencing and dirt to purchase. Determine both the perimeter and area.
Eureka Math Grade 6 Module 5 Lesson 9 Example Answer Key 1
Answer:
Eureka Math Grade 6 Module 5 LessonEureka Math Grade 6 Module 5 Lesson 9 Example Answer Key 2

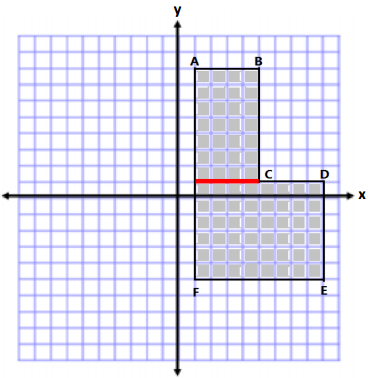
AB = 4 units BC = 7 units CD = 4 units
DE = 6 units EF = 8 units AF = 13 units

Perimeter = 4 units + 7 units + 4 units + 6 units + 8 units + 13 units
Perimeter = 42 units

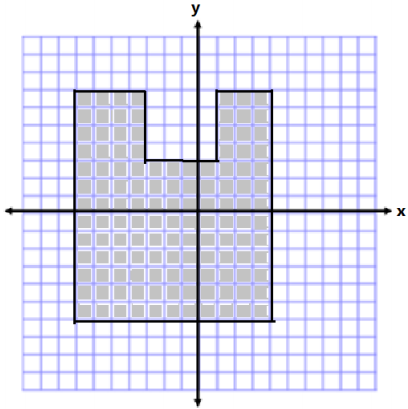
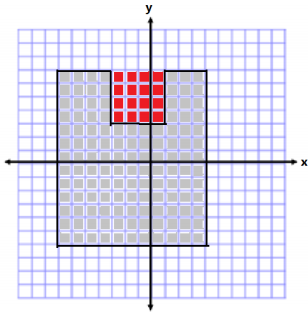
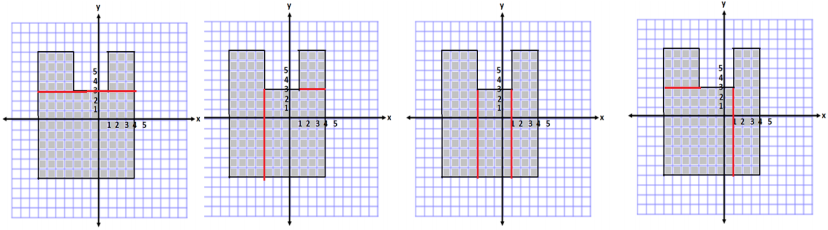
The area is determined by making a horizontal cut from (1, 1) to point C.
Area of Top
A = lw
A = (4 units)(7 units)
A = 28 units2

Area of Bottom
A = lw
A = (8 units) (6 units)
A = 48 units2

Total Area = 28 units2 + 48 units2
Total Area = 76 units2

Example 2:

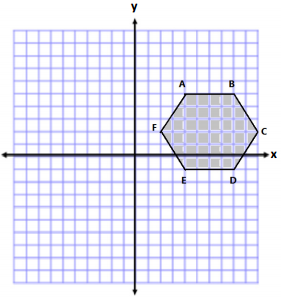
Calculate the area of the polygon using two different methods. Write two expressions to represent the two methods, and compare the structure of the expressions.
Eureka Math Grade 6 Module 5 Lesson 9 Example Answer Key 3
Answer:
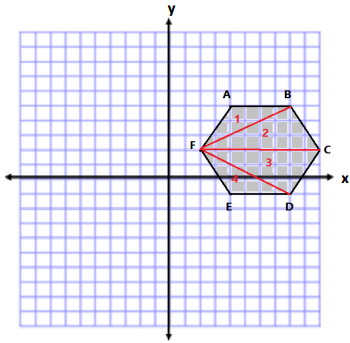
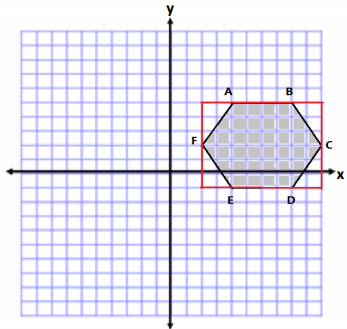
Answers will vary. The following are two possible methods. However, students could also break the shape into two
triangles and a rectangle or use another correct method.

Method one:
Eureka Math Grade 6 Module 5 Lesson 9 Example Answer Key 4

Method Two:
Eureka Math Grade 6 Module 5 Lesson 9 Example Answer Key 5

Area of Triangle 1 and 4
A = \(\frac{1}{2}\) bh
A = \(\frac{1}{2}\) (4 units)(3 units)
A = \(\frac{1}{2}\) (12 units2)
A = 6 units2
Since there are 2, we have a total area of 12 units2.

Area of Triangle 2 and 3
A = \(\frac{1}{2}\) bh
A = \(\frac{1}{2}\) (8 units)(3 units)
A = \(\frac{1}{2}\) (24 units2)
A = 12 units2
Since there are 2, we have a total area of 24 units2.

A = lw
A = (8 units) (6 units)
A = 48 units2

A = \(\frac{1}{2}\) bh
A = \(\frac{1}{2}\) (2 units)(3 units)
A = 3 units2

There are 4 triangles of equivalent base and height.
4(3 units2) = 12 units2

Total Area = 48 units2 – 12 units2
Total area = 36 units2

Total Area = 12 units2 + 24 units2 = 36 units2
Total area = 36 units2

Expressions:
2(\(\frac{1}{2}\)(4)(3)) + 2(\(\frac{1}{2}\)(8)(3)) or (8)(6) – 4(\(\frac{1}{2}\)(2)(3))

The first expression shows terms being added together because I separated the hexagon into smaller pieces and had to add their areas back together.
The second expression shows terms being subtracted because I made a larger outside shape and then had to take away the extra pieces.

Eureka Math Grade 6 Module 5 Lesson 9 Exercise Answer Key

Question 1.
Determine the area of the following shapes.

a. Eureka Math Grade 6 Module 5 Lesson 9 Exercise Answer Key 6
Answer:
Eureka Math Grade 6 Module 5 Lesson 9 Exercise Answer Key 7
Area of rectangle = lw
A = (10 units) (9 units)
A = 90 units 2

Area of Triangle
A = \(\frac{1}{2}\) bh
A = \(\frac{1}{2}\) (3 units) (3 units)
A = 4.5 units 2

4 triangles with equivalent base and height
4 (4.5 units 2) = 18 units2

Area = 90 units2 – 18 units2
Area = 72 units2

Please note the students may also choose to solve by decomposing. Here is another option.

Eureka Math Grade 6 Module 5 Lesson 9 Exercise Answer Key 8

b. Eureka Math Grade 6 Module 5 Lesson 9 Exercise Answer Key 9
Answer:
Eureka Math Grade 6 Module 5 Lesson 9 Exercise Answer Key 10

Area of Triangle 1
A = \(\frac{1}{2}\) bh
A = \(\frac{1}{2}\) (8 units)(3 units)
A = (4 units)(3 units)
A = 12 units2

Area of Triangles 2 and 4
A = \(\frac{1}{2}\) bh
A = \(\frac{1}{2}\) (5 units)(3 units)
A = \(\frac{1}{2}\) (15 units2)
A = 7.5 units2

Since triangles 2 and 4 have the same base and height measurements, the combined area is 15 units.

Area of Rectangle 3
A = bh
A = (5 units)(2 units)
A = 10 units2

Total Area = 12 units2 + 15 units2 + 10 units2
Total Area = 37 units2

Another correct solution might start with the following diagram:

Eureka Math Grade 6 Module 5 Lesson 9 Exercise Answer Key 11

Question 2.
Determine the area and perimeter of the following shapes.

a. Eureka Math Grade 6 Module 5 Lesson 9 Exercise Answer Key 12
Answer:
Eureka Math Grade 6 Module 5 Lesson 9 Exercise Answer Key 13

Area of Large Square

A = s2
A = (10 units)2
A = 100units2

Removed Piece
A = bh
A = (6 units)(4 units)
A = 24 units2

Area = 100 units2 – 24 units2
Area = 76 units2

Perimeter = 10 units + 6 units + 6 units + 4 units + 4 units + 10 units
Perimeter = 40 units

Other correct solutions might start with the following diagrams:

Eureka Math Grade 6 Module 5 Lesson 9 Exercise Answer Key 14

Eureka Math Grade 6 Module 5 Lesson 9 Exercise Answer Key 15

b. Eureka Math Grade 6 Module 5 Lesson 9 Exercise Answer Key 16
Answer:
Eureka Math Grade 6 Module 5 Lesson 9 Exercise Answer Key 17

Area:

Horizontal Area
A = bh
A = (15 units) (6 units)
A = 90 units2

Vertical Area
A = bh
A = (10 units) (4 units)
A = 40 units2

Total Area = 90 units2 + 40 units2
Total Area = 130 units2

Perimeter = 15 units + 6 units + 4 units + 10 units + 4 units + 10 units + 7 units + 6 units
Perimeter = 62 units

Other correct solutions might start with the following diagrams:

Eureka Math Grade 6 Module 5 Lesson 9 Exercise Answer Key 18

Eureka Math Grade 6 Module 5 Lesson 9 Exercise Answer Key 19

Eureka Math Grade 6 Module 5 Lesson 9 Problem Set Answer Key

Question 1.
Determine the area of polygon.
Eureka Math Grade 6 Module 5 Lesson 9 Problem Set Answer Key 20
Answer:
Eureka Math Grade 6 Module 5 Lesson 9 Problem Set Answer Key 21

Area of Triange 1
A = \(\frac{1}{2}\) bh
A = \(\frac{1}{2}\) (5 units)(8 units)
A = \(\frac{1}{2}\) (40 units2)
A = 20 units2

Area of Triangle 2
A = \(\frac{1}{2}\) bh
A = \(\frac{1}{2}\) (12 units)(8 units)
A = \(\frac{1}{2}\) (96 units2)
A = 48 units2

Area of Tnangle 3
A = \(\frac{1}{2}\) bh
A = \(\frac{1}{2}\) (12 units)( 5 units)
A = \(\frac{1}{2}\) (60 units2)
A = 30 units2

Total Area = 20 units2 + 48 units2 + 30 units2
Total Area = 98 units2

Question 2.
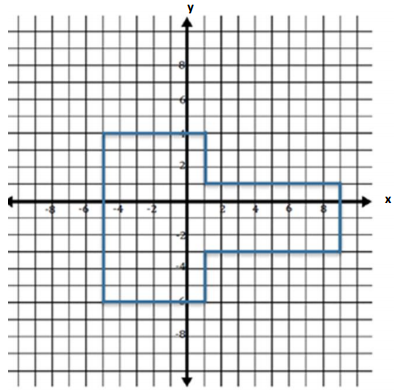
Determine the area and perimeter of the polygon.
Eureka Math Grade 6 Module 5 Lesson 9 Problem Set Answer Key 22
Answer:
Eureka Math Grade 6 Module 5 Lesson 9 Problem Set Answer Key 23

Area:

Horizontal Rectangle
A = bh
A = (13 units) (5 units)
A = 65 units2

Vertical Rectangle
A = bh
A = (5 units) (9 units)
A = 45 units2

Square
A = S2
A = (2 units)2
A = 4 units2

Total Area = 65 units2 + 45 units2 +4 units2
Total Area = 114 units2

Perimeter:

Perimeter = 2 units + 2 units + 7 units + 13 units + 14 units + 5 units + 9 units + 6 units
Perimeter = 58 units

Question 3.
Determine the area of the polygon. Then, write an expression that could be used to determine the area.
Eureka Math Grade 6 Module 5 Lesson 9 Problem Set Answer Key 27
Answer:
Eureka Math Grade 6 Module 5 Lesson 9 Problem Set Answer Key 28

Area of Rectangle on Left
A = lw
A = (8 units) (7 units)
A = 56 units2

Area of Rectangle on Right
A = lw
A = (5 units) (8 units)
A = 40 units2

Area of Triangle on Top
A = \(\frac{1}{2}\) bh
A = \(\frac{1}{2}\) (5 units)(5 units)
A = 12.5 units2

Total Area = 56 units2 + 40 units2 + 12.5 units2 = 108.5 units2
Expression: (8)(7) + (5)(8) + \(\frac{1}{2}\) (5)(5)

Question 4.
If the length of each square was worth 2 instead of 1, how would the area in Problem 3 change? How would your expression change to represent this area?
Answer:
If each length is twice as long, when they are multiplied, 2l × 2w = 41w. Therefore, the area will be four times larger when the side lengths are doubled.

I could multiply my entire expression by 4 to make it 4 times as big. 4 [(8)(7) + (5)(8) + \(\frac{1}{2}\) (5)(5)]

Question 5.
Determine the area of the polygon. Then, write an expression that represents the area.
Eureka Math Grade 6 Module 5 Lesson 9 Problem Set Answer Key 29
Answer:
Eureka Math Grade 6 Module 5 Lesson 9 Problem Set Answer Key 30

Area of Outside Rectangle
A = lw
A = (9 units) (16 units)
A = 144 units2

Area of Rectangle on Left
A = lw
A = (4 units) (8 units)
A = 32 units2

Area of Rectangle on Right
A = lw
A = (4 units) (3 units)
A = 12 units2

Total Area = 144 units2 – 32 units2 – 12 units2
Total Area = 100 units2
Expression: (9)(16) – (4)(8) – (4)(3)

Question 6.
Describe another method you could use to find the area of the polygon in Problem 5. Then, state how the expression for the area would be different than the expression you wrote.
Answer:
I could have broken up the large shape into many smaller rectangles. Then I would need to add all the areas of these rectangles together to determine the total area.

My expression showed subtraction because I created o rectangle that was larger than the original polygon, and then I had to subtract the extra oreos. If I break the shape into pieces, I would need to add the terms together instead of subtracting them to get the total area.

Question 7.
Write one of the letters from your name using rectangles on the coordinate plane. Then, determine the area and perimeter. (For help see Exercise 2(b). This irregular polygon looks sort of like a T.)
Answer:
Eureka Math Grade 6 Module 5 Lesson 9 Problem Set Answer Key 31
Answers will vary.

Eureka Math Grade 6 Module 5 Lesson 9 Exit Ticket Answer Key

Question 1.
Determine the area and perimeter of the figure below. Note that each square unit is 1 unit in length.
Eureka Math Grade 6 Module 5 Lesson 9 Exit Ticket Answer Key 24
Answer:
Eureka Math Grade 6 Module 5 Lesson 9 Exit Ticket Answer Key 25

Area:

Area of Large Rectangle
A = bh
A = (11 units)(13 units)
A = 143 units2

Area of Small Square
A = s2
A = (4units)2
A = 16 units2

Area of Irregular Shape
A = 143 units2 – 16 units2
A = 127 units2

Perimeter = 13 units + 4 units + 4 units + 4 units + 4 units + 3 units + 13 units + 11 units
Perimeter = 56 units

Other correct solutions might start with the following diagrams:

Eureka Math Grade 6 Module 5 Lesson 9 Exit Ticket Answer Key 26

Eureka Math Grade 6 Module 5 Lesson 9 Addition and Subtraction Equations Answer Key

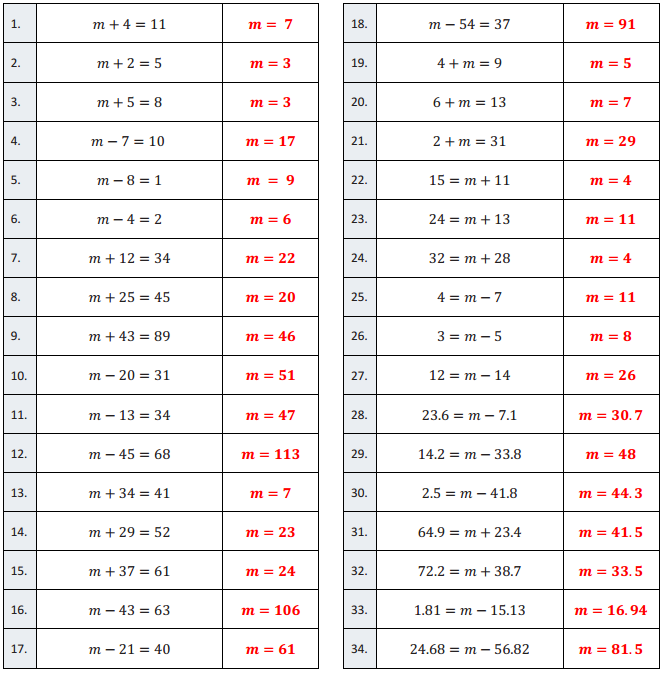
Addition and Subtraction Equations – Round 1:

Directions: Find the value of m in each equation.

Eureka Math Grade 6 Module 5 Lesson 9 Addition and Subtraction Equations Answer Key 32

Eureka Math Grade 6 Module 5 Lesson 9 Addition and Subtraction Equations Answer Key 33

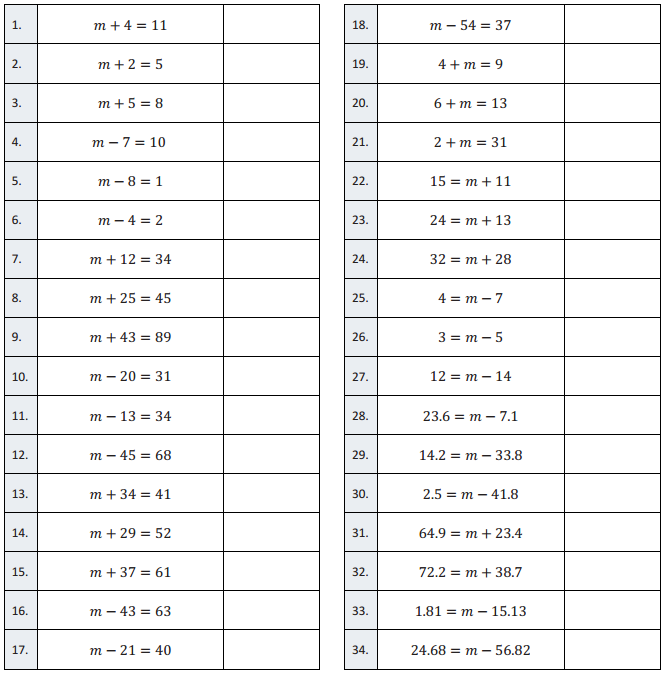
Question 1.
m + 4 = 11
Answer:
m = 7

Question 2.
m + 2 = 5
Answer:
m = 3

Question 3.
m + 5 = 8
Answer:
m = 3

Question 4.
m – 7 = 10
Answer:
m = 17

Question 5.
m – 8 = 1
Answer:
m = 9

Question 6.
m – 4 = 2
Answer:
m = 6

Question 7.
m + 12 = 34
Answer:
m = 22

Question 8.
m + 25 = 45
Answer:
m = 20

Question 9.
m + 43 = 89
Answer:
m = 46

Question 10.
m – 20 = 31
Answer:
m = 51

Question 11.
m – 13 = 34
Answer:
m = 47

Question 12.
m – 45 = 68
Answer:
m = 113

Question 13.
m + 34 = 41
Answer:
m = 7

Question 14.
m + 29 = 52
Answer:
m = 23

Question 15.
m + 37 = 61
Answer:
m = 24

Question 16.
m – 43 = 63
Answer:
m = 106

Question 17.
m – 21 = 40
Answer:
m = 61

Question 18.
m – 54 = 37
Answer:
m = 91

Question 19.
4 + m = 9
Answer:
m = 5

Question 20.
6 + m = 13
Answer:
m = 7

Question 21.
2 + m = 31
Answer:
m = 29

Question 22.
15 = m + 11
Answer:
m = 4

Question 23.
24 = m + 13
Answer:
m = 11

Question 24.
32 = m + 28
Answer:
m = 4

Question 25.
4 = m – 7
Answer:
m = 11

Question 26.
3 = m – 5
Answer:
m = 8

Question 27.
12 = m – 14
Answer:
m = 26

Question 28.
23.6 = m – 7.1
Answer:
m = 30.7

Question 29.
14.2 = m – 33.8
Answer:
m = 48

Question 30.
2.5 = m – 41.8
Answer:
m = 44.3

Question 31.
64.9 = m + 23.4
Answer:
m = 41.5

Question 32.
72.2 = m + 38.7
Answer:
m = 33.5

Question 33.
1.81 = m – 15.13
Answer:
m = 16.94

Question 34.
24.68 = m – 56.82
Answer:
m = 81.5

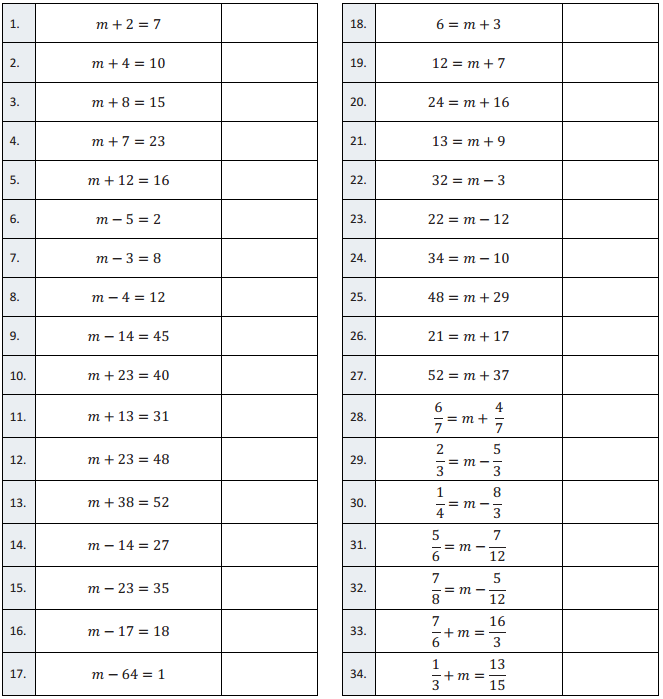
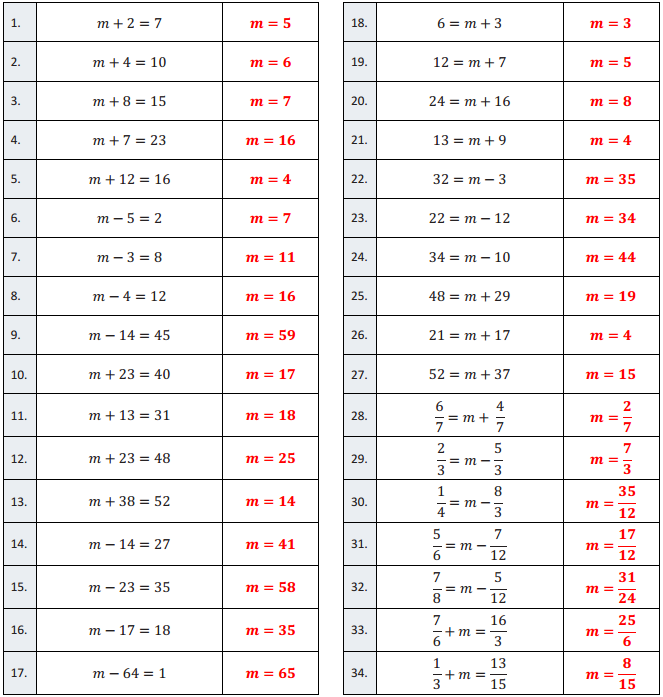
Addition and Subtraction Equations – Round 1:

Directions: Find the value of m in each equation.

Eureka Math Grade 6 Module 5 Lesson 9 Addition and Subtraction Equations Answer Key 34

Eureka Math Grade 6 Module 5 Lesson 9 Addition and Subtraction Equations Answer Key 35

Question 1.
m + 2 = 7
Answer:
m = 5

Question 2.
m + 4 = 10
Answer:
m = 6

Question 3.
m + 8 = 15
Answer:
m = 7

Question 4.
m + 7 = 23
Answer:
m = 16

Question 5.
m + 12 = 16
Answer:
m = 4

Question 6.
m – 5 = 2
Answer:
m = 7

Question 7.
m – 3 = 8
Answer:
m = 11

Question 8.
m – 4 = 12
Answer:
m = 16

Question 9.
m – 14 = 45
Answer:
m = 59

Question 10.
m + 23 = 40
Answer:
m = 17

Question 11.
m + 13 = 31
Answer:
m = 18

Question 12.
m + 23 = 48
Answer: 25
m =

Question 13.
m + 38 = 52
Answer:
m = 14

Question 14.
m – 14 = 27
Answer:
m = 13

Question 15.
m – 23 = 35
Answer:
m = 12

Question 16.
m – 17 = 18
Answer:
m = 35

Question 17.
m – 64 = 1
Answer:
m = 65

Question 18.
6 = m + 3
Answer:
m = 3

Question 19.
12 = m + 7
Answer:
m = 5

Question 20.
24 = m + 16
Answer:
m = 8

Question 21.
13 = m + 9
Answer:
m = 4

Question 21.
32 = m – 3
Answer:
m = 35

Question 23.
22 = m – 12
Answer:
m = 34

Question 24.
34 = m – 10
Answer:
m = 44

Question 25.
48 = m + 29
Answer: 19

Question 26.
21 = m + 17
Answer:
m = 4

Question 27.
52 = m + 37
Answer:
m = 15

Question 28.
\(\frac{6}{7}\) = m + \(\frac{4}{7}\)
Answer:
m = \(\frac{2}{7}\)

Question 29.
\(\frac{2}{3}\) = m – \(\frac{5}{3}\)
Answer:
m = \(\frac{7}{3}\)

Question 30.
\(\frac{1}{4}\) = m – \(\frac{8}{3}\)
Answer:
m = \(\frac{35}{12}\)

Question 31.
\(\frac{5}{6}\) = m – \(\frac{7}{12}\)
Answer:
m = \(\frac{17}{12}\)

Question 32.
\(\frac{7}{8}\) = m – \(\frac{5}{12}\)
Answer:
m = \(\frac{31}{24}\)

Question 33.
\(\frac{7}{6}\) + m = \(\frac{16}{3}\)
Answer:
m = \(\frac{25}{6}\)

Question 34.
\(\frac{1}{3}\) + m = \(\frac{13}{15}\)
Answer:
m = \(\frac{8}{15}\)

Eureka Math Grade 6 Module 3 Lesson 17 Answer Key

Engage NY Eureka Math 6th Grade Module 3 Lesson 17 Answer Key

Eureka Math Grade 6 Module 3 Lesson 17 Example Answer Key

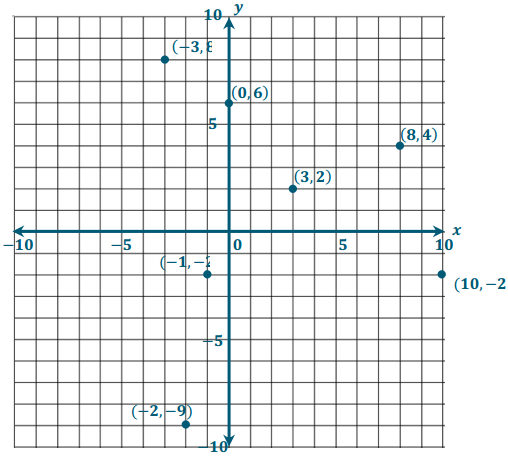
Example 1.
Locate and label the points {(3, 2), (8, 4), (- 3, 8), (- 2, – 9), (0, 6), (- 1, – 2), (10, – 2)) on the grid above.
Answer:
Eureka Math Grade 6 Module 3 Lesson 17 Example Answer Key 3

Example 2.
Drawing the Coordinate Plane Using an Increased Number Scale for One Axis
Draw a coordinate plane on the grid below, and then locate and label the following points:
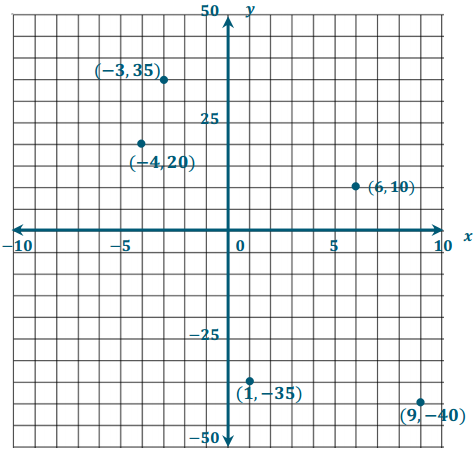
{(- 4, 20), (- 3, 35), (1, – 35), (6, 10), (9, – 40)}.
Answer:
Eureka Math Grade 6 Module 3 Lesson 17 Example Answer Key 4

Example 3.
Drawing the Coordinate Plane Using a Decreased Number Scale for One Axis
Draw a coordinate plane on the grid below, and then locate and label the following points:
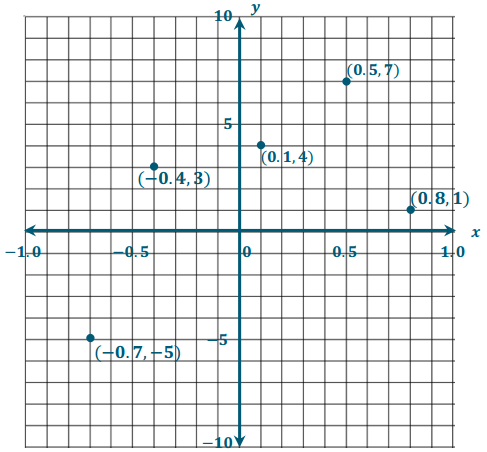
{(0. 1, 4), (0. 5, 7), (- 0.7, – 5), (- 0.4, 3), (0.8, 1))}.
Answer:
Eureka Math Grade 6 Module 3 Lesson 17 Example Answer Key 5

Example 4.
Drawing the Coordinate Plane Using a Different Number Scale for Both Axes
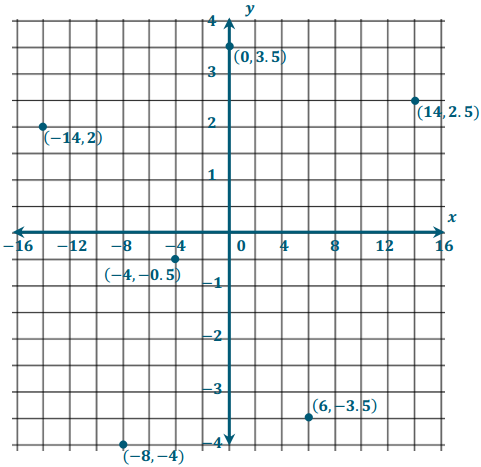
Determine a scale for the x-axis that will allow all x-coordinates to be shown on your grid.
Answer:
The grid is 16 units wide, and the x-coordinates range from – 14 to 14. If I let each grid line represent 2 units, then the x-axis will range from – 16 to 16.

Determine a scale for the y-axis that will allow all y-coordinates to be shown on your grid.
Answer:
The grid is 16 units high, and the y-coordinates range from – 4 to 3. 5. I could let each grid line represent one unit, but if I let each grid line represent \(\frac{1}{2}\) of a unit, the points will be easier to graph.

Draw and label the coordinate plane, and then locate and label the set of points.
{(- 14, 2), (- 4, – 0. 5), (6,- 3. 5), (14, 2. 5), (0, 3.5), (- 8, – 4)}
Answer:
Eureka Math Grade 6 Module 3 Lesson 17 Example Answer Key 6

Eureka Math Grade 6 Module 3 Lesson 17 Problem Set Answer Key

Question 1.
Label the coordinate plane, and then locate and label the set of points below.
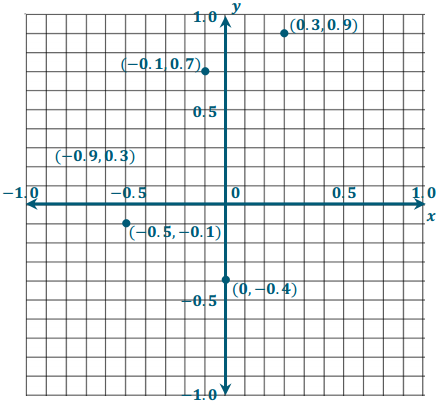
{(0.3, 0.9), (- 0.1, 0.7), (- 0.5, – 0.1), (- 0.9, 0.3), (0, – 0.4)}
Answer:
Eureka Math Grade 6 Module 3 Lesson 17 Problem Set Answer Key 7

Question 2.
Label the coordinate plane, and then locate and label the set of points below.
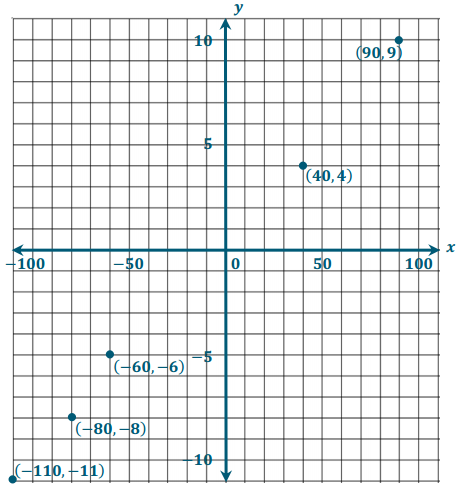
{(90, 9), (- 110, – 11), (40, 4), (- 60, – 6), (- 80, – 8)}
Answer:
Eureka Math Grade 6 Module 3 Lesson 17 Problem Set Answer Key 8

Extension:

Question 3.
Describe the pattern you see in the coordinates In Problem 2 and the pattern you see in the points. Are these patterns consistent for other points too?
Answer:
The x-coordinate for each of the given points is 10 times its y-coordinate. When I graphed the points, they appear to make a straight line. I checked other ordered pairs with the same pattern, such as (- 100, – 10), (20, 2), and even (0, 0), and it appears that these points are also on that line.

Eureka Math Grade 6 Module 3 Lesson 17 Exit Ticket Answer Key

Question 1.
Determine an appropriate scale for the set of points given below. Draw and label the coordinate plane, and then locate and label the set of points.
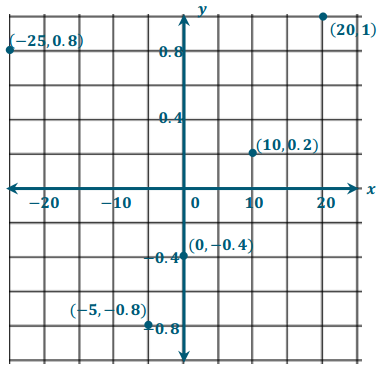
{(10, 0. 2), (- 25, 0.8), (0, – 0.4), (20, 1), (- 5, – 0. 8)}
Answer:
The x-coordinates range from – 25 to 20. The grid is 10 units wide. If I let each grid line represent 5 units, then the x-axis will range from – 25 to 25.

The y-coordinates range from – 0.8 to 1. The grid is 10 units high. If I let each grid line represent two-tenths of a unit, then the y-axis will range from – 1 to 1.

Eureka Math Grade 6 Module 3 Lesson 17 Exit Ticket Answer Key 9

Eureka Math Grade 6 Module 3 Lesson 17 Opening Exercise Answer Key

Question 1.
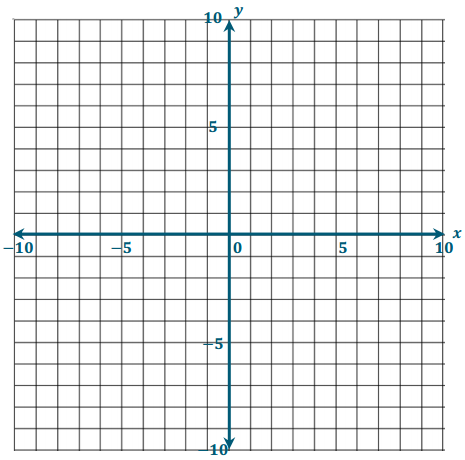
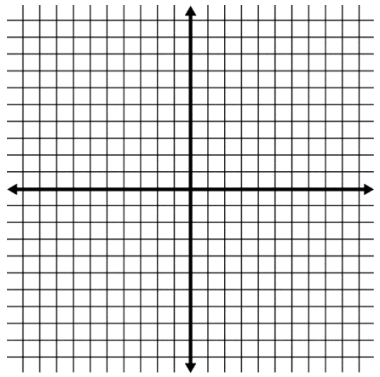
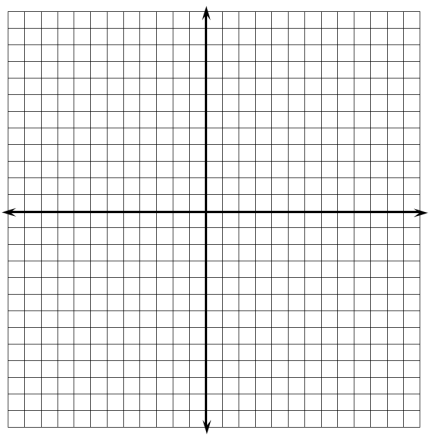
Draw all necessary components of the coordinate plane on the blank 20 × 20 grid provided below, placing the origin at the center of the grid and letting each grid line represent 1 unit.
Eureka Math Grade 6 Module 3 Lesson 17 Opening Exercise Answer Key 1
Answer:
Eureka Math Grade 6 Module 3 Lesson 17 Opening Exercise Answer Key 2

Eureka Math Grade 6 Module 3 Lesson 16 Answer Key

Engage NY Eureka Math 6th Grade Module 3 Lesson 16 Answer Key

Eureka Math Grade 6 Module 3 Lesson 16 Example Answer Key

Example 1.
Extending Opposite Numbers to the Coordinate Plane
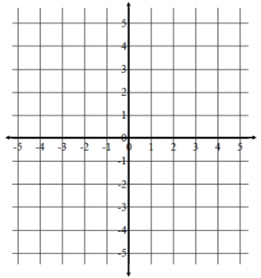
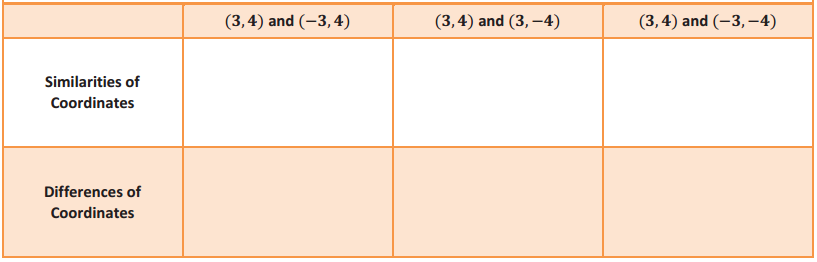
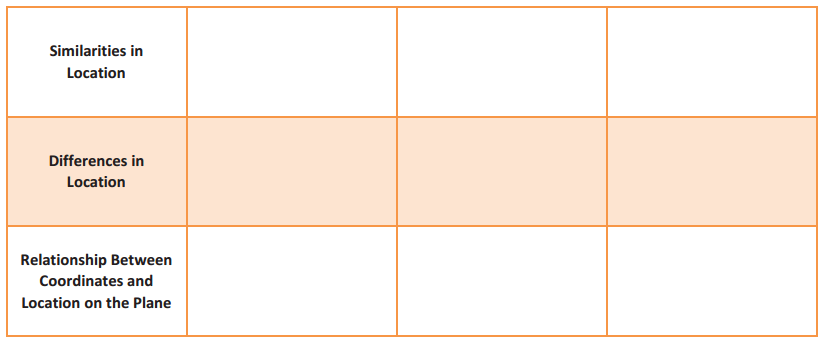
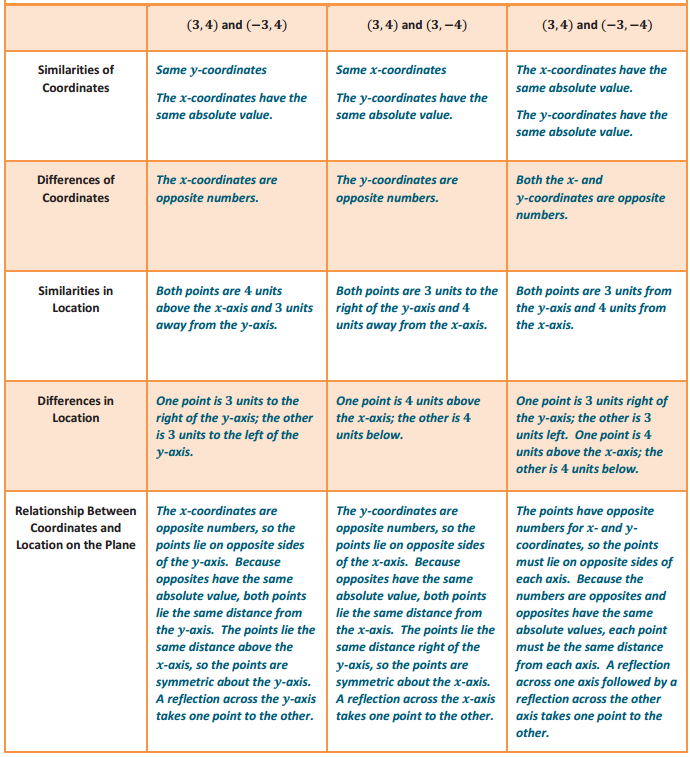
Extending Opposite Numbers to the Coordinates of Points on the Coordinate Plane Locate and label your points on the coordinate plane to the right. For each given pair of points in the table below, record your observations and conjectures in the appropriate cell. Pay attention to the absolute values of the coordinates and where the points lie in reference to each axis.
Eureka Math Grade 6 Module 3 Lesson 16 Example Answer Key 1
Eureka Math Grade 6 Module 3 Lesson 16 Example Answer Key 2
Eureka Math Grade 6 Module 3 Lesson 16 Example Answer Key 3
Answer:
Eureka Math Grade 6 Module 3 Lesson 16 Example Answer Key 4

Examples 2 – 3: Navigating the Coordinate Plane

Eureka Math Grade 6 Module 3 Lesson 16 Example Answer Key 5
Answer:

Eureka Math Grade 6 Module 3 Lesson 16 Exercise Answer Key

Exercises

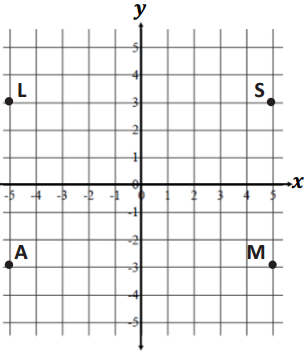
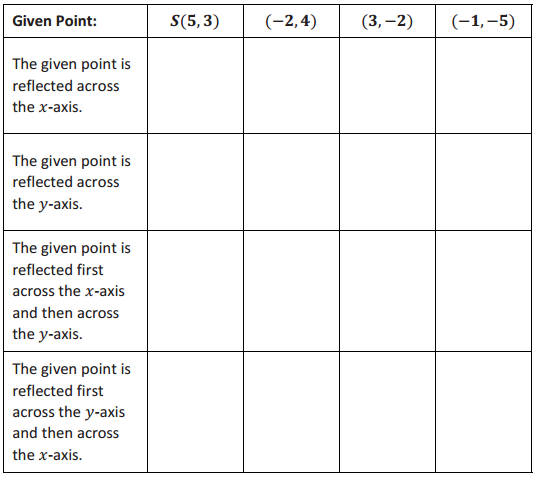
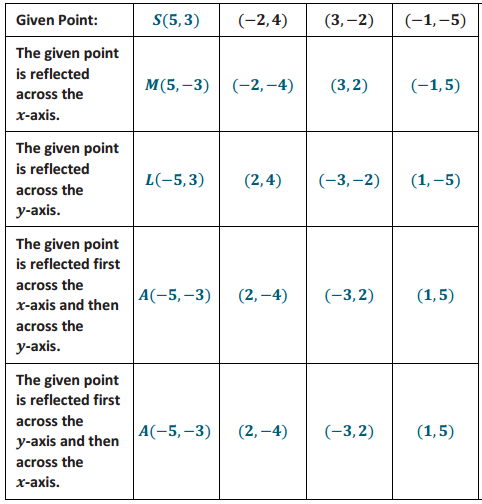
In each column, write the coordinates of the points that are related to the given point by the criteria listed in the first column of the table. Point S(5, 3) has been reflected over the x- and y-axes for you as a guide, and its images are shown on the coordinate plane. Use the coordinate grid to help you locate each point and its corresponding coordinates.
Eureka Math Grade 6 Module 3 Lesson 16 Exercise Answer Key 6
Eureka Math Grade 6 Module 3 Lesson 16 Exercise Answer Key 7
Answer:
Eureka Math Grade 6 Module 3 Lesson 16 Exercise Answer Key 8

Exercise 1.
When the coordinates of two points are (x, y) and (- x, y), what line of symmetry do the points share? Explain.
Answer:
They share the y-axis because the y-coordinates are the same and the x-coordinates are opposites, which means the points will be the same distance from the y-axis but on opposite sides.

Exercise 2.
When the coordinates of two points are (x, y) and (x, – y). what line of symmetry do the points share? Explain.
Answer:
They share the x-axis because the x-coordinates are the same and the y-coordinates are opposites, which means the points will be the same distance from the x-axis but on opposite sides.

Eureka Math Grade 6 Module 3 Lesson 16 Problem Set Answer Key

Question 1.
Locate a point In Quadrant IV of the coordinate plane. Label the point A, and write its ordered pair next to it.
Answer:
Answers will vary; Quadrant IV (5, – 3)

a. Reflect point A over an axis so that its image is in Quadrant III. Label the image B, and write its ordered pair next to it. Which axis did you reflect over? What is the only difference in the ordered pairs of points A and B?
Answer:
B(- 5, – 3); reflected over the y-axis
The ordered pairs differ only by the sign of their x-coordinates: A(5, – 3) and B(- 5, – 3).

b. Reflect point B over an axis so that its image is in Quadrant II. Label the image C, and write its ordered pair next to it. Which axis did you reflect over? What is the only difference in the ordered pairs of points B and C? How does the ordered pair of point C relate to the ordered pair of point A?
Answer:
C(- 5, 3); reflected over the x-axis
The ordered pairs differ only by the signs of their y-coordinates: B(- 5, – 3) and C(- 5, 3).
The ordered pair for point C differs from the ordered pair for point A by the signs of both coordinates:
A(5, – 3) and C(- 5, 3).

c. Reflect point C over an axis so that its image is in Quadrant I. Label the image D, and write its ordered pair next to it. Which axis did you reflect over? How does the ordered pair for point D compare to the ordered pair for point C? How does the ordered pair for point D compare to points A and B?
Answer:
D(5, 3); reflected over the y-axis again
Point D differs from point C by only the sign of its x-coordinate: D(5, 3) and C(- 5, 3).
Point D differs from point B by the signs of both coordinates: D(5, 3) and B(- 5, – 3).
Point D differs from point A by only the sign of the y-coordinate: D(5, 3) and A(5, – 3).

Question 2.
Bobbie listened to her teacher’s directions and navigated from the point (- 1,0) to (5, – 3). She knows that she has the correct answer, but she forgot part of the teacher’s directions. Her teacher’s directions included the following:
“Move 7 units down, reflect about the   ?   -axis, move up 4 units, and then move right 4 units.”
Help Bobbie determine the missing axis in the directions, and explain your answer.
Answer:
The missing line is a reflection over the y-axis. The first line would move the location to (- 1, – 7). A reflection over the y-axis would move the location to (1, – 7) in Quadrant IV, which is 4 units left and 4 units down from the end point (5, – 3).

Eureka Math Grade 6 Module 3 Lesson 16 Exit Ticket Answer Key

Question 1.
How are the ordered pairs (4, 9) and (4, – 9) similar, and how are they different? Are the two points related by a reflection over an axis in the coordinate plane? If so, indicate which axis is the line of symmetry between the points. If they are not related by a reflection over an axis in the coordinate plane, explain how you know.
Answer:
The x-coordinates are the same, but the y-coordinates are opposites, meaning they are the same distance from zero on the x-axis and the same distance but on opposite sides of zero on the y-axis. Reflecting about the x-axis interchanges these two points.

Question 2.
Given the point (- 5, 2), write the coordinates of a point that is related by a reflection over the x- or y-axis. Specify which axis is the line of symmetry.
Answer:
Using the x-axis as a line of symmetry, (-3, -2); using the y-axis as a line of symmetry, (5,2)

Eureka Math Grade 6 Module 3 Lesson 16 Opening Exercise Answer Key

Question 1.
Give an example of two opposite numbers, and describe where the numbers lie on the number line. How are opposite numbers similar, and how are they different?
Answer:
Answers may vary. 2 and – 2 are opposites because they are both 2 units from zero on a number line but in opposite directions. Opposites are similar because they have the same absolute value, but they are different because opposites are on opposite sides of zero.

Eureka Math Grade 6 Module 3 Lesson 15 Answer Key

Engage NY Eureka Math 6th Grade Module 3 Lesson 15 Answer Key

Eureka Math Grade 6 Module 3 Lesson 15 Example Answer Key

Example 1. Extending the Axes Beyond Zero
The point below represents zero on the number line. Draw a number line to the right starting at zero. Then, follow directions as provided by the teacher.
Eureka Math Grade 6 Module 3 Lesson 15 Example Answer Key 1
Answer:
→ Use a straightedge to extend the x-axis to the left of zero to represent the real number line horizontally, and complete the number line using the same scale as on the right side of zero.
→ Describe the y-axis. What types of numbers should it include?
The y-axis is a vertical number line that includes numbers on both sides of zero (above and below), and so it includes both positive and negative numbers.
→ Use a straightedge to draw a vertical number line above zero.

Provide students with time to draw.
→ Extend the y-axis below zero to represent the real number line vertically, and complete the number line using
the same scale as above zero.

Example 2: Components of the Coordinate Plane
All points on the coordinate plane are described with reference to the origin. What is the origin, and what are its coordinates?
Answer:
The origin is the point where the x- and y-axes intersect. The coordinates of the origin are (0, 0).

To describe locations of points in the coordinate plane, we use _________________________ of numbers. Order is important, so on the coordinate plane, we use the form ( ). The first coordinate represents the point’s location from zero on the ________-axis, and the second coordinate represents the point’s location from zero on the ________-axis.
Answer:
To describe locations of points in the coordinate plane, we use   ordered   pairs of numbers. Order is important, so on the coordinate plane, we use the form (   x, y   ). The first coordinate represents the point’s location from zero on the    x   -axis, and the second coordinate represents the point’s location from zero on the   y   -axis.

Eureka Math Grade 6 Module 3 Lesson 15 Exercise Answer Key

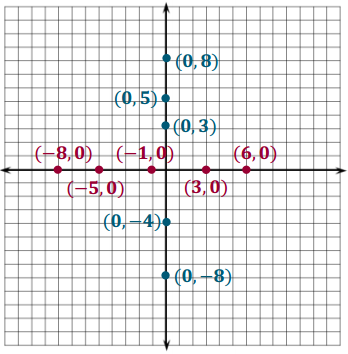
Exercise 1.
Use the coordinate plane below to answer parts (a) – (c).
a. Graph at least five points on the x-axis, and label their coordinates.
Answer:
Points will vary.

b. What do the coordinates of your points have in common?
Answer:
Each point has a y-coordinate of 0.

c. What must be true about any point that lies on the x-axis? Explain.
Answer:
If a point lies on the x-axis, its y-coordinate must be 0 because the point is located 0 units above or below the x-axis. The x-axis intersects the y-axis at 0.

Eureka Math Grade 6 Module 3 Lesson 15 Exercise Answer Key 2
Answer:
Eureka Math Grade 6 Module 3 Lesson 15 Exercise Answer Key 3

Exercise 2.
Use the coordinate plane to answer parts (a) – (c).
a. Graph at least five points on the y-axis, and label their coordinates.
Answer:
Points will wary.

b. What do the coordinates of your points have in common?
Answer:
Each point has an x-coordinate of 0.

c. What must be true about any point that lies on the y-axis? Explain.
Answer:
If a point lies on the y-axis, its x-coordinate must be 0 because the point is located 0 units left or right of the y-axis. The y-axis intersects 0 on the x-axis.

Exercise 3.
If the origin is the only point with 0 for both coordinates, what must be true about the origin?
Answer:
The origin is the only point that is on both the x-axis and the y-axis.

Exercise 4.
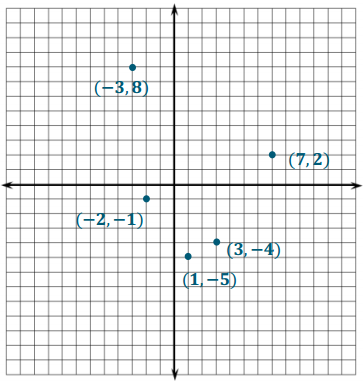
Locate and label each point described by the ordered pairs below. Indicate which of the quadrants the points lie in.
a. (7, 2)
Answer:
Quadrant I

b. (3, – 4)
Answer:
Quadrant IV

c. (1, – 5)
Answer:
Quadrant IV

d. (- 3, 8)
Answer:
Quadrant II

e. (- 2, – 1)
Answer:
Quadrant III

Eureka Math Grade 6 Module 3 Lesson 15 Exercise Answer Key 4
Answer:
Eureka Math Grade 6 Module 3 Lesson 15 Exercise Answer Key 5

Exercise 5.
Write the coordinates of at least one other point in each of the four quadrants.
a. Quadrant I
Answer:
Answers will vary, but both numbers must be positive.

b. Quadrant II
Answer:
Answers will vary, but the x-coordinate must be negative, and the y-coordinate must be positive.

c. Quadrant III
Answer:
Answers will vary, but both numbers must be negative.

d. Quadrant IV
Answer:
Answers will vary, but the x-coordinate must be positive, and the y-coordinate must be negative.

Exercise 6.
Do you see any similarities in the points within each quadrant? Explain your reasoning.
Answer:
The ordered pairs describing the points in Quadrant I contain both positive values. The ordered pairs describing the points in Quadrant III contain both negative values. The first coordinates of the ordered pairs describing the points in Quadrant II are negative values, but their second coordinates are positive values. The first coordinates of the ordered pairs describing the points in Quadrant IV are positive values, but their second coordinates are negative values.

Eureka Math Grade 6 Module 3 Lesson 15 Problem Set Answer Key

Question 1.
Name the quadrant in which each of the points lies. If the point does not lie in a quadrant, specify which axis the point lies on.
a. (- 2, 5)
Quadrant II

b. (8, – 4)
Quadrant IV

c. (- 1, – 8)
Quadrant Ill

d. (9. 2, 7)
Quadrant I

e. (0, – 4)
None; the point is not in a quadrant because it lies on the y-axis.

Question 2.
Jackie claims that points with the same x- and y-coordinates must lie in Quadrant I or Quadrant Ill. Do you agree or disagree? Explain your answer.
Answer:
Disagree; most points with the same x- and y-coordinates lie in Quadrant I or Quadrant III, but the origin (o, 0) is on the x- and y-axes, not in any quadrant.

Question 3.
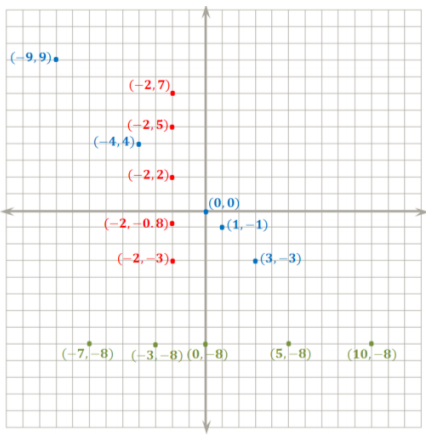
Locate and label each set of points on the coordinate plane. Describe similarities of the ordered pairs in each set, and describe the points on the plane.
a. {(- 2, 5), (- 2, 2), (- 2, 7), (- 2, – 3), (- 2, – 0. 8))
Answer:
The ordered pairs all have x-coordinates of – 2, and the points lie along a vertical line above and below – 2 on the x-axis.

b. {(- 9, 9), (- 4, 4), (- 2, 2), (1, – 1), (3, – 3), (0, 0)}
Answer:
The ordered pairs each have opposite values for their x- and y-coordinates. The points in the plane line up diagonally through Quadrant II, the origin, and Quadrant IV.

c. {(- 7, – 8), (5, – 8), (0, – 8), (10, – 8), (- 3, – 8)}
Answer:
The ordered pairs all have y-coordinates of – 8, and the points lie along a horizontal line to the left and right of – 8 on the y-axis.

Eureka Math Grade 6 Module 3 Lesson 15 Problem Set Answer Key 6
Answer:
Eureka Math Grade 6 Module 3 Lesson 15 Problem Set Answer Key 7

Question 4.
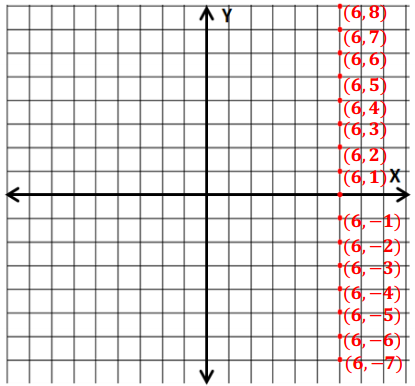
Locate and label at least five points on the coordinate plane that have an x-coordinate of 6.
a. What is true of the y-coordinates below the x-axis?
Answer:
The y-coordinates are all negative values.

b. What is true of the y-coordinates above the x-axis?
Answer:
The y-coordinates are all positive values.

c. What must be true of the y-coordinates on the x-axis?
Answer:
The y-coordinates on the x-axis must be 0.

Eureka Math Grade 6 Module 3 Lesson 15 Problem Set Answer Key 8
Answer:
Eureka Math Grade 6 Module 3 Lesson 15 Problem Set Answer Key 9

Eureka Math Grade 6 Module 3 Lesson 15 Exit Ticket Answer Key

Question 1.
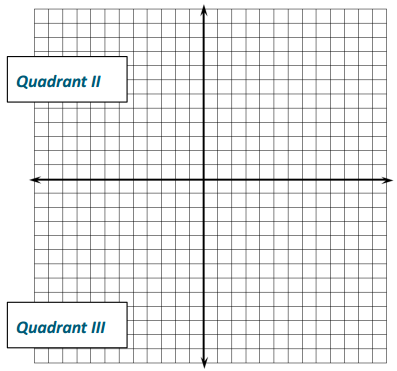
Label the second quadrant on the coordinate plane, and then answer the following questions:
a. Write the coordinates of one point that lies in the second quadrant of the coordinate plane.
Answer:
Answers will vary.

b. What must be true about the coordinates of any point that lies in the second quadrant?
Answer:
The x-coordinate must be a negative value, and the y-coordinate must be a positive value.

Eureka Math Grade 6 Module 3 Lesson 15 Exit Ticket Answer Key 10
Answer:
Eureka Math Grade 6 Module 3 Lesson 15 Exit Ticket Answer Key 11

Question 2.
Label the third quadrant on the coordinate plane, and then answer the following questions:
a. Write the coordinates of one point that lies in the third quadrant of the coordinate plane.
Answer:
Answers will vary.

b. What must be true about the coordinates of any point that lies in the third quadrant?
Answer:
The x- and y-coordinates of any point in the third quadrant must both be negative values.

Question 3.
An ordered pair has coordinates that have the same sign. In which quadrant(s) could the point lie? Explain.
Answer:
The point would have to be located either in Quadrant I where both coordinates are positive values or in Quadrant III where both coordinates are negative values.

Question 4.
Another ordered pair has coordinates that are opposites. In which quadrant(s) could the point lie? Explain.
Answer:
The point would have to be located in either Quadrant II or Quadrant IV because those are the two quadrants where the coordinates have opposite signs. The point could also be located at the origin (0, 0) since zero is its own opposite.

Eureka Math Grade 6 Module 3 Lesson 14 Answer Key

Engage NY Eureka Math 6th Grade Module 3 Lesson 14 Answer Key

Eureka Math Grade 6 Module 3 Lesson 14 Example Answer Key

Example 1: The Order in Ordered Pairs
The first number of an ordered pair is called the ___________ .
Answer:
first coordinate.

The second number of an ordered pair is called the ___________ .
Answer:
second coordinate.

Example 2.
Using Ordered Pairs to Name Locations
Describe how the ordered pair is being used in your scenario. Indicate what defines the first coordinate and what defines the second coordinate in your scenario.
Answer:
Ordered pairs are like a set of directions; they indicate where to go in one direction and then indicate where to go in the second direction.
→ Scenario 1: The seats in a college football stadium are arranged into 210 sections, with 144 seats in each
section. Your ticket to the game indicates the location of your seat using the ordered pair of numbers
(123,37). Describe the meaning of each number in the ordered pair and how you would use them to find your seat.

→ Scenario 2: Airline pilots use measurements of longitude and latitude to determine their location and to find airports around the world. Longitude is measured as 0 – 180° east or 0 – 180° west of a line stretching from the North Pole to the South Pole through Greenwich, England, called the prime meridian. Latitude is measured as 0 – 90° north or 0 – 90° south of the earth’s equator. A pilot has the ordered pair (90° west, 30° north). What does each number in the ordered pair describe? How would the pilot locate the airport on a map? Would there be any confusion if a pilot were given the ordered pair (90°, 30°)? Explain.

→ Scenario 3: Each room in a school building is named by an ordered pair of numbers that indicates the number of the floor on which the room lies, followed by the sequential number of the room on the floor from the main staircase. A new student at the school is trying to get to science class in room 4 – 13. Describe to the student what each number means and how she should use the number to find her classroom. Suppose there are classrooms below the main floor. How might these rooms be described?

Eureka Math Grade 6 Module 3 Lesson 14 Exercise Answer Key

The first coordinates of the ordered pairs represent the numbers on the line labeled X, and the second coordinates represent the numbers on the line labeled y.

Exercise 1.
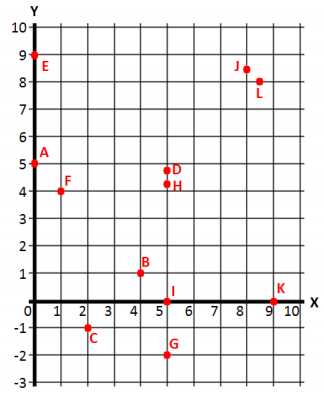
Name the letter from the grid below that corresponds with each ordered pair of numbers below.
Eureka Math Grade 6 Module 3 Lesson 14 Exercise Answer Key 1
a. (1, 4)
Answer:
Point F

b. (0, 5)
Answer:
Point A

c. (4, 1)
Answer:
Point B

d. (8.5, 8)
Answer:
Point L

e. (5, – 2)
Answer:
Point G

f. (5, 4.2)
Answer:
Point H

g. (2,- 1)
Answer:
Point C

h. (0, 9)
Answer:
Point E

Exercise 2.
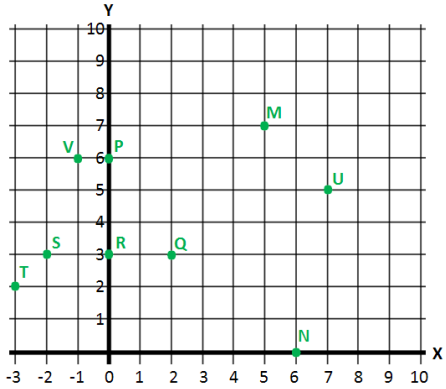
List the ordered pair of numbers that corresponds with each letter from the grid below.
Eureka Math Grade 6 Module 3 Lesson 14 Exercise Answer Key 2
a. Point M
Answer:
(5, 7)

b. Point S
Answer:
(- 2, 3)

c. Point N
Answer:
(6, 0)

d. Point T
Answer:
(- 3, 2)

e. Point P
Answer:
(0, 6)

f. Point U
Answer:
(7, 5)

g. Point Q
Answer:
(2, 3)

h. Point V
Answer:
(- 1, 6)

I. Point R
Answer:
(0, 3)

Eureka Math Grade 6 Module 3 Lesson 14 Problem Set Answer Key

Question 1.
Use the set of ordered pairs below to answer each question.
{(4, 20), (8, 4), (2, 3), (15, 3), (6, 15), (6, 30), (1, 5), (6, 18), (0, 3)}

a. Write the ordered pair(s) whose first and second coordinate have a greatest common factor of 3.
Answer:
(15, 3) and (6, 15)

b. Write the ordered pair(s) whose first coordinate is a factor of its second coordinate.
Answer:
(4, 20), (6, 30), (1, 5), and (6, 18)

c. Write the ordered pair(s) whose second coordinate is a prime number.
Answer:
(2, 3), (15, 3), (1, 5), and (0, 3)

Question 2.
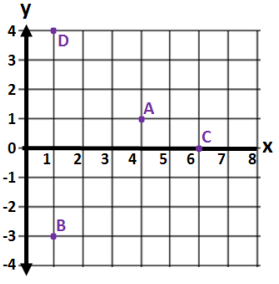
Write ordered pairs that represent the location of points A, B, C, and D, where the first coordinate represents the horizontal direction, and the second coordinate represents the vertical direction.
Eureka Math Grade 6 Module 3 Lesson 14 Problem Set Answer Key 3
Answer:
A (4, 1); B (1, – 3); C (6, 0); D (1, 4)

Extension:

Question 3.
Write ordered pairs of integers that satisfy the criteria in each part below. Remember that the origin is the point whose coordinates are (0, 0). When possible, give ordered pairs such that (i) both coordinates are positive, (ii) both coordinates are negative, and (iii) the coordinates have opposite signs in either order.

a. These points’ vertical distance from the origin Is twice their horizontal distance.
Answer:
Answers will vary; examples are (5, 10), (- 2, 4), (- 5, – 10), (2, – 4).

b. These points’ horizontal distance from the origin Is two units more than the vertical distance.
Answer:
Answers will vary; examples are (3, 1), (- 3, 1), (- 3,- 1), (3, – 1).

c. These points’ horizontal and vertical distances from the origin are equal, but only one coordinate is positive.
Answer:
Answers will vary; examples are (3, – 3), (- 8,8).

Eureka Math Grade 6 Module 3 Lesson 14 Exit Ticket Answer Key

Question 1.
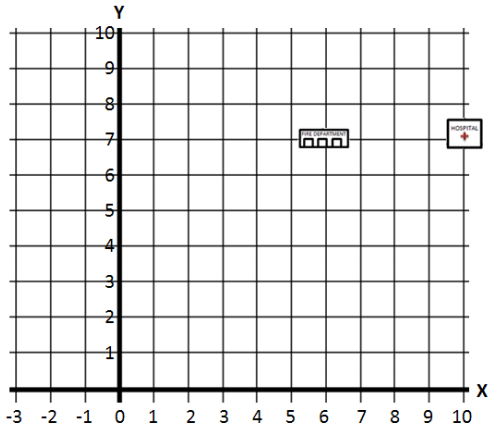
On the map below, the fire department and the hospital have one matching coordinate. Determine the proper order of the ordered pairs In the map, and write the correct ordered pairs for the locations of the fire department and hospital. Indicate which of their coordinates are the same.
Answer:
The order of the numbers is (x, y); fire department: (6, 7) and hospital: (10, 7); they have the same second coordinate.

Eureka Math Grade 6 Module 3 Lesson 14 Exit Ticket Answer Key 4
Answer:
Eureka Math Grade 6 Module 3 Lesson 14 Exit Ticket Answer Key 5

Question 2.
On the map above, locate and label the location of each description below:
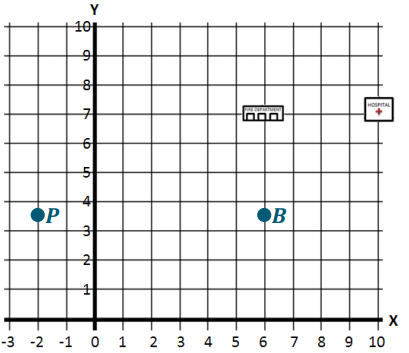
a. The local bank has the same first coordinate as the fire department, but its second coordinate is half of the fire department’s second coordinate. What ordered pair describes the location of the bank? Locate and label the bank on the map using point B.
Answer:
(6, 3. 5); see the map image for the correct location of point B.

b. The Village Police Department has the same second coordinate as the bank, but its first coordinate is – 2. What ordered pair describes the location of the Village Police Department? Locate and label the Village Police Department on the map using point P.
Answer:
(- 2, 3.5); see the map image for the correct location of point P.

Eureka Math Grade 6 Module 3 Lesson 13 Answer Key

Engage NY Eureka Math 6th Grade Module 3 Lesson 13 Answer Key

Eureka Math Grade 6 Module 3 Lesson 13 Example Answer Key

Example 1. Ordering Numbers In the Real World
A $25 credit and a $25 charge appear similar, yet they are very different.
Describe what is similar about the two transactions.
Answer:
The transactions look similar because they are described using the same number. Both transactions have the same magnitude (or absolute value) and, therefore, result in a change of $25 to an account balance.

How do the two transactions differ?
Answer:
The credit would cause an increase to an account balance and, therefore, should be represented by 25, while the charge would instead decrease an account balance and should be represented by – 25. The two transactions represent changes that are opposites.

Example 2: Using Absolute Value to Solve Real-World Problems
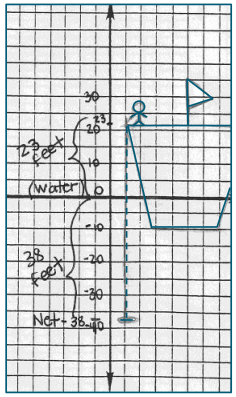
The captain of a fishing vessel is standing on the deck at 23 feet above sea level. He holds a rope tied to his fishing net that is below him underwater at a depth of 38 feet.

Draw a diagram using a number line, and then use absolute value to compare the lengths of rope in and out of the water.
Answer:
Eureka Math Grade 6 Module 3 Lesson 13 Example Answer Key 1
The captain is above the water, and the fishing net is below the water’s surface. Using the water level as reference point zero, I can draw the diagram using a vertical number line. The captain is located at 23, and the fishing net is located at – 38.

|23| = 23 and |- 38| = 38,so there is more rope underwater than above.

38 – 23 = 15
The length of rope below the water’s surface is 15 feet longer than the rope above water.

Example 3: Making Sense of Absolute Value and Statements of Inequality
A recent television commercial asked viewers, “Do you have over $10,000 in credit card debt?”

What types of numbers are associated with the word debt, and why? Write a number that represents the value from the television commercial.
Answer:
Negative numbers; debt describes money that is owed; – 10,000

Give one example of “over $10,000 in credit card debt.” Then, write a rational number that represents your example.
Answer:
Answers will vary, but the number should have a value of less than – 10,000. Credit card debt of $11,000; – 11,000

How do the debts compare, and how do the rational numbers that describe them compare? Explain.
Answer:
The example $11, 000 is greater than $10, 000 from the commercial; however, the rational numbers that represent these debt values have the opposite order because they are negative numbers. – 11,000 < – 10, 000. The absolute values of negative numbers have the opposite order of the negative values themselves.

Eureka Math Grade 6 Module 3 Lesson 13 Exercise Answer Key

Exercise 1.
Scientists are studying temperatures and weather patterns in the Northern Hemisphere. They recorded
temperatures (in degrees Celsius) in the table below as reported in emails from various participants. Represent each reported temperature using a rational number. Order the rational numbers from least to greatest. Explain why the rational numbers that you chose appropriately represent the given temperatures.
Eureka Math Grade 6 Module 3 Lesson 13 Exercise Answer Key 2
Answer:
Eureka Math Grade 6 Module 3 Lesson 13 Exercise Answer Key 3
– 13 < – 8 < – 6 < – 5 < – 4 < 0 < 2 < 12
The words “below zero” refer to negative numbers because they are located below zero on a vertical number line.

Exercise 2.
Jami’s bank account statement shows the transactions below. Represent each transaction as a rational number describing how it changes Jami’s account balance. Then, order the rational numbers from greatest to least. Explain why the rational numbers that you chose appropriately reflect the given transactions.
Eureka Math Grade 6 Module 3 Lesson 13 Exercise Answer Key 4
Answer:
Eureka Math Grade 6 Module 3 Lesson 13 Exercise Answer Key 5
5.5 > 4.08 > – 1.5 > – 3 > – 3.95 > – 12.2 > – 20
The words “debit,” “charge,” and “withdrawal” all describe transactions in which money is taken out of Jami’s account, decreasing its balance. These transactions are represented by negative numbers. The words “credit” and “deposit” describe transactions that will put money into Jami’s account, increasing its balance. These transactions are represented by positive numbers.

Exercise 3.
During the summer, Madison monitors the water level in her parents’ swimming pool to make sure it is not too far above or below normal. The table below shows the numbers she recorded In July and August to represent how the water levels compare to normal. Order the rational numbers from least to greatest. Explain why the rational numbers that you chose appropriately reflect the given water levels.
Eureka Math Grade 6 Module 3 Lesson 13 Exercise Answer Key 6
Answer:
Eureka Math Grade 6 Module 3 Lesson 13 Exercise Answer Key 7
\(-1 \frac{1}{4}<-\frac{3}{4}<-\frac{1}{2}<-\frac{3}{8}<\frac{1}{8}<\frac{1}{4}<\frac{1}{2}\)
The measurements are taken in reference to normal level, which is considered to be 0. The words “above normal” refer to the positive numbers located above zero on a vertical number line, and the words “below normal” refer to the negative numbers located below zero on a vertical number line.

Exercise 4.
Changes in the weather can be predicted by changes in the barometric pressure. Over several weeks, Stephanie recorded changes in barometric pressure seen on her barometer to compare to local weather forecasts. Her observations are recorded In the table below. Use rational numbers to record the indicated changes In the pressure in the second row of the table. Order the rational numbers from least to greatest. Explain why the rational numbers that you chose appropriately represent the given pressure changes.
Eureka Math Grade 6 Module 3 Lesson 13 Exercise Answer Key 8
Answer:
Eureka Math Grade 6 Module 3 Lesson 13 Exercise Answer Key 9

Eureka Math Grade 6 Module 3 Lesson 13 Problem Set Answer Key

Question 1.
Negative air pressure created by an air pump makes a vacuum cleaner able to collect air and dirt into a bag or other container. Below are several readings from a pressure gauge. Write rational numbers to represent each of the readings, and then order the rational numbers from least to greatest.
Eureka Math Grade 6 Module 3 Lesson 13 Problem Set Answer Key 10
Answer:
Eureka Math Grade 6 Module 3 Lesson 13 Problem Set Answer Key 11
– 13 < – 7.8 < – 6.3 < – 1.9 < 2 < 7.8 < 25

Question 2.
The fuel gauge in Nic’s car says that he has 26 miles to go until his tank is empty. He passed a fuel station 19 miles ago, and a sign says there is a town only 8 miles ahead. If he takes a chance and drives ahead to the town and there isn’t a fuel station there, does he have enough fuel to go back to the last station? Include a diagram along a number line, and use absolute value to find your answer.
Answer:
No, he does not have enough fuel to drive to the town and then back to the fuel station. He needs 8 miles’ worth of fuel to get to the town, which lowers his limit to 18 miles. The total distance between the fuel station and the town is 27 miles; |8| + |- 19| = 8 + 19 = 27. Nic would be9miles short on fuel. It would be safer to go back to the fuel station without going to the town first.
Eureka Math Grade 6 Module 3 Lesson 13 Problem Set Answer Key 12

Eureka Math Grade 6 Module 3 Lesson 13 Exit Ticket Answer Key

Question 1.
Loni and Daryl call each other from different sides of Watertown. Their locations are shown on the number line below using miles. Use absolute value to explain who is a farther distance (in miles) from Watertown. How much closer is one than the other?
Eureka Math Grade 6 Module 3 Lesson 13 Exit Ticket Answer Key 13
Answer:
Eureka Math Grade 6 Module 3 Lesson 13 Exit Ticket Answer Key 14

Loni’s location is – 6, and |- 6| = 6 because – 6 is 6 units from 0 on the number line. Daryl’s location is 10, and |10| = 10 because 10 is 10 units from 0 on the number line. We know that 10 > 6, so Daryl is farther from Watertown than Loni.
10 – 6 = 4; Loni is 4 miles closer to Watertown than Daryl.

Question 2.
Claude recently read that no one has ever scuba dived more than 330 meters below sea level. Describe what this means in terms of elevation using sea level as a reference point.
Answer:
330 meters below sea level is an elevation of – 330 feet. “More than 330 meters below sea level” means that no diver has ever had more than 330 meters between himself and sea level when he was below the water’s surface while scuba diving.

Eureka Math Grade 6 Module 3 Lesson 13 Opening Exercise Answer Key

Question 1.
A radio disc jockey reports that the temperature outside his studio has changed 10 degrees since he came on the air this morning. Discuss with your group what listeners can conclude from this report.
Answer:
The report is not specific enough to be conclusive because 10 degrees of change could mean an increase or a decrease in temperature. A listener might assume the report says an increase in temperature; however, the word “changed” is not specific enough to conclude a positive or negative change.

Eureka Math Grade 6 Module 3 Lesson 12 Answer Key

Engage NY Eureka Math 6th Grade Module 3 Lesson 12 Answer Key

Eureka Math Grade 6 Module 3 Lesson 12 Example Answer Key

Example 1: Comparing Order of Integers to the Order of Their Absolute Values
Write an Inequality statement relating the ordered integers from the Opening Exercise. Below each integer, write its absolute value.
Answer:
Eureka Math Grade 6 Module 3 Lesson 12 Example Answer Key 1

Circle the absolute values that are in increasing numerical order and their corresponding integers. Describe the circled values.
Answer:
Eureka Math Grade 6 Module 3 Lesson 12 Example Answer Key 2
The circled integers are all positive values except zero. The positive integers and their absolute values have the same order.

Rewrite the integers that are not circled in the space below. How do these integers differ from the ones you circled?
Answer:
– 12, – 9, – 5, – 2, – 1
They are all negative integers.

Rewrite the negative integers in ascending order and their absolute values in ascending order below them.
Answer:
Eureka Math Grade 6 Module 3 Lesson 12 Example Answer Key 3

Describe how the order of the absolute values compares to the order of the negative integers.
Answer:
The orders of the negative integers and their corresponding absolute values are opposite.

Example 2: The Order of Negative Integers and Their Absolute Values
Draw arrows starting at the dashed line (zero) to represent each of the integers shown on the number line below. The arrows that correspond with 1 and 2 have been modeled for you.
Eureka Math Grade 6 Module 3 Lesson 12 Example Answer Key 4
Answer:
Eureka Math Grade 6 Module 3 Lesson 12 Example Answer Key 5

As you approach zero from the left on the number line, the integers ___________, but the absolute values of those integers ___________. This means that the order of negative integers is ___________ the order of their absolute values.
Answer:
As you approach zero from the left on the number line, the integers   increase   , but the absolute values of those integers    decrease  . This means that the order of negative integers is   opposite   the order of their absolute values.

Eureka Math Grade 6 Module 3 Lesson 12 Exercise Answer Key

Complete the steps below to order these numbers:

{2.1, – 4\(\frac{1}{2}\), – 6. 0.25, – 1.5, 0, 3.9, – 6.3, – 4, 2\(\frac{3}{4}\), 3.99, – 9\(\frac{1}{4}\)}

a. Separate the set of numbers into positive rational numbers, negative rational numbers, and zero in the top cells below (order does not matter).
Answer:

b. Write the absolute values of the rational numbers (order does not matter) in the bottom cells below.
Eureka Math Grade 6 Module 3 Lesson 12 Example Answer Key 7
Answer:
Eureka Math Grade 6 Module 3 Lesson 12 Example Answer Key 8

c. Order each subset of absolute values from least to greatest.
Eureka Math Grade 6 Module 3 Lesson 12 Example Answer Key 9
Answer:
Eureka Math Grade 6 Module 3 Lesson 12 Example Answer Key 10

d. Order each subset of rational numbers from least to greatest.
Eureka Math Grade 6 Module 3 Lesson 12 Example Answer Key 11
Answer:
Eureka Math Grade 6 Module 3 Lesson 12 Example Answer Key 12

e. Order the whole given set of rational numbers from least to greatest.
Answer:
– 9\(\frac{1}{4,}\), – 6.3, – 6, – 4\(\frac{1}{2}\), – 4, – 1.5, 0, 0.25, 2.1, 2\(\frac{3}{4}\), 3.9, 3.99

Exercise 2.
a. Find a set of four integers such that their order and the order of their absolute values are the same.
Answer:
Answers will vary. An example follows: 4, 6, 8, 10

b. Find a set of four integers such that their order and the order of their absolute values are opposite.
Answer:
Answers will vary. An example follows: – 10, – 8, – 6, – 4

c. Find a set of four non-integer rational numbers such that their order and the order of their absolute values are the same.
Answer:
Answers will vary. An example follows: 2\(\frac{1}{2}\), 3\(\frac{1}{2}\), 4\(\frac{1}{2}\), 5\(\frac{1}{2}\)

d. Find a set of four non-integer rational numbers such that their order and the order of their absolute values are opposite.
Answer:
Answers will vary. An example follows: – 5\(\frac{1}{2}\), – 4\(\frac{1}{2}\), – 3\(\frac{1}{2}\), – 2\(\frac{1}{2}\)

e. Order all of your numbers from parts (a) – (d) in the space below. This means you should be ordering 16 numbers from least to greatest.
Answer:
Answers will vary. An example follows:
– 10, – 8, – 6, – 5\(\frac{1}{2}\), – 4\(\frac{1}{2}\), – 4, – 3\(\frac{1}{2}\), – 2\(\frac{1}{2}\), 2\(\frac{1}{2}\), 3\(\frac{1}{2}\), 4, 4\(\frac{1}{2}\), 5\(\frac{1}{2}\), 6, 8, 10

Eureka Math Grade 6 Module 3 Lesson 12 Problem Set Answer Key

Question 1.
Micah and Joel each have a set of five rational numbers. Although their sets are not the same, their sets of numbers have absolute values that are the same. Show an example of what Micah and Joel could have for numbers. Give the sets in order and the absolute values in order.
Answer:
Examples may vary, If Micah had 1, 2, 3, 4, 5, then his order of absolute values would be the same: 1, 2, 3, 4, 5. If Joel had the numbers – 5, – 4, – 3, -2, -1, then his order of absolute values would also be 1, 2, 3, 4, 5.

Enrichment Extension: Show an example where Micah and Joel both have positive and negative numbers.
Answer:
If Micah had the numbers: – 5, – 3, – 1, 2, 4, his order of absolute values would be 1, 2, 3, 4, 5. If Joel hod the numbers – 4, – 2, 1, 3, 5, then the order of his absolute values would also be 1, 2, 3, 4, 5.

Question 2.
For each pair of rational numbers below, place each number In the Venn diagram based on how it compares to the other.
a. – 4, – 8
b. 4,8
C. 7,- 3
d. – 9,2
e. 6,1
f. – 5,5
g. – 2,0
Answer:
Eureka Math Grade 6 Module 3 Lesson 12 Problem Set Answer Key 13

Eureka Math Grade 6 Module 3 Lesson 12 Exit Ticket Answer Key

Question 1.
Bethany writes a set of rational numbers in increasing order. Her teacher asks her to write the absolute values of these numbers in Increasing order. When her teacher checks Bethany’s work, she Is pleased to see that Bethany has not changed the order of her numbers. Why is this?
Answer:
All of Bethany’s rational numbers are positive or 0. The positive rational numbers have the same order as their absolute values. If any of Bethany’s rational numbers are negative, then the order would be different.

Question 2.
Mason was ordering the following rational numbers In math class: – 3. 3, – 15, – 8\(\frac{8}{9}\).
a. Order the numbers from least to greatest.
Answer:
– 15, – 8\(\frac{8}{9}\), – 3.3

b. List the order of their absolute values from least to greatest.
Answer:
3.3, 8\(\frac{8}{9}\), 15

c. Explain why the orderings in parts (a) and (b) are different.
Answer:
Since these are all negative numbers, when I ordered them from least to greatest, the one farthest away from zero (farthest to the left on the number line) came first. This number is – 15. Absolute value is the numbers’ distance from zero, and so the number farthest away from zero has the greatest absolute value, so 15 will be greatest in the list of absolute values, and so on.

Eureka Math Grade 6 Module 3 Lesson 12 Opening Exercise Answer Key

Record your integer values in order from least to greatest in the space below.
Answer:
Sample answer: – 12, – 9, – 5, – 2, – 1, 0, 2, 5, 7, 8

Eureka Math Grade 6 Module 3 Lesson 11 Answer Key

Engage NY Eureka Math 6th Grade Module 3 Lesson 11 Answer Key

Eureka Math Grade 6 Module 3 Lesson 11 Example Answer Key

Example 1. The Absolute Value of a Number
The absolute value often is written as |10|. On the number line, count the number of units from 10 to 0. How many units is 10 from 0?
Answer:
|10| = 10

Eureka Math Grade 6 Module 3 Lesson 11 Example Answer Key 2
Answer:
Eureka Math Grade 6 Module 3 Lesson 11 Example Answer Key 3

What other number has an absolute value of 10? Why?
Answer:
|- 10| = 10 because – 10 is 10 units from zero and – 10 and 10 are opposites.

The   absolute   value of a number is the distance between the number and zero on the number line.

Example 2. Using Absolute Value to Find Magnitude
Mrs. Owens received a call from her bank because she had a checkbook balance of – $45. What was the magnitude of the amount overdrawn?
Answer:
|- 45| = 45
Mrs. Owens overdrew her checking account by $45.

The   magnitude    of a measurement is the absolute value of its measure.

Eureka Math Grade 6 Module 3 Lesson 11 Exercise Answer Key

Exercise 1 – 3
Complete the following chart.
Eureka Math Grade 6 Module 3 Lesson 11 Exercise Answer Key 4
Answer:
Eureka Math Grade 6 Module 3 Lesson 11 Exercise Answer Key 5

For each scenario below, use absolute value to determine the magnitude of each quantity.

Exercise 4.
Maria was sick with the flu, and her weight change as a result of it is represented by – 4 pounds. How much weight did Maria lose?
Answer:
|-4| = 4 Maria lost 4 pounds.

Exercise 5.
Jeffrey owes his friend $5. How much is Jeffrey’s debt?
Answer:
|- 5| = 5 Jeffrey has a $5 debt.

Exercise 6.
The elevation of Niagara Falls, which is located between Lake Erie and Lake Ontario, is 326 feet. How far is this above sea level?
Answer:
|326| = 326 It is 326 feet above sea level.

Exercise 7.
How far below zero is – 16 degrees Celsius?
Answer:
|- 16| = 16 – 16°C is 16 degrees below zero.

Exercise 8.
Frank received a monthly statement for his college savings account. It listed a deposit of $100 as + 100. 00. It listed a withdrawal of $25 as – 25.00. The statement showed an overall ending balance of $835. 50. How much money did Frank add to his account that month? How much did he take out? What is the total amount Frank has saved for college?
Answer:
|100| = 100 Frank added $100 to his account.
|- 25| = 25 Frank took $25 out of his account.
|835. 50| = 835. 50 The total amount of Frank’s savings for college is $835. 50.

Exercise 9.
Meg is playing a card game with her friend, lona. The cards have positive and negative numbers printed on them. Meg exclaims: “The absolute value of the number on my card equals 8.” What is the number on Meg’s card?
Answer:
|- 8| = 8 or |8| = 8
Meg either has 8 or – 8 on her card.

Exercise 10.
List a positive and negative number whose absolute value is greater than 3. Justify your answer using the number line.
Answer:
Answers may vary. |-4| = 4 and |7| = 7; 4 > 3 and 7 > 3. On a number line, the distance from zero to – 4 is 4 units. So, the absolute value of – 4 is 4. The number 4 is to the right of 3 on the number line, so 4 is greater than 3. The distance from zero to 7 on a number line is 7 units, so the absolute value of 7 is 7. Since 7 is to the right of 3 on the number line, 7 is greater than 3.

Exercise 11.
Which of the following situations can be represented by the absolute value of 10? Check all that apply.
_________ The temperature is 10 degrees below zero. Express this as an integer.
_________ Determine the size of Harold’s debt if he owes $10.
_________ Determine how far – 10 is from zero on a number line.
_________ 10 degrees is how many degrees above zero?
Answer:
The temperature is 10 degrees below zero. Express this as an integer.
  X    Determine the size of Harold’s debt if he owes $10.
  X    Determine how far – 10 is from zero on a number line.
  X    10 degrees is how many degrees above zero?

Exercise 12.
Julia used absolute value to find the distance between 0 and 6 on a number line. She then wrote a similar
statement to represent the distance between 0 and – 6. Below is her work. Is it correct? Explain.
Answer:
|6| = 6 and |- 6| = – 6
No. The distance is 6 units whether you go from 0 to 6 or 0 to – 6. So, the absolute value 0f – 6 should also be 6, but Julia said it was – 6.

Exercise 13.
Use absolute value to represent the amount, in dollars, of a $238. 25 profit.
Answer:
|1238. 25| = 238.25

Exercise 14.
Judy lost 15 pounds. Use absolute value to represent the number of pounds Judy lost.
Answer:
|- 15| = 15

Exercise 15.
In math class, Carl and Angela are debating about Integers and absolute value. Carl said two integers can have the same absolute value, and Angela said one integer can have two absolute values. Who is right? Defend your answer.
Answer:
Carl is right. An integer and Its opposite are the same distance from zero. So, they have the same absolute values because absolute value is the distance between the number and zero.

Exercise 16.
Jamie told his math teacher: “Give me any absolute value, and I can tell you two numbers that have that absolute value.” Is Jamie correct? For any given absolute value, will there always be two numbers that have that absolute value?
Answer:
No, Jamie is not correct because zero is its own opposite. Only one number has an absolute value oJO, and that would be O.

Exercise 17.
Use a number line to show why a number and its opposite have the same absolute value.
Answer:
A number and its opposite are the same distance from zero but on opposite sides. An example is 5 and – 5. These numbers are both 5 units from zero. Their distance is the same, so they have the same absolute value, 5.
Eureka Math Grade 6 Module 3 Lesson 11 Exercise Answer Key 6

Exercise 18.
A bank teller assisted two customers with transactions. One customer made a $25 withdrawal from a savings account. The other customer made a $15 deposit. Use absolute value to show the size of each transaction. Which transaction involved more money?
Answer:
|- 25| = 25 and |15| = 15. The $25 withdrawal involved more money.

Exercise 19.
Which is farther from zero: – 7\(\frac{3}{4}\) or 7\(\frac{1}{2}\)? Use absolute value to defend your answer.
Answer:
The number that is farther from 0 is – 7\(\frac{3}{4}\). This is because = |-7\(\frac{3}{4}\)| and |7\(\frac{1}{2}\)| = 7\(\frac{1}{2}\). Absolute value is a number’s distance from zero. I compared the absolute value of each number to determine which was farther from zero. The absolute value of – 7\(\frac{3}{4}\) is 7\(\frac{3}{4}\). The absolute value of 7 is 7\(\frac{1}{2}\). We know that 7\(\frac{3}{4}\) is greater than 7\(\frac{1}{2}\). Therefore, – 7\(\frac{3}{4}\) is farther from zero than 7\(\frac{1}{2}\).
Therefore, – 7\(\frac{3}{4}\) is farther from zero than 7\(\frac{1}{2}\).

Eureka Math Grade 6 Module 3 Lesson 11 Problem Set Answer Key

For each of the following two quantities in Problems 1 – 4, which has the greater magnitude? (Use absolute value to defend your answers.)

Question 1.
33 dollars and – 52 dollars
Answer:
|- 52| = 52 |33| = 33                                       52 > 33, so – 52 dollars has the greater magnitude.

Question 2.
– 14 feet and 23 feet
Answer:
|- 14| = 14 |23| = 23                                      14 < 23, so 23 feet has the greater magnitude.

Question 3.
– 24.6 pounds and – 24.58 pounds
Answer:
|- 24.6| = 24.6                                |- 24. 58| = 24.58
24.6 > 24.58, so – 24.6 pounds has the greater magnitude.

Question 4.
– 11\(\frac{1}{4}\) degrees and 11 degrees
Answer:
|-11\(\frac{1}{4}\)| = 11\(\frac{1}{4}\)                              |11| = 11
11\(\frac{1}{4}\) > 11, so – 11\(\frac{1}{4}\) degrees has the greater magnitude.

For Problems 5-7, answer true or false. If false, explain why.

Question 5.
The absolute value of a negative number will always be a positive number.
Answer:
True

Question 6.
The absolute value of any number will always be a positive number.
Answer:
False. Zero is the exception since the absolute value of zero is zero, and zero is not positive.

Question 7.
Positive numbers will always have a higher absolute value than negative numbers.
Answer:
False. A number and its opposite have the same absolute value.

Question 8.
Write a word problem whose solution is |20| = 20.
Answer:
Answers will vary. Kelli flew a kite 20 feet above the ground. Determine the distance between the kite and the ground.

Question 9.
Write a word problem whose solution is |- 70| = 70.
Answer:
Answers will vary. Paul dug a hole in his yard 70 inches deep to prepare for an in-ground swimming pool. Determine the distance between the ground and the bottom of the hole that Paul dug.

Question 10.
Look at the bank account transactions listed below, and determine which has the greatest impact on the account balance. Explain.
a. A withdrawal of $60
b. A deposit of $55
c. A withdrawal of $58.50
Answer:
|- 60| = 60                         |55| = 55                           |- 58.50| = 58.50
60 > 58. 50 > 55, so a withdrawal of $60 has the greatest impact on the account balance.

Eureka Math Grade 6 Module 3 Lesson 11 Exit Ticket Answer Key

Jessie and his family drove up to a picnic area on a mountain. In the morning, they followed a trail that led to the mountain summit, which was 2,000 feet above the picnic area. They then returned to the picnic area for lunch. After lunch, they hiked on a trail that led to the mountain overlook, which was 3, 500 feet below the picnic area.

Eureka Math Grade 6 Module 3 Lesson 11 Exit Ticket Answer Key 7

a. Locate and label the elevation of the mountain summit and mountain overlook on a vertical number line. The picnic area represents zero. Write a rational number to represent each location.
Answer:
Picnic area:   0 
Mountain summit:   2,000  
Mountain overlook:   3,500  

b. Use absolute value to represent the distance on the number line of each location from the picnic area.
Answer:
Distance from the picnic area to the mountain summit    |2,000| =   2,000   
Distance from the picnic area to the mountain overlook:    |- 3,500| =   3,500   

c. What is the distance between the elevations of the summit and overlook? Use absolute value and your number line from part (a) to explain your answer.
Answer:
Summit to picnic area and picnic area to overlook: 2,000 + 3,500 = 5,500
There are 2,000 units from zero to 2,000 on the number line.
There are 3,500 units from zero to – 3, 500 on the number line.
Altogether, that equals 5, 500 units, which represents the distance on the number line between the two elevations. Therefore, the difference in elevations is 5,500 feet.

Eureka Math Grade 6 Module 3 Lesson 11 Opening Exercise Answer Key

Eureka Math Grade 6 Module 3 Lesson 11 Opening Exercise Answer Key 1
Answer:
After two minutes:
→ What are some examples you found (pairs of numbers that are the same distance from zero)?
\(\frac{1}{2}\) and \(\frac{1}{2}\), 8.01 and – 8.01, – 7 and 7.
→ What is the relationship between each pair of numbers?
They are opposites.
→ How does each pair of numbers relate to zero?
Both numbers in each pair are the same distance from zero.

Eureka Math Grade 6 Module 3 Lesson 10 Answer Key

Engage NY Eureka Math 6th Grade Module 3 Lesson 10 Answer Key

Eureka Math Grade 6 Module 3 Lesson 10 Example Answer Key

Example 1.
Writing Inequality Statements Involving Rational Numbers
Write one inequality statement to show the relationship among the following shoe sizes: 10\(\frac{1}{2}\), 8, and 9.
a. From least to greatest:
Answer:
8 < 9 < 10\(\frac{1}{2}\)

b. From greatest to least:
Answer:
10\(\frac{1}{2}\) > 9 > 8

Example 2.
Interpreting Data and Writing Inequality Statements
Mary is comparing the rainfall totals for May, June, and July. The data Is reflected in the table below. Fill in the blanks below to create inequality statements that compare the changes in Total Rainfall for each month (the right-most column of the table).
Eureka Math Grade 6 Module 3 Lesson 10 Example Answer Key 1

Write one inequality to order the Changes in Total Rainfall:
From least to greatest:   – 1.4 < 0.3 < 0.5   
From greatest to least:   0.5 >0.3 > -1.4     

In this case, does the greatest number indicate the greatest change in rainfall? Explain.
Answer:
No. In this situation, the greatest change is for the month of May since the average total rainfall went down from last year by 1.4 inches, but the greatest number in the inequality statement is 0. 5.

Eureka Math Grade 6 Module 3 Lesson 10 Exercise Answer Key

Exercise 1.
Graph your answer from the Opening Exercise part (a) on the number line below.
Answer:

Exercise 2.
Also, graph the points associated with 4 and 5 on the number line.
Answer:

Exercise 3.
Explain in words how the location of the three numbers on the number line supports the inequality statements you wrote in the Opening Exercise parts (b) and (c).
Answer:
The numbers are ordered from least to greatest when I look at the number line from left to right. So, 4 is less than 4. 75, and 4.75 is less than 5.

Exercise 4.
Write one inequality statement that shows the relationship among all three numbers.
Eureka Math Grade 6 Module 3 Lesson 10 Exercise Answer Key 2
Answer:
4 < 4.75 < 5
Eureka Math Grade 6 Module 3 Lesson 10 Exercise Answer Key 3

Exercise 5.
Mark’s favorite football team lost yards on two back-to-back plays. They lost 3 yards on the first play. They lost 1 yard on the second play. Write an inequality statement using integers to compare the forward progress made on each play.
Answer:
– 3 < – 1

Exercise 6.
Sierra had to pay the school for two textbooks that she lost. One textbook cost $55, and the other cost $75. Her mother wrote two separate checks, one for each expense. Write two integers that represent the change to her mother’s checking account balance. Then, write an inequality statement that shows the relationship between these two numbers.
Answer:
– 55 and – 75; – 55 > – 75

Exercise 7.
Jason ordered the numbers – 70, – 18, and – 18. 5 from least to greatest by writing the following statement: – 18 < – 18.5 < – 70. Is this a true statement? Explain.
Answer:
No, it is not a true statement because 18 < 18. 5 < 70, so the opposites of these numbers are in the opposite order. The order should be – 70 < – 18.5 < 18.

Exercise 8.
Write a real-world situation that is represented by the following inequality: – 19 < 40. Explain the position of the numbers on a number line.
Answer:
The coldest temperature in January was – 19 degrees Fahrenheit, and the warmest temperature was 40 degrees Fahrenheit. Since the point associated with 40 is above zero on a vertical number line and – 19 is below zero, we know that 40 is greater than – 19. This means that 40 degrees Fahrenheit is warmer than – 19 degrees Fahrenheit.

Exercise 9.
A Closer Look at the Sprint
Look at the following two examples from the Sprint.
Eureka Math Grade 6 Module 3 Lesson 10 Exercise Answer Key 4
a. Fill in the numbers In the correct order.
– 1< – <\(\frac{1}{4}\) < 0 and 0 > – \(\frac{1}{4}\) > – 1

b. Explain how the position of the numbers on the number line supports the inequality statements you created.
Answer:
– 1 is the farthest left on the number line, so it is the least value. 0 is farthest right, so it is the greatest value, and – \(\frac{1}{4}\) is in between.

c. Create a new pair of greater than and less than inequality statements using three other rational numbers.
Answer:
Answers will vary. 8 > 0. 5 > – 1.8 and – 1.8 < 0.5 < 8

Eureka Math Grade 6 Module 3 Lesson 10 Problem Set Answer Key

For each of the relationships described below, write an Inequality that relates the rational numbers.

Question 1.
Seven feet below sea level Is farther below sea level than 4\(\frac{1}{2}\) feet below sea level.
Answer:
– 7 < – 4\(\frac{1}{2}\)

Question 2.
Sixteen degrees Celsius is warmer than zero degrees Celsius.
Answer:
16 > 0

Question 3.
Three and one-half yards of fabric Is less than five and one-half yards of fabric.
Answer:
3\(\frac{1}{2}\) < 5\(\frac{1}{2}\)

Question 4.
A loss of $500 in the stock market is worse than a gain of $200 in the stock market.
Answer:
– 500 < 200

Question 5.
A test score of 64 is worse than a test score of 65, and a test score of 65 is worse than a test score of 67\(\frac{1}{2}\)
Answer:
64 < 65 < 67\(\frac{1}{2}\)

Question 6.
In December, the total snowfall was 13. 2 inches, which is more than the total snowfall in October and November, which was 3.7 inches and 6. 15 inches, respectively.
Answer:
13.2 > 6.15 > 3.7

For each of the following, use the information given by the inequality to describe the relative position of the numbers on a horizontal number line.

Question 7.
– 0.2 < – 0.1
Answer:
– 0.2 is to the left of – 0.1, or – 0.1 is to the right of – 0.2.

Question 8.
8\(\frac{1}{4}\) > -8\(\frac{1}{4}\)
Answer:
8\(\frac{1}{4}\) is to the right of – 8\(\frac{1}{4}\) or – 8\(\frac{1}{4}\) is to the left of 8\(\frac{1}{4}\).

Question 9.
– 2 < 0 < 5
Answer:
– 2 is to the left of zero and zero is to the left of 5, or 5 is to the right of zero and zero is to the right of – 2.

Question 10.
– 99 > – 100
Answer:
– 99 is to the right of – 100, or – 100 is to the left of – 99.

Question 11.
– 7.6 <- 7\(\frac{1}{2}\) – 7
Answer:
– 7.6 is to the left of – 7\(\frac{1}{2}\) and – 7\(\frac{1}{2}\) is to the left of – 7, or – 7 is to the right of – 7\(\frac{1}{2}\) and – 7\(\frac{1}{2}\) is to the right of – 7.6.

Fill in the blanks with numbers that correctly complete each of the statements.

Question 12.
Three integers between -4 and 0
Answer:
– 3 < – 2 < – 1

Question 13.
Three rational numbers between 16 and 15
Answer:
15.3 < 15.6 < 15.7
Other answers are possible.

Question 14.
Three rational numbers between -1 and -2
Answer:
– 1.9 < – 1.55 < – 1.02
Other answers are possible.

Question 15.
Three integers between 2 and – 2
Answer:
– 1 < 0 < 1

Eureka Math Grade 6 Module 3 Lesson 10 Exit Ticket Answer Key

Question 1.
Kendra collected data for her science project. She surveyed people asking them how many hours they sleep during a typical night. The chart below shows how each person’s response compares to 8 hours (which is the answer she expected most people to say).
Eureka Math Grade 6 Module 3 Lesson 10 Exit Ticket Answer Key 5

a. Plot and label each of the numbers in the right-most column of the table above on the number line below.
Eureka Math Grade 6 Module 3 Lesson 10 Exit Ticket Answer Key 6
Answer:
Eureka Math Grade 6 Module 3 Lesson 10 Exit Ticket Answer Key 7

b. List the numbers from least to greatest
Answer:
– 1.0, – \(\frac{1}{4}\), 0, 0.5, 1.5

c. Using your answer from part (b) and inequality symbols, write one statement that shows the relationship among all the numbers.
Answer:
– 1.0 < –\(\frac{1}{4}\) < 0 < 0.5 < 1.5 or 0.5 > 0.5 > 0 > –\(\frac{1}{4}\) > -1.0

Eureka Math Grade 6 Module 3 Lesson 10 Opening Exercise Answer Key

“The amount of money I have in my pocket is less than $5 but greater than $4.”
a. One possible value for the amount of money in my pocket is ___________ .
Answer:
$4.75

b. Write an inequality statement comparing the possible value of the money in my pocket to $4.
Answer:
4.00 < 4.75

c. Write an inequality statement comparing the possible value of the money in my pocket to $5.
Answer:
4.75 < 5.00

Eureka Math Grade 6 Module 3 Lesson 10 Inequality Statements Answer Key

Rational Numbers: Inequality Statements – Round 1
Directions: Work in numerical order to answer Problems 1 – 33. Arrange each set of numbers in order according to the inequality symbols.

Question 1.
Eureka Math Grade 6 Module 3 Lesson 10 Inequality Statements Answer Key 8
Answer:
Eureka Math Grade 6 Module 3 Lesson 10 Inequality Statements Answer Key 41

Question 2
Eureka Math Grade 6 Module 3 Lesson 10 Inequality Statements Answer Key 9
Answer:
Eureka Math Grade 6 Module 3 Lesson 10 Inequality Statements Answer Key 42

Question 3.
Eureka Math Grade 6 Module 3 Lesson 10 Inequality Statements Answer Key 10
Answer:
Eureka Math Grade 6 Module 3 Lesson 10 Inequality Statements Answer Key 43

Question 4.
Eureka Math Grade 6 Module 3 Lesson 10 Inequality Statements Answer Key 11
Answer:
Eureka Math Grade 6 Module 3 Lesson 10 Inequality Statements Answer Key 44

Question 5.
Eureka Math Grade 6 Module 3 Lesson 10 Inequality Statements Answer Key 12
Answer:
Eureka Math Grade 6 Module 3 Lesson 10 Inequality Statements Answer Key 45

Question 6.
Eureka Math Grade 6 Module 3 Lesson 10 Inequality Statements Answer Key 13
Answer:
Eureka Math Grade 6 Module 3 Lesson 10 Inequality Statements Answer Key 46

Question 7.
Eureka Math Grade 6 Module 3 Lesson 10 Inequality Statements Answer Key 14
Answer:
Eureka Math Grade 6 Module 3 Lesson 10 Inequality Statements Answer Key 47

Question 8.
Eureka Math Grade 6 Module 3 Lesson 10 Inequality Statements Answer Key 15
Answer:
Eureka Math Grade 6 Module 3 Lesson 10 Inequality Statements Answer Key 48

Question 9.
Eureka Math Grade 6 Module 3 Lesson 10 Inequality Statements Answer Key 16
Answer:
Eureka Math Grade 6 Module 3 Lesson 10 Inequality Statements Answer Key 49

Question 10.
Eureka Math Grade 6 Module 3 Lesson 10 Inequality Statements Answer Key 17
Answer:
Eureka Math Grade 6 Module 3 Lesson 10 Inequality Statements Answer Key 50

Question 11.
Eureka Math Grade 6 Module 3 Lesson 10 Inequality Statements Answer Key 18
Answer:
Eureka Math Grade 6 Module 3 Lesson 10 Inequality Statements Answer Key 51

Question 12.
Eureka Math Grade 6 Module 3 Lesson 10 Inequality Statements Answer Key 19
Answer:
Eureka Math Grade 6 Module 3 Lesson 10 Inequality Statements Answer Key 52

Question 13.
Eureka Math Grade 6 Module 3 Lesson 10 Inequality Statements Answer Key 20
Answer:
Eureka Math Grade 6 Module 3 Lesson 10 Inequality Statements Answer Key 53

Question 14
Eureka Math Grade 6 Module 3 Lesson 10 Inequality Statements Answer Key 21
Answer:
Eureka Math Grade 6 Module 3 Lesson 10 Inequality Statements Answer Key 54

Question 15.
Eureka Math Grade 6 Module 3 Lesson 10 Inequality Statements Answer Key 22
Answer:
Eureka Math Grade 6 Module 3 Lesson 10 Inequality Statements Answer Key 55

Question 16.
Eureka Math Grade 6 Module 3 Lesson 10 Inequality Statements Answer Key 23
Answer:
Eureka Math Grade 6 Module 3 Lesson 10 Inequality Statements Answer Key 56

Question 17.
Eureka Math Grade 6 Module 3 Lesson 10 Inequality Statements Answer Key 24
Answer:
Eureka Math Grade 6 Module 3 Lesson 10 Inequality Statements Answer Key 57

Question 18.
Eureka Math Grade 6 Module 3 Lesson 10 Inequality Statements Answer Key 25
Answer:
Eureka Math Grade 6 Module 3 Lesson 10 Inequality Statements Answer Key 58

Question 19.
Eureka Math Grade 6 Module 3 Lesson 10 Inequality Statements Answer Key 26
Answer:
Eureka Math Grade 6 Module 3 Lesson 10 Inequality Statements Answer Key 59

Question 20.
Eureka Math Grade 6 Module 3 Lesson 10 Inequality Statements Answer Key 27
Answer:
Eureka Math Grade 6 Module 3 Lesson 10 Inequality Statements Answer Key 60

Question 21.
Eureka Math Grade 6 Module 3 Lesson 10 Inequality Statements Answer Key 28
Answer:
Eureka Math Grade 6 Module 3 Lesson 10 Inequality Statements Answer Key 61

Question 22.
Eureka Math Grade 6 Module 3 Lesson 10 Inequality Statements Answer Key 29
Answer:
Eureka Math Grade 6 Module 3 Lesson 10 Inequality Statements Answer Key 62

Question 23.
Eureka Math Grade 6 Module 3 Lesson 10 Inequality Statements Answer Key 30
Answer:
Eureka Math Grade 6 Module 3 Lesson 10 Inequality Statements Answer Key 63

Question 24.
Eureka Math Grade 6 Module 3 Lesson 10 Inequality Statements Answer Key 31
Answer:
Eureka Math Grade 6 Module 3 Lesson 10 Inequality Statements Answer Key 64

Question 25.
Eureka Math Grade 6 Module 3 Lesson 10 Inequality Statements Answer Key 32
Answer:
Eureka Math Grade 6 Module 3 Lesson 10 Inequality Statements Answer Key 65

Question 26.
Eureka Math Grade 6 Module 3 Lesson 10 Inequality Statements Answer Key 33
Answer:
Eureka Math Grade 6 Module 3 Lesson 10 Inequality Statements Answer Key 66

Question 27.
Eureka Math Grade 6 Module 3 Lesson 10 Inequality Statements Answer Key 34
Answer:
Eureka Math Grade 6 Module 3 Lesson 10 Inequality Statements Answer Key 67

Question 28.
Eureka Math Grade 6 Module 3 Lesson 10 Inequality Statements Answer Key 77 35
Answer:
Eureka Math Grade 6 Module 3 Lesson 10 Inequality Statements Answer Key 68

Question 29.
Eureka Math Grade 6 Module 3 Lesson 10 Inequality Statements Answer Key 36
Answer:
Eureka Math Grade 6 Module 3 Lesson 10 Inequality Statements Answer Key 69

Question 30.
Eureka Math Grade 6 Module 3 Lesson 10 Inequality Statements Answer Key 37
Answer:
Eureka Math Grade 6 Module 3 Lesson 10 Inequality Statements Answer Key 70

Question 31.
Eureka Math Grade 6 Module 3 Lesson 10 Inequality Statements Answer Key 38
Answer:
Eureka Math Grade 6 Module 3 Lesson 10 Inequality Statements Answer Key 71

Question 32.
Eureka Math Grade 6 Module 3 Lesson 10 Inequality Statements Answer Key 39
Answer:
Eureka Math Grade 6 Module 3 Lesson 10 Inequality Statements Answer Key 72

Question 33.
Eureka Math Grade 6 Module 3 Lesson 10 Inequality Statements Answer Key 40
Answer:
Eureka Math Grade 6 Module 3 Lesson 10 Inequality Statements Answer Key 73

Rational Numbers: Inequality Statements – Round 2
Directions: Work in numerical order to answer Problems 1 – 33. Arrange each set of numbers in order according to the inequality symbols.

Eureka Math Grade 6 Module 3 Lesson 10 Inequality Statements Answer Key 74
Eureka Math Grade 6 Module 3 Lesson 10 Inequality Statements Answer Key 75
Answer:
Eureka Math Grade 6 Module 3 Lesson 10 Inequality Statements Answer Key 76
Eureka Math Grade 6 Module 3 Lesson 10 Inequality Statements Answer Key 77

Eureka Math Grade 8 Module 3 Lesson 9 Answer Key

Engage NY Eureka Math 8th Grade Module 3 Lesson 9 Answer Key

Eureka Math Grade 8 Module 3 Lesson 9 Exploratory Challenge Answer Key

Exploratory Challenge 1.
The goal is to show that if △ABC is similar to △A’ B’ C’, then △A’ B’ C’ is similar to △ABC. Symbolically,
if △ABC~△A’B’C’, then △A’ B’ C’~△ABC.
Eureka Math Grade 8 Module 3 Lesson 9 Exploratory Challenge Answer Key 1
a. First, determine whether or not △ABC is in fact similar to △A’ B’ C’. (If it isn’t, then no further work needs to be done.) Use a protractor to verify that the corresponding angles are congruent and that the ratios of the corresponding sides are equal to some scale factor.
Answer:
Eureka Math Grade 8 Module 3 Lesson 9 Exploratory Challenge Answer Key 2
The corresponding angles are congruent: ∠A≅∠A’, ∠B≅∠B’, and ∠C≅∠C’, therefore
|∠A|=|∠A’ |=49°, |∠B|=|∠B’ |=99°, and |∠C|=|∠C’ |=32°.
The ratios of the corresponding sides are equal: \(\frac{4}{8}\)=\(\frac{3}{6}\)=\(\frac{2}{4}\)=r.

b. Describe the sequence of dilation followed by a congruence that proves △ABC~△A’ B’ C’.
Answer:
Eureka Math Grade 8 Module 3 Lesson 9 Exploratory Challenge Answer Key 2.1
To map △ABC onto △A’ B’ C’, dilate △ABC from center O by scale factor r=\(\frac{1}{2}\), noted in the diagram above by the red triangle. Then, translate the red triangle up two units and five units to the right. Next, rotate the red triangle 180 degrees around point A’ until AC coincides with A’C’.

c. Describe the sequence of dilation followed by a congruence that proves △A’B’C’~△ABC.
Answer:
Note that in the diagram below, both axes have been compressed.
Eureka Math Grade 8 Module 3 Lesson 9 Exploratory Challenge Answer Key 3
To map △A’B’C’ onto △ABC, dilate △A’B’C’ from center O by scale factor r=2, noted by the blue triangle in the diagram. Then, translate the blue triangle ten units to the left and two units down. Next, rotate the blue triangle 180 degrees around point A until side A’C’ coincides with side AC.

d. Is it true that △ABC~△A’ B’ C’ and △A’ B’ C’~△ABC? Why do you think this is so?
Answer:
Yes, it is true that △ABC~△A’ B’ C’ and △A’ B’ C’~△ABC. I think it is true because when we say figures are similar, it means that they are the same figure, just a different size because one has been dilated by a scale factor. For that reason, if one figure, like △ABC, is similar to another, like △A’ B’ C’, it must mean that △A’ B’ C’~△ABC. However, the sequence you would use to map one of the figures onto the other is different.

Exploratory Challenge 2.
The goal is to show that if △ABC is similar to △A’B’C’ and △A’B’C’ is similar to △A”B”C”, then △ABC is similar to
△A”B”C”. Symbolically, if △ABC~△A’ B’ C’ and △A’B’C’~△A”B”C”, then △ABC~△A”B”C”.
Eureka Math Grade 8 Module 3 Lesson 9 Exploratory Challenge Answer Key 4

a. Describe the similarity that proves △ABC~△A’B’C’.
Answer:
Eureka Math Grade 8 Module 3 Lesson 9 Exploratory Challenge Answer Key 5
To map △ABC onto △A’B’C’, we need to first determine the scale factor that makes △ABC the same size as △A’ B’ C’. Then, \(\frac{3}{1}\)=\(\frac{6.3}{2.1}\)=\(\frac{9}{3}\)=r. Dilate △ABC from center O by scale factor r=3, shown in red in the diagram. Then, translate the red triangle 5 units up.

b. Describe the similarity that proves △A’B’C’~△A”B”C”.
Answer:
Eureka Math Grade 8 Module 3 Lesson 9 Exploratory Challenge Answer Key 6
To map △A’B’C’ onto △A”B”C”, we need to first determine the scale factor that makes △A’B’C’ the same size as △A”B”C”. Then, \(\frac{4.2}{6.3}\)=\(\frac{6}{9}\)=\(\frac{2}{3}\)=r. Dilate △A’B’C’ from center O by scale factor r=\(\frac{2}{3}\), shown in blue in the diagram. Then, translate the blue triangle 3.5 units down and 5 units to the right. Next, rotate the blue triangle 90 degrees clockwise around point A” until the blue triangle coincides with
△A”B”C”.

c. Verify that, in fact, △ABC~△A”B”C” by checking corresponding angles and corresponding side lengths. Then, describe the sequence that would prove the similarity △ABC~△A” B” C”.
Answer:
Eureka Math Grade 8 Module 3 Lesson 9 Exploratory Challenge Answer Key 7
The corresponding angles are congruent: ∠A≅∠A”, ∠B≅∠B”, and ∠C≅∠C”; therefore, |∠A|=|∠A” |=18°, |∠B|=|∠B” |=117°, and |∠C|=|∠C” |=45°. The ratio of the corresponding sides is equal:
\(\frac{4.2}{2.1}\)=\(\frac{6}{3}\)=\(\frac{2}{1}\)=r. Dilate △ABC from center O by scale factor r=2, shown as the pink triangle in the diagram. Then, translate the pink triangle 5 units to the right. Finally, rotate the pink triangle 90 degrees clockwise around point A” until the pink triangle coincides with △A”B”C”.

d. Is it true that if △ABC~△A’ B’ C’ and △A’ B’ C’~△A”B”C”, then △ABC~△A”B”C”? Why do you think this is so?
Answer:
Yes, it is true that if △ABC~△A’ B’ C’ and △A’ B’ C’~△A” B” C”, then △ABC~△A” B” C”. Again, because these figures are similar, it means that they have equal angles and are made different sizes based on a specific scale factor. Since dilations map angles to angles of the same degree, it makes sense that all three figures would have the “same shape.” Also, using the idea that similarity is a symmetric relation, the statement that △ABC~△A’ B’ C’ implies that △A’ B’ C’~△ABC.
Since we know that △A’ B’ C’~△A”B”C”, it is reasonable to conclude that △ABC~△A”B”C”.

Eureka Math Grade 8 Module 3 Lesson 9 Problem Set Answer Key

Question 1.
Would a dilation alone be enough to show that similarity is symmetric? That is, would a dilation alone prove that if △ABC~ △A’B’C’, then △A’ B’ C’~ △ABC? Consider the two examples below.
a. Given △ABC~ △A’ B’ C’, is a dilation enough to show that △A’ B’ C’~ △ABC? Explain.
Eureka Math Grade 8 Module 3 Lesson 9 Problem Set Answer Key 31
Answer:
For these two triangles, a dilation alone is enough to show that if △ABC~△A’B’C’, then △A’ B’ C’~△ABC. The reason that dilation alone is enough is because both of the triangles have been dilated from the same center. Therefore, to map one onto the other, all that would be required is a dilation.

b. Given △ABC~△A’ B’ C’, is a dilation enough to show that △A’ B’ C’~△ABC? Explain.
Eureka Math Grade 8 Module 3 Lesson 9 Problem Set Answer Key 32
Answer:
For these two triangles, a dilation alone is not enough to show that if △ABC~ △A’ B’ C’, then △A’ B’ C’~
△ABC. The reason is that a dilation would just make them the same size. It would not show that you could map one of the triangles onto the other. To do that, you would need a sequence of basic rigid motions to demonstrate the congruence.

c. In general, is dilation enough to prove that similarity is a symmetric relation? Explain.
Answer:
No, in general, a dilation alone does not prove that similarity is a symmetric relation. In some cases, like part (a), it would be enough, but because we are talking about general cases, we must consider figures that require a sequence of basic rigid motions to map one onto the other. Therefore, in general, to show that there is a symmetric relationship, we must use what we know about similar figures, a dilation followed by a congruence, as opposed to dilation alone.

Question 2.
Would a dilation alone be enough to show that similarity is transitive? That is, would a dilation alone prove that if
△ABC~△A’B’C’, and △A’ B’ C’~△A”B”C”, then △ABC~△A”B”C”? Consider the two examples below.
a. Given △ABC~△A’ B’ C’ and △A’ B’ C’~△A”B”C”, is a dilation enough to show that △ABC~△A”B”C”? Explain.
Eureka Math Grade 8 Module 3 Lesson 9 Problem Set Answer Key 33
Answer:
Yes, in this case, we could dilate by different scale factors to show that all three triangles are similar to each other.

b. Given △ABC~△A’ B’ C’ and △A’ B’ C’~△A”B”C”, is a dilation enough to show that △ABC~△A”B”C”? Explain.
Answer:
Eureka Math Grade 8 Module 3 Lesson 9 Problem Set Answer Key 34
In this case, it would take more than just a dilation to show that all three triangles are similar to one another. Specifically, it would take a dilation followed by a congruence to prove the similarity among the three.

c. In general, is dilation enough to prove that similarity is a transitive relation? Explain.
Answer:
In some cases, it might be enough, but the general case requires the use of dilation and a congruence. Therefore, to prove that similarity is a transitive relation, you must use both a dilation and a congruence.

Question 3.
In the diagram below, △ABC~△A’ B’ C’ and △A’ B’ C’~△A”B”C”. Is △ABC~△A”B”C”? If so, describe the dilation followed by the congruence that demonstrates the similarity.
Eureka Math Grade 8 Module 3 Lesson 9 Problem Set Answer Key 35
Answer:
Yes, △ABC~△A”B”C” because similarity is transitive. Since r|AB|=|A”B”|, then r×4=2, which means
r=\(\frac{1}{2}\). Then, a dilation from the origin by scale factor r=\(\frac{1}{2}\) makes △ABC the same size as △A”B”C”. Translate the dilated image of △ABC 6 \(\frac{1}{2}\) units to the left and then reflect across line A”B”. The sequence of the dilation and the congruence map △ABC onto △A” B” C”, demonstrating the similarity.

Eureka Math Grade 8 Module 3 Lesson 9 Exit Ticket Answer Key

Use the diagram below to answer Problems 1 and 2.
Eureka Math Grade 8 Module 3 Lesson 9 Exit Ticket Answer Key 30

Question 1.
Which two triangles, if any, have similarity that is symmetric?
Answer:
△S~△R and △R~△S
△S~△T and △T~△S
△T~△R and △R~△T

Question 2.
Which three triangles, if any, have similarity that is transitive?
Answer:
One possible solution: Since △S~△R and △R~△T, then △S~△T.
Note that △U and △V are not similar to each other or any other triangles. Therefore, they should not be in any solution.

Eureka Math Grade 8 Module 3 Lesson 7 Answer Key

Engage NY Eureka Math 8th Grade Module 3 Lesson 7 Answer Key

Eureka Math Grade 8 Module 3 Lesson 7 Exercise Answer Key

Use the diagram below to prove the theorem: Dilations preserve the measures of angles.

Let there be a dilation from center O with scale factor r. Given ∠PQR, show that since P’=Dilation(P),
Q’=Dilation(Q), and R’=Dilation(R), then |∠PQR|=|∠P’Q’R’|. That is, show that the image of the angle after a dilation has the same measure, in degrees, as the original.
Eureka Math Grade 8 Module 3 Lesson 7 Exercise Answer Key 1
Answer:
Using FTS, we know that the line containing \(\overrightarrow{Q^{\prime} P^{\prime}}\) is parallel to the line containing \(\overrightarrow{Q P}\) and that the line containing \(\overrightarrow{Q R}\) is parallel to the line containing \(\overrightarrow{Q R}\). We also know that there exists just one line through a given point, parallel to a given line. Therefore, we know that Eureka Math Grade 8 Module 3 Lesson 7 Exercise Answer Key 15 must intersect Eureka Math Grade 8 Module 3 Lesson 7 Exercise Answer Key 16 at a point. We know this because there is already a line that goes through point Q’ that is parallel to Eureka Math Grade 8 Module 3 Lesson 7 Exercise Answer Key 18, and that line is Eureka Math Grade 8 Module 3 Lesson 7 Exercise Answer Key 19. Since Eureka Math Grade 8 Module 3 Lesson 7 Exercise Answer Key 20 cannot be parallel to Eureka Math Grade 8 Module 3 Lesson 7 Exercise Answer Key 21, it must intersect it. We let the intersection of Eureka Math Grade 8 Module 3 Lesson 7 Exercise Answer Key 23 and Eureka Math Grade 8 Module 3 Lesson 7 Exercise Answer Key 24 be named point B. Alternate interior angles of parallel lines cut by a transversal are equal in measure. Parallel lines QR and Q’R’ are cut by transversal \(\overline{\boldsymbol{Q}^{\prime} \boldsymbol{B}}\). Therefore, the alternate interior angles P’Q’R’ and Q’BQ are equal in measure. Parallel lines Eureka Math Grade 8 Module 3 Lesson 7 Exercise Answer Key 25 and Eureka Math Grade 8 Module 3 Lesson 7 Exercise Answer Key 26 are cut by transversal \(\overline{Q B} .\) Therefore, the alternate interior angles PQR and Q’BQ are equal in measure. Since the measures of ∠P’Q’R’ and ∠PQR are equal to the measure of ∠QB’Q, then the measure of ∠PQR is equal to the measure of ∠P’ Q’ R’.

Eureka Math Grade 8 Module 3 Lesson 7 Problem Set Answer Key

Question 1.
A dilation from center O by scale factor r of a line maps to what? Verify your claim on the coordinate plane.
Answer:
The dilation of a line maps to a line.
Sample student work is shown below.
Eureka Math Grade 8 Module 3 Lesson 7 Problem Set Answer Key 50

Question 2.
A dilation from center O by scale factor r of a segment maps to what? Verify your claim on the coordinate plane.
Answer:
The dilation of a segment maps to a segment.
Sample student work is shown below.
Eureka Math Grade 8 Module 3 Lesson 7 Problem Set Answer Key 51

Question 3.
A dilation from center O by scale factor r of a ray maps to what? Verify your claim on the coordinate plane.
Answer:
The dilation of a ray maps to a ray.
Sample student work is shown below.
Eureka Math Grade 8 Module 3 Lesson 7 Problem Set Answer Key 52

Question 4.
Challenge Problem:
Prove the theorem: A dilation maps lines to lines.
Let there be a dilation from center O with scale factor r so that P’=Dilation(P) and Q’=Dilation(Q). Show that line PQ maps to line P’Q’ (i.e., that dilations map lines to lines). Draw a diagram, and then write your informal proof of the theorem. (Hint: This proof is a lot like the proof for segments. This time, let U be a point on line PQ that is not between points P and Q.)
Answer:
Sample student drawing and response are below:
Eureka Math Grade 8 Module 3 Lesson 7 Problem Set Answer Key 53
Let U be a point on line PQ. By the definition of dilation, we also know that U’=Dilation(U). We need to show that U’ is a point on line P’Q’. If we can, then we have proven that a dilation maps lines to lines.
By the definition of dilation and FTS, we know that \(\frac{\left|O P^{\prime}\right|}{|O P|}\) =\(\frac{\left|O Q^{\prime}\right|}{|O Q|}\) and that \(\overleftrightarrow{P Q}\) is parallel to Eureka Math Grade 8 Module 3 Lesson 7 Problem Set Answer Key 30. Similarly, we know that Eureka Math Grade 8 Module 3 Lesson 7 Problem Set Answer Key 31 and that line QU is parallel to line Q’U’. Since U is a point on line PQ, then we also know that line PQ is parallel to line Q’U’. But we already know that Eureka Math Grade 8 Module 3 Lesson 7 Problem Set Answer Key 33 is parallel to Eureka Math Grade 8 Module 3 Lesson 7 Problem Set Answer Key 34. Since there can only be one line that passes through Q’ that is parallel to line PQ, then line P’Q’ and line Q’U’ must coincide. That places the dilation of point U, U’, on the line P’Q’, which proves that dilations map lines to lines.

Eureka Math Grade 8 Module 3 Lesson 7 Exit Ticket Answer Key

Dilate ∠ABC with center O and scale factor r=2. Label the dilated angle, ∠A’B’C’.
Engage NY Math 8th Grade Module 3 Lesson 7 Exit Ticket Answer Key 20
Answer:
Engage NY Math 8th Grade Module 3 Lesson 7 Exit Ticket Answer Key 20.1

Question 1.
If ∠ABC=72°, then what is the measure of ∠A’ B’ C’?
Answer:
Since dilations preserve angles, then ∠A’B’C’=72°.

Question 2.
If the length of segment AB is 2 cm, what is the length of segment A’B’?
Answer:
The length of segment A’B’ is 4 cm.

Question 3.
Which segments, if any, are parallel?
Answer:
Since dilations map segments to parallel segments, then \(\overline{A B}\) || \(\overline{A^{\prime} B^{\prime}}\), and \(\overline{\boldsymbol{B C}}\) || \(\overline{\boldsymbol{B}^{\prime} \boldsymbol{C}^{\prime}}\).

Eureka Math Grade 8 Module 3 Lesson 8 Answer Key

Engage NY Eureka Math 8th Grade Module 3 Lesson 8 Answer Key

Eureka Math Grade 8 Module 3 Lesson 8 Example Answer Key

Example 1.
In the picture below, we have triangle ABC that has been dilated from center O by a scale factor of r=\(\frac{1}{2}\). It is noted by A’B’C’. We also have triangle A”B”C”, which is congruent to triangle A’B’C’ (i.e., △A’B’C’≅△A”B”C”).
Engage NY Math 8th Grade Module 3 Lesson 8 Example Answer Key 1
Describe the sequence that would map triangle A”B”C” onto triangle ABC.

→ Based on the definition of similarity, how could we show that triangle A”B”C” is similar to triangle ABC?
→ To show that △A” B” C”~△ABC, we need to describe a dilation followed by a congruence.
→ We want to describe a sequence that would map triangle A”B”C” onto triangle ABC. There is no clear way to do this, so let’s begin with something simpler: How can we map triangle A’B’C’ onto triangle ABC? That is, what is the precise dilation that would make triangle A’B’C’ the same size as triangle ABC?
→ A dilation from center O with scale factor r=2
→ Remember, our goal was to describe how to map triangle A”B”C” onto triangle ABC. What precise dilation would make triangle A”B”C” the same size as triangle ABC?
→ A dilation from center O with scale factor r=2 would make triangle A”B”C” the same size as triangle ABC.
→ (Show the picture below with the dilated triangle A”B”C” noted by A”’B”’C”’.) Now that we know how to make triangle A”B”C” the same size as triangle ABC, what rigid motion(s) should we use to actually map triangle A”B”C” onto triangle ABC? Have we done anything like this before?
Engage NY Math 8th Grade Module 3 Lesson 8 Example Answer Key 2
→ Problem 2 of the Problem Set from Lesson 2 was like this. That is, we had two figures dilated by the same scale factor in different locations on the plane. To get one to map to the other, we just translated along a vector.
→ Now that we have an idea of what needs to be done, let’s describe the translation in terms of coordinates. How many units and in which direction do we need to translate so that triangle A”’B”’C”’ maps to triangle ABC?
→ We need to translate triangle A”’B”’C”’ 20 units to the left and 2 units down.
→ Let’s use precise language to describe how to map triangle A”B”C” onto triangle ABC. We need information about the dilation and the translation.
→ The sequence that would map triangle A”B”C” onto triangle ABC is as follows: Dilate triangle A”B”C” from center O by scale factor r=2. Then, translate the dilated triangle 20 units to the left and 2 units down.
→ Since we were able to map triangle A”B”C” onto triangle ABC with a dilation followed by a congruence, we can write that triangle A”B”C” is similar to triangle ABC, in notation, △A” B” C”~△ABC.

Example 2.
In the picture below, we have triangle DEF that has been dilated from center O, by scale factor r=3. It is noted by D’ E’ F’. We also have triangle D” E” F”, which is congruent to triangle D’ E’ F’ (i.e., △D’ E’ F’≅
△D”E”F”).
Engage NY Math 8th Grade Module 3 Lesson 8 Example Answer Key 3
→ We want to describe a sequence that would map triangle D”E”F” onto triangle DEF. This is similar to what we did in the last example. Can someone summarize the work we did in the last example?
→ First, we figured out what scale factor r would make the triangles the same size. Then, we used a sequence of translations to map the magnified figure onto the original triangle.
→ What is the difference between this problem and the last?
→ This time, the scale factor is greater than one, so we need to shrink triangle D”E”F” to the size of triangle DEF. Also, it appears as if a translation alone does not map one triangle onto another.
→ Now, since we want to dilate triangle D”E”F” to the size of triangle DEF, we need to know what scale factor r to use. Since triangle D”E”F” is congruent to D’E’F’, then we can use those triangles to determine the scale factor needed. We need a scale factor so that |OF|=r|OF’|. What scale factor do you think we should use, and why?
→ We need a scale factor r=\(\frac{1}{3}\) because we want |OF|=r|OF’|.
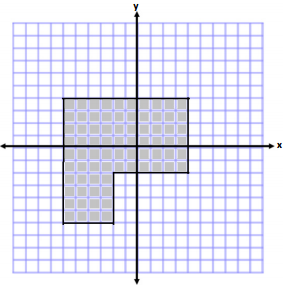
→ What precise dilation would make triangle D”E”F” the same size as triangle DEF?
→ A dilation from center O with scale factor r=\(\frac{1}{3}\) would make triangle D”E”F” the same size as triangle DEF.
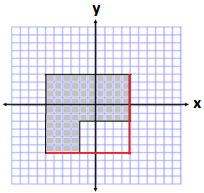
→ (Show the picture below with the dilated triangle D”E”F” noted by D”’E”’F”’.) Now we should use what we know about rigid motions to map the dilated version of triangle D”E”F” onto triangle DEF. What should we do first?
Engage NY Math 8th Grade Module 3 Lesson 8 Example Answer Key 4
→ We should translate triangle D”’E”’F”’ 2 units to the right.
→ (Show the picture below, the translated triangle noted in red.) What should we do next (refer to the translated triangle as the red triangle)?
Engage NY Math 8th Grade Module 3 Lesson 8 Example Answer Key 5
→ Next, we should reflect the red triangle across the x-axis to map the red triangle onto triangle DEF.
→ Use precise language to describe how to map triangle D”E”F” onto triangle DEF.
→ The sequence that would map triangle D”E”F” onto triangle DEF is as follows: Dilate triangle D”E”F” from center O by scale factor r=\(\frac{1}{3}\) . Then, translate the dilated image of triangle D”E”F”, noted by D”’ E”’ F”’, two units to the right. Finally, reflect across the x-axis to map the red triangle onto triangle DEF.
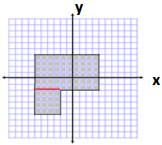
→ Since we were able to map triangle D”E”F” onto triangle DEF with a dilation followed by a congruence, we can write that triangle D”E”F” is similar to triangle DEF. (In notation: △D”E”F”~△DEF)

Example 3.
In the diagram below, △ABC ~△A’B’C’. Describe a sequence of a dilation followed by a congruence that would prove these figures to be similar.
Engage NY Math 8th Grade Module 3 Lesson 8 Example Answer Key 6
→ Let’s begin with the scale factor. We know that r|AB|=|A’B’|. What scale factor r makes △ABC the same size as △A’B’C’?
→ We know that r⋅2=1; therefore, r=\(\frac{1}{2}\) makes △ABC the same size as △A’ B’ C’.
→ If we apply a dilation from the origin of scale factor r=\(\frac{1}{2}\), then the triangles are the same size (as shown and noted by triangle A”B”C”). What sequence of rigid motions would map the dilated image of △ABC onto △A’B’C’?
Engage NY Math 8th Grade Module 3 Lesson 8 Example Answer Key 7
→ We could translate the dilated image of △ABC, △A”B”C”, 3 units to the right and 4 units down and then reflect the triangle across line A’B’.
→ The sequence that would map △ABC onto △A’B’C’ to prove the figures similar is a dilation from the origin by scale factor r=\(\frac{1}{2}\), followed by the translation of the dilated version of △ABC 3 units to the right and 4 units down, followed by the reflection across line A’B’.

Example 4.
In the diagram below, we have two similar figures. Using the notation, we have △ABC ~△DEF. We want to describe a sequence of the dilation followed by a congruence that would prove these figures to be similar.
Engage NY Math 8th Grade Module 3 Lesson 8 Example Answer Key 7.7
→ First, we need to describe the dilation that would make the triangles the same size. What information do we have to help us describe the dilation?
→ Since we know the length of side \(\overline{A C}\) and side \(\overline{D F}\), we can determine the scale factor.
→ Can we use any two sides to calculate the scale factor? Assume, for instance, that we know that side \(\overline{A C}\) is
18 units in length and side \(\overline{E F}\) is 2 units in length. Could we find the scale factor using those two sides, \(\overline{A C}\) and \(\overline{E F}\)? Why or why not?
→ No, we need more information about corresponding sides. Sides \(\overline{A C}\) and \(\overline{D F}\) are the longest sides of each triangle (they are also opposite the obtuse angle in the triangle). Side \(\overline{A C}\) does not correspond to side \(\overline{E F}\). If we knew the length of side \(\overline{B C}\), we could use sides \(\overline{B C}\) and \(\overline{E F}\).
→ Now that we know that we can find the scale factor if we have information about corresponding sides, how would we calculate the scale factor if we were mapping △ABC onto △DEF?
→ |DF|=r|AC|, so 6=r⋅18, and r=\(\frac{1}{3}\).
→ If we were mapping △DEF onto △ABC, what would the scale factor be?
→ |AC|=r|DF|, so 18=r∙6, and r=3.
→ What is the precise dilation that would map △ABC onto △DEF?
→ Dilate △ABC from center O, by scale factor r=\(\frac{1}{3}\).
→ (Show the picture below with the dilated triangle noted as △A’B’C’.) Now we have to describe the congruence. Work with a partner to determine the sequence of rigid motions that would map △ABC onto △DEF.
Engage NY Math 8th Grade Module 3 Lesson 8 Example Answer Key 8
→ Translate the dilated version of △ABC 7 units to the right and 2 units down. Then, rotate d degrees around point E so that segment B’C’ maps onto segment EF. Finally, reflect across line EF.
Note that “d degrees” refers to a rotation by an appropriate number of degrees to exhibit similarity. Students may choose to describe this number of degrees in other ways.
→ The sequence of a dilation followed by a congruence that proves △ABC ~△DEF is as follows: Dilate △ABC from center O by scale factor r=\(\frac{1}{3}\). Translate the dilated version of △ABC 7 units to the right and 2 units down. Next, rotate around point E by d degrees so that segment B’C’ maps onto segment EF, and then reflect the triangle across line EF.

Example 5.
→ Knowing that a sequence of a dilation followed by a congruence defines similarity also helps determine if two figures are in fact similar. For example, would a dilation map triangle ABC onto triangle DEF (i.e., is △ABC ~△DEF)?
Engage NY Math 8th Grade Module 3 Lesson 8 Example Answer Key 9
→ No. By FTS, we expect the corresponding side lengths to be in proportion and equal to the scale factor. When we compare side \(\overline{A C}\) to side \(\overline{D F}\) and \(\overline{B C}\) to \(\overline{E F}\), we get \(\frac{18}{6}\)≠\(\frac{15}{4}\).
→ Therefore, the triangles are not similar because a dilation does not map one to the other.

Example 6.
→ Again, knowing that a dilation followed by a congruence defines similarity also helps determine if two figures are in fact similar. For example, would a dilation map Figure A onto Figure A’ (i.e., is Figure A ~ Figure A’)?
Engage NY Math 8th Grade Module 3 Lesson 8 Example Answer Key 10
→ No. Even though we could say that the corresponding sides are in proportion, there exists no single rigid motion or sequence of rigid motions that would map a four-sided figure to a three-sided figure. Therefore, the figures do not fulfill the congruence part of the definition for similarity, and Figure A is not similar to Figure A’.

Eureka Math Grade 8 Module 3 Lesson 8 Exercise Answer Key

Exercises
Allow students to work in pairs to describe sequences that map one figure onto another.

Exercise 1.
Triangle ABC was dilated from center O by scale factor r=\(\frac{1}{2}\). The dilated triangle is noted by A’B’C’. Another triangle A”B”C” is congruent to triangle A’B’C’ (i.e., △A”B”C”≅△A’B’C’). Describe a dilation followed by the basic rigid motion that would map triangle A”B”C” onto triangle ABC.
Eureka Math Grade 8 Module 3 Lesson 8 Exercise Answer Key 11
Answer:
Triangle A”B”C” needs to be dilated from center O, by scale factor r=2 to bring it to the same size as triangle ABC. This produces a triangle noted by A”’B”’C”’. Next, triangle A”’B”’C”’ needs to be translated 4 units up and 12 units left. The dilation followed by the translation maps triangle A”B”C” onto triangle ABC.

Exercise 2.
Describe a sequence that would show △ABC ~△A’ B’ C’.
Eureka Math Grade 8 Module 3 Lesson 8 Exercise Answer Key 12
Answer:
Since r|AB|=|A’ B’ |, then r⋅2=6, and r=3. A dilation from the origin by scale factor r=3 makes △ABC the same size as △A’B’C’. Then, a translation of the dilated image of △ABC ten units right and five units down, followed by a rotation of 90 degrees around point C’, maps △ABC onto △A’ B’ C’, proving the triangles to be similar.

Exercise 3.
Are the two triangles shown below similar? If so, describe a sequence that would prove △ABC ~△A’B’C’. If not, state how you know they are not similar.
Eureka Math Grade 8 Module 3 Lesson 8 Exercise Answer Key 13
Answer:
Yes, △ABC ~△A’B’C’. The corresponding sides are in proportion and equal to the scale factor:
\(\frac{10}{15}\)=\(\frac{4}{6}\)=\(\frac{12}{18}\)=\(\frac{2}{3}\)=r
To map triangle ABC onto triangle A’B’C’, dilate triangle ABC from center O, by scale factor r=\(\frac{2}{3}\). Then, translate triangle ABC along vector \(\overrightarrow{A A^{\prime}}\). Next, rotate triangle ABC d degrees around point A.

Exercise 4.
Are the two triangles shown below similar? If so, describe the sequence that would prove △ABC ~△A’B’C’. If not, state how you know they are not similar.
Eureka Math Grade 8 Module 3 Lesson 8 Exercise Answer Key 14
Answer:
Yes, triangle △ABC ~△A’B’C’. The corresponding sides are in proportion and equal to the scale factor:
\(\frac{4}{3}\)=\(\frac{8}{6}\)=\(\frac{4}{3}\)=\(1.3 \overline{3}\); \(\frac{10.67}{8}\)=1.33375; therefore, r=1.33 which is approximately equal to \(\frac{4}{3}\)
To map triangle ABC onto triangle A’B’C’, dilate triangle ABC from center O, by scale factor r=\(\frac{4}{3}\). Then, translate triangle ABC along vector \(\overrightarrow{A A^{\prime}}\). Next, rotate triangle ABC 180 degrees around point A’.

Eureka Math Grade 8 Module 3 Lesson 8 Problem Set Answer Key

Students practice dilating a curved figure and describing a sequence of a dilation followed by a congruence that maps one figure onto another.

Question 1.
In the picture below, we have triangle DEF that has been dilated from center O by scale factor r=4. It is noted by D’E’F’. We also have triangle D”E”F”, which is congruent to triangle D’E’F’ (i.e., △D’E’F’≅△D”E”F”). Describe the sequence of a dilation, followed by a congruence (of one or more rigid motions), that would map triangle D”E”F” onto triangle DEF.
Engage NY Math Grade 8 Module 3 Lesson 8 Problem Set Answer Key 16
Answer:
Engage NY Math Grade 8 Module 3 Lesson 8 Problem Set Answer Key 16.1
First, we must dilate triangle D”E”F” by scale factor r=\(\frac{1}{4}\) to shrink it to the size of triangle DEF. Next, we must translate the dilated triangle, noted by D”’E”’F”’, one unit up and two units to the right. This sequence of the dilation followed by the translation would map triangle D”E”F” onto triangle DEF.

Question 2.
Triangle ABC was dilated from center O by scale factor r=\(\frac{1}{2}\). The dilated triangle is noted by A’B’C’. Another triangle A”B”C” is congruent to triangle A’B’C’ (i.e., △A”B”C”≅△A’B’C’). Describe the dilation followed by the basic rigid motions that would map triangle A”B”C” onto triangle ABC.
Engage NY Math Grade 8 Module 3 Lesson 8 Problem Set Answer Key 17
Answer:
Engage NY Math Grade 8 Module 3 Lesson 8 Problem Set Answer Key 17.1
Triangle A”B”C” needs to be dilated from center O by scale factor r=2 to bring it to the same size as triangle ABC. This produces a triangle noted by A”’B”’C”’. Next, triangle A”’B”’C”’ needs to be translated 18 units to the right and two units down, producing the triangle shown in red. Next, rotate the red triangle d degrees around point B so that one of the segments of the red triangle coincides completely with segment BC. Then, reflect the red triangle across line BC. The dilation, followed by the congruence described, maps triangle A”B”C” onto triangle ABC.

Question 3.
Are the two figures shown below similar? If so, describe a sequence that would prove the similarity. If not, state how you know they are not similar.
Engage NY Math Grade 8 Module 3 Lesson 8 Problem Set Answer Key 18
Answer:
No, these figures are not similar. There is no single rigid motion, or sequence of rigid motions, that would map Figure A onto Figure B.

Question 4.
Triangle ABC is similar to triangle A’B’C’ (i.e., △ABC ~△A’B’C’). Prove the similarity by describing a sequence that would map triangle A’B’C’ onto triangle ABC.
Engage NY Math Grade 8 Module 3 Lesson 8 Problem Set Answer Key 19
Answer:
The scale factor that would magnify triangle A’B’C’ to the size of triangle ABC is r=3. The sequence that would prove the similarity of the triangles is a dilation from center O by a scale factor of r=3, followed by a translation along vector \(\overrightarrow{A^{\prime} A}\), and finally, a reflection across line AC.

Question 5.
Are the two figures shown below similar? If so, describe a sequence that would prove △ABC ~△A’B’C’. If not, state how you know they are not similar.
Engage NY Math Grade 8 Module 3 Lesson 8 Problem Set Answer Key 20
Answer:
Yes, the triangles are similar. The scale factor that triangle ABC has been dilated is r=\(\frac{1}{5}\). The sequence that proves the triangles are similar is as follows: dilate triangle A’B’C’ from center O by scale factor r=5; then, translate triangle A’B’C’ along vector \(\overrightarrow{C^{\prime} C}\); next, rotate triangle A’B’C’ d degrees around point C; and finally, reflect triangle A’B’C’ across line AC.

Question 6.
Describe a sequence that would show △ABC ~△A’ B’ C’.
Engage NY Math Grade 8 Module 3 Lesson 8 Problem Set Answer Key 21
Answer:
Since r|AB|=|A’ B’|, then r∙3=1 and r = \(\frac{1}{3}\). A dilation from the origin by scale factor r\(\frac{1}{3}\) makes △ABC the same size as △A’B’C’. Then, a translation of the dilated image of △ABC four units down and one unit to the right, followed by a reflection across line A’ B’, maps △ABC onto △A’ B’ C’, proving the triangles to be similar.
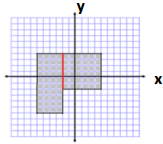
Eureka Math Grade 8 Module 3 Lesson 8 Exit Ticket Answer Key

In the picture below, we have triangle DEF that has been dilated from center O by scale factor r=\(\frac{1}{2}\). The dilated triangle is noted by D’E’F’. We also have a triangle D”EF, which is congruent to triangle DEF (i.e., △DEF≅△D”EF). Describe the sequence of a dilation, followed by a congruence (of one or more rigid motions), that would map triangle D’E’F’ onto triangle D”EF.
Eureka Math Grade 8 Module 3 Lesson 8 Exit Ticket Answer Key 15
Answer:
Triangle D’E’F’ needs to be dilated from center O by scale factor r=2 to bring it to the same size as triangle DEF. This produces the triangle noted by DEF. Next, triangle DEF needs to be reflected across line EF. The dilation followed by the reflection maps triangle D’E’F’ onto triangle D”EF.

Eureka Math Grade 8 Module 3 Lesson 6 Answer Key

Engage NY Eureka Math 8th Grade Module 3 Lesson 6 Answer Key

Eureka Math Grade 8 Module 3 Lesson 6 Example Answer Key

Example 1.
Students learn the multiplicative effect of scale factor on a point. Note that this effect holds when the center of dilation is the origin. In this lesson, the center of any dilation used is always assumed to be (0,0).
Show the diagram below, and ask students to look at and write or share a claim about the effect that dilation has on the coordinates of dilated points.
→ The graph below represents a dilation from center (0,0) by scale factor r=2.
Engage NY Math 8th Grade Module 3 Lesson 6 Example Answer Key 1
Show students the second diagram below so they can check if their claims were correct. Give students time to verify the claims that they made about the above graph with the one below. Then, have them share their claims with the class. Use the discussion that follows to crystallize what students observed.

→ The graph below represents a dilation from center (0,0) by scale factor r=4.
Engage NY Math 8th Grade Module 3 Lesson 6 Example Answer Key 2
→ In Lesson 5, we found the location of a dilated point by using the knowledge of dilation and scale factor, as well as the lines of the coordinate plane to ensure equal angles, to find the coordinates of the dilated point. For example, we were given the point A(5,2) and told the scale factor of dilation was r=2. Remember that the center of this dilation is (0,0). We created the following picture and determined the location of A’to be (10,4).
Engage NY Math 8th Grade Module 3 Lesson 6 Example Answer Key 3
→ We can use this information and the observations we made at the beginning of class to develop a shortcut for finding the coordinates of dilated points when the center of dilation is the origin.
→ Notice that the horizontal distance from the y-axis to point A was multiplied by a scale factor of 2. That is, the x-coordinate of point A was multiplied by a scale factor of 2. Similarly, the vertical distance from the x-axis to point A was multiplied by a scale factor of 2.
→ Here are the coordinates of point A(5,2) and the dilated point A'(10,4). Since the scale factor was 2, we can more easily see what happened to the coordinates of A after the dilation if we write the coordinates of A’as (2∙5,2∙2), that is, the scale factor of 2 multiplied by each of the coordinates of A to get A’.
→ The reasoning goes back to our understanding of dilation. The length r|OB|=|OB’|, by the definition of dilation, and the length r|AB|=|A’B’|; therefore,
r=\(\frac{\left|O B^{\prime}\right|}{|O B|}\) =\(\frac{\left|A^{\prime} B^{\prime}\right|}{|A B|}\),
where the length of the segment OB’is the x-coordinate of the dilated point (i.e., 10), and the length of the segment A’B’is the y-coordinate of the dilated point (i.e., 4).
In other words, based on what we know about the lengths of dilated segments, when the center of dilation is the origin, we can determine the coordinates of a dilated point by multiplying each of the coordinates in the original point by the scale factor.

Example 2.
Students learn the multiplicative effect of scale factor on a point.
→ Let’s look at another example from Lesson 5. We were given the point A(7,6) and asked to find the location of the dilated point A’when r=\(\frac{11}{7}\). Our work on this problem led us to coordinates of approximately (11,9.4) for point A’. Verify that we would get the same result if we multiply each of the coordinates of point A by the scale factor.
A'(\(\frac{11}{7}\)∙7,\(\frac{11}{7}\)∙6)
\(\frac{11}{7}\)∙7=11
and
\(\frac{11}{7}\)∙6=\(\frac{66}{7}\)≈9.4
Therefore, multiplying each coordinate by the scale factor produced the desired result.

Example 3.
→ The coordinates in other quadrants of the graph are affected in the same manner as we have just seen. Based on what we have learned so far, given point A(-2,3), predict the location of A’when A is dilated from a center at the origin, (0,0), by scale factor r=3.
Provide students time to predict, justify, and possibly verify, in pairs, that A'(3∙(-2),3∙3)=(-6,9). Verify the fact on the coordinate plane, or have students share their verifications with the class.

→ As before, mark a point B on the x-axis. Then, |OB’|=3|OB|. Where is point B’located?
→ Since the length of |OB|=2, then |OB’|=3∙2=6. But we are looking at a distance to the left of zero; therefore, the location of B’is (-6,0).
Engage NY Math 8th Grade Module 3 Lesson 6 Example Answer Key 4
→ Now that we know where B’is, we can easily find the location of A’. It is on the ray \(\overrightarrow{O A}\), but at what location?
→ The location of A'(-6,9), as desired
Engage NY Math 8th Grade Module 3 Lesson 6 Example Answer Key 5

Example 4.
Students learn the multiplicative effect of scale factor on a two-dimensional figure.
→ Now that we know the multiplicative relationship between a point and its dilated location (i.e., if point P(p1,p2) is dilated from the origin by scale factor r, then P'(rp1,rp2 )), we can quickly find the coordinates of any point, including those that comprise a two-dimensional figure, under a dilation of any scale factor.
→ For example, triangle ABC has coordinates A(2,3), B(-3,4), and C(5,7). The triangle is being dilated from the origin with scale factor r=4. What are the coordinates of triangle A’B’C’?
→ First, find the coordinates of A’.
→ A'(4⋅2,4⋅3)=A'(8,12)
→ Next, locate the coordinates of B’.
→ B'(4⋅(-3),4⋅4)=B'(-12,16)
→ Finally, locate the coordinates of C’.
→ C'(4∙5,4∙7)=C'(20,28)
→ Therefore, the vertices of triangle A’B’C’have coordinates of (8,12), (-12,16), and (20,28), respectively.

Example 5.
→ Students learn the multiplicative effect of scale factor on a two-dimensional figure.
→ Parallelogram ABCD has coordinates of (-2,4), (4,4), (2,-1), and (-4,-1), respectively. Find the coordinates of parallelogram A’B’C’D’after a dilation from the origin with a scale factor r=\(\frac{1}{2}\).
→ A'(\(\frac{1}{2}\)∙(-2),\(\frac{1}{2}\)∙4)=A'(-1,2)
→ B'(\(\frac{1}{2}\)∙4,\(\frac{1}{2}\)∙4)=B'(2,2)
→ C'(\(\frac{1}{2}\)∙2,\(\frac{1}{2}\)∙(-1))=C'(1,-\(\frac{1}{2}\))
→ D'(\(\frac{1}{2}\)∙(-4),\(\frac{1}{2}\)∙(-1))=D'(-2,-\(\frac{1}{2}\))
Therefore, the vertices of parallelogram A’B’C’D’have coordinates of (-1,2), (2,2), (1,-\(\frac{1}{2}\)), and (-2,-\(\frac{1}{2}\)), respectively.

Eureka Math Grade 8 Module 3 Lesson 6 Exercise Answer Key

Exercises 1–5.
Point A(7,9) is dilated from the origin by scale factor r=6. What are the coordinates of point A’?
Answer:
A'(6∙7,6∙9)=A'(42,54)

Exercise 2.
Point B(-8,5) is dilated from the origin by scale factor r=\(\frac{1}{2}\). What are the coordinates of point B’?
Answer:
B'(\(\frac{1}{2}\)∙(-8),\(\frac{1}{2}\)∙5)=B'(-4,\(\frac{5}{2}\))

Exercise 3.
Point C(6,-2) is dilated from the origin by scale factor r=\(\frac{3}{4}\). What are the coordinates of point C’?
Answer:
C'(\(\frac{3}{4}\)∙6,\(\frac{3}{4}\)∙(-2))=C'(\(\frac{9}{2}\),-\(\frac{3}{2}\))

Exercise 4.
Point D(0,11) is dilated from the origin by scale factor r=4. What are the coordinates of point D’?
Answer:
D'(4∙0,4∙11)=D'(0,44)

Exercise 5.
Point E(-2,-5) is dilated from the origin by scale factor r=\(\frac{3}{2}\). What are the coordinates of point E’?
Answer:
E'(\(\frac{3}{2}\)∙(-2),\(\frac{3}{2}\)∙(-5))=E'(-3,-\(\frac{15}{2}\))

Exercises 6–8.

Exercise 6.
The coordinates of triangle ABC are shown on the coordinate plane below. The triangle is dilated from the origin by scale factor r=12. Identify the coordinates of the dilated triangle A’B’C’.
Eureka Math Grade 8 Module 3 Lesson 6 Exercise Answer Key 6
Point A(-2,2), so A'(12∙(-2),12∙2)=A'(-24,24).
Point B(-3,-3), so B'(12∙(-3),12∙(-3))=B'(-36,-36).
Point C(6,1), so C'(12∙6,12∙1)=C'(72,12).
The coordinates of the vertices of triangle A’B’C’are (-24,24), (-36,-36), and (72,12), respectively.

Exercise 7.
Figure DEFG is shown on the coordinate plane below. The figure is dilated from the origin by scale factor r=\(\frac{2}{3}\). Identify the coordinates of the dilated figure D’E’F’G’, and then draw and label figure D’E’F’G’ on the coordinate plane.
Eureka Math Grade 8 Module 3 Lesson 6 Exercise Answer Key 7
Answer:
Point D(-6,3), so D'(\(\frac{2}{3}\)∙(-6),\(\frac{2}{3}\)∙3)=D'(-4,2).
Point E(-4,-3), so E'(\(\frac{2}{3}\)∙(-4),\(\frac{2}{3}\)∙(-3))=E'(-\(\frac{8}{3}\),-2).
Point F(5,-2), so F'(\(\frac{2}{3}\)∙5,\(\frac{2}{3}\)∙(-2))=F'(\(\frac{10}{3}\),-\(\frac{4}{3}\) ). –
Point G(-3,3), so G'(\(\frac{2}{3}\)∙(-3),\(\frac{2}{3}\)∙3)=G'(-2,2).
The coordinates of the vertices of figure D’E’F’G’are (-4,2), (-\(\frac{8}{3}\),-2), (\(\frac{10}{3}\),-\(\frac{4}{3}\)), and (-2,2), respectively.

Exercise 8.
The triangle ABC has coordinates A(3,2), B(12,3), and C(9,12). Draw and label triangle ABC on the coordinate plane. The triangle is dilated from the origin by scale factor r=\(\frac{1}{3}\). Identify the coordinates of the dilated triangle
Eureka Math Grade 8 Module 3 Lesson 6 Exercise Answer Key 8
A’B’C’, and then draw and label triangle A’B’C’on the \(\frac{1}{3}\) coordinate plane.
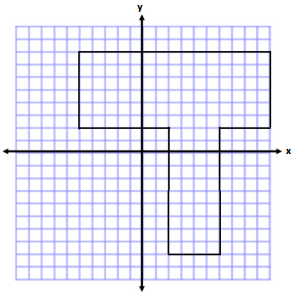
Answer:
Point A(3,2), then A'(\(\frac{1}{3}\)∙3,\(\frac{1}{3}\)∙2)=A'(1,\(\frac{2}{3}\)).
Point B(12,3), so B'(\(\frac{1}{3}\)∙12,\(\frac{1}{3}\)∙3)=B'(4,1).
Point C(9,12), so C'(\(\frac{1}{3}\)∙9,\(\frac{1}{3}\)∙12)=C'(3,4).
The coordinates of triangle A’B’C’are (1,\(\frac{2}{3}\)), (4,1), and (3,4), respectively.

Eureka Math Grade 8 Module 3 Lesson 6 Problem Set Answer Key

Students practice finding the coordinates of dilated points of two-dimensional figures.

Question 1.
Triangle ABC is shown on the coordinate plane below. The triangle is dilated from the origin by scale factor r=4. Identify the coordinates of the dilated triangle A’B’C’.
Eureka Math Grade 8 Module 3 Lesson 6 Problem Set Answer Key 61
Answer:
Point A(-10,6), so A'(4∙(-10),4∙6)=A'(-40,24).
Point B(-11,2), so B'(4∙(-11),4∙2)=B'(-44,8).
Point C(-4,4), so C'(4∙(-4),4∙4)=C'(-16,16).
The coordinates of the vertices of triangle A’B’C’are (-40,24), (-44,8), and (-16,16), respectively.

Question 2.
Triangle ABC is shown on the coordinate plane below. The triangle is dilated from the origin by scale factor r=\(\frac{5}{4}\). Identify the coordinates of the dilated triangle A’B’C’.
Eureka Math Grade 8 Module 3 Lesson 6 Problem Set Answer Key 62
Answer:
Point A(-14,-8), so A'(\(\frac{5}{4}\)∙(-14),\(\frac{5}{4}\)∙(-8))=A'(-\(\frac{35}{2}\),-10).
Point B(-12,-1), so B'(\(\frac{5}{4}\)∙(-12),\(\frac{5}{4}\)∙(-1))=B'(-15,-\(\frac{5}{4}\)).
Point C(-4,-1), so C'(\(\frac{5}{4}\)∙(-4),\(\frac{5}{4}\)∙(-1))=B'(-5,-\(\frac{5}{4}\)).
The coordinates of the vertices of triangle A’B’C’are (-\(\frac{35}{2}\),-10), (-15,-\(\frac{5}{4}\)), and (-5,-\(\frac{5}{4}\)), respectively.

Question 3.
The triangle ABC has coordinates A(6,1), B(12,4), and C(-6,2). The triangle is dilated from the origin by a scale factor r=\(\frac{1}{2}\). Identify the coordinates of the dilated triangle A’B’C’.
Answer:
Point A(6,1), so A'(\(\frac{1}{2}\)∙6,\(\frac{1}{2}\)∙1)=A'(3,\(\frac{1}{2}\)).
Point B(12,4), so B'(\(\frac{1}{2}\)∙12,\(\frac{1}{2}\)∙4)=B'(6,2).
Point C(-6,2), so C'(\(\frac{1}{2}\)∙(-6),\(\frac{1}{2}\)∙2)=C'(-3,1).
The coordinates of the vertices of triangle A’B’C’are (3,\(\frac{1}{2}\)), (6,2), and (-3,1), respectively.

Question 4.
Figure DEFG is shown on the coordinate plane below. The figure is dilated from the origin by scale factor r=\(\frac{3}{2}\). Identify the coordinates of the dilated figure D’E’F’G’, and then draw and label figure D’E’F’G’ on the coordinate plane.
Eureka Math Grade 8 Module 3 Lesson 6 Problem Set Answer Key 63
Answer:
Point D(-3,1), so D'(\(\frac{3}{2}\)∙(-3),\(\frac{3}{2}\)∙1)=D'(-\(\frac{9}{2}\),\(\frac{3}{2}\)).
Point E(-1,-1), so E'(\(\frac{3}{2}\)∙(-1),\(\frac{3}{2}\)∙(-1))=E'(-\(\frac{3}{2}\),-\(\frac{3}{2}\)).
Point F(6,1), so F'(\(\frac{3}{2}\)∙6,\(\frac{3}{2}\)∙1)=F'(9,\(\frac{3}{2}\)).
Point G(0,5), so G'(\(\frac{3}{2}\)∙0,\(\frac{3}{2}\)∙5)=G'(0,\(\frac{15}{2}\)).
The coordinates of the vertices of figure D’E’F’G’are (-\(\frac{9}{2}\),\(\frac{3}{2}\)), (-\(\frac{3}{2}\),-\(\frac{3}{2}\)), (9,\(\frac{3}{2}\)), and (0,\(\frac{15}{2}\)), respectively.

Question 5.
Figure DEFG has coordinates D(1,1), E(7,3), F(5,-4), and G(-1,-4). The figure is dilated from the origin by scale factor r=7. Identify the coordinates of the dilated figure D’E’F’G’.
Answer:
Point D(1,1), so D'(7∙1,7∙1)=D'(7,7).
Point E(7,3), so E'(7∙7,7∙3)=E'(49,21).
Point F(5,-4), so F'(7∙5,7∙(-4))=F'(35,-28).
Point G(-1,-4), so G'(7∙(-1),7∙(-4))=G'(-7,-28).
The coordinates of the vertices of figure D’E’F’G’are (7,7), (49,21),(35,-28), and (-7,-28), respectively.

Eureka Math Grade 8 Module 3 Lesson 6 Exit Ticket Answer Key

Question 1.
The point A(7,4) is dilated from the origin by a scale factor r=3. What are the coordinates of point A’?
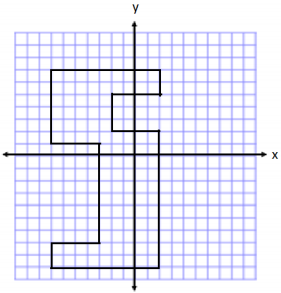
Answer:
Since point A(7,4), then A'(3∙7,3∙4)=A'(21,12).

Question 2.
The triangle ABC, shown on the coordinate plane below, is dilated from the origin by scale factor r=\(\frac{1}{2}\). What is the location of triangle A’B’C’? Draw and label it on the coordinate plane.
Eureka Math Grade 8 Module 3 Lesson 6 Exit Ticket Answer Key 60
Answer:
Eureka Math Grade 8 Module 3 Lesson 6 Exit Ticket Answer Key 611
Point A(3,4), so A'(\(\frac{1}{2}\)∙3,\(\frac{1}{2}\)∙4)=A'(\(\frac{3}{2}\),2).
Point B(-7,2), so B'(\(\frac{1}{2}\)∙(-7),\(\frac{1}{2}\)∙2)=B'(-\(\frac{7}{2}\),1).
Point C(2,2), so C'(\(\frac{1}{2}\)∙2,\(\frac{1}{2}\)∙2)=C'(1,1).
The coordinates of the vertices of triangle A’B’C’are (\(\frac{3}{2}\),2), (-\(\frac{7}{2}\),1), and (1,1), respectively.